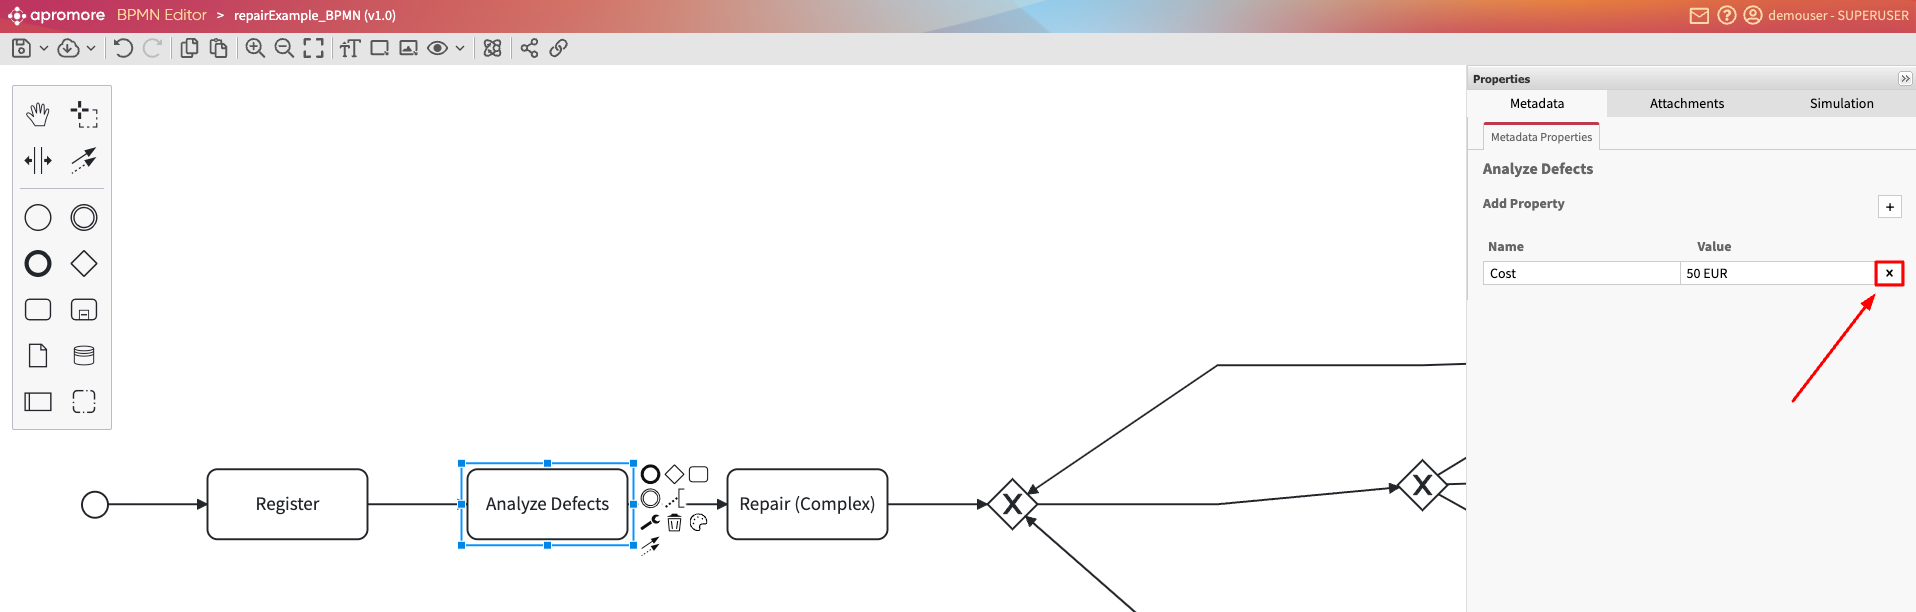
Create data pipeline
The data pipeline, also referred as the ETL pipeline, allows users to compose event logs from one or more tables or data sources. It aims to integrate data from multiple sources by extracting, merging, transforming, and loading to gain essential business insights for competitive advantage.
To define a data pipeline, click Data > Create pipeline.
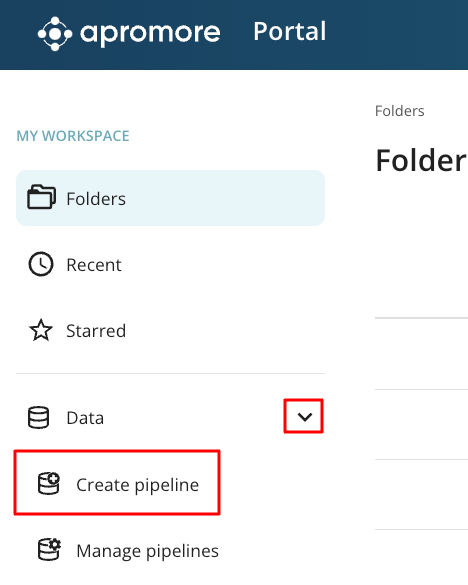
Click Create data pipeline.
The Data pipeline creation window appears.
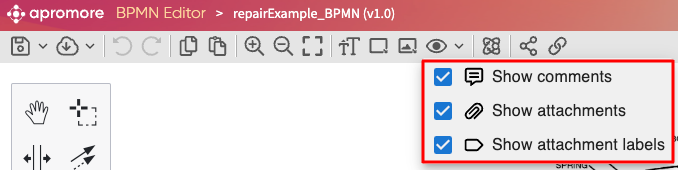
Four operations can be done in the ETL pipeline: Extract, Merge, Transform, Load, each with its view.
Note
We can switch between the four main views. However, to create the insightful result, it is essential to complete steps in the sequential order: Extract – Merge – Transform – Load.
Extract data
The Extract view is used for extracting data from a data source. We can extract data from our Local File System, Apromore’s Workspace, AWS S3 bucket or a pipeline component.
Local file system
To upload a file from the local file system, click the File upload button. This open our local file system where the file can be selected and uploaded.
Note
Files uploaded from the local file system should be in CSV or parquet file format.
Apromore workspace
To upload a file from Apromore Workspace, click the Workspace button. This opens the file in the Apromore Workspace. Select one or more files and click Extract.
Apromore dataset importer automatically discover the column headers in the dataset alongside their datatype.

We can click on the edit icon to change the column header or click the dropdown to change the datatype.
Click Import to import the data.
Note
If we do not want this preview after selecting a file to extract, untick “Review data upon import” in the bottom left corner.
Note
In ETL pipelines, start timestamps cannot be automatically discovered.
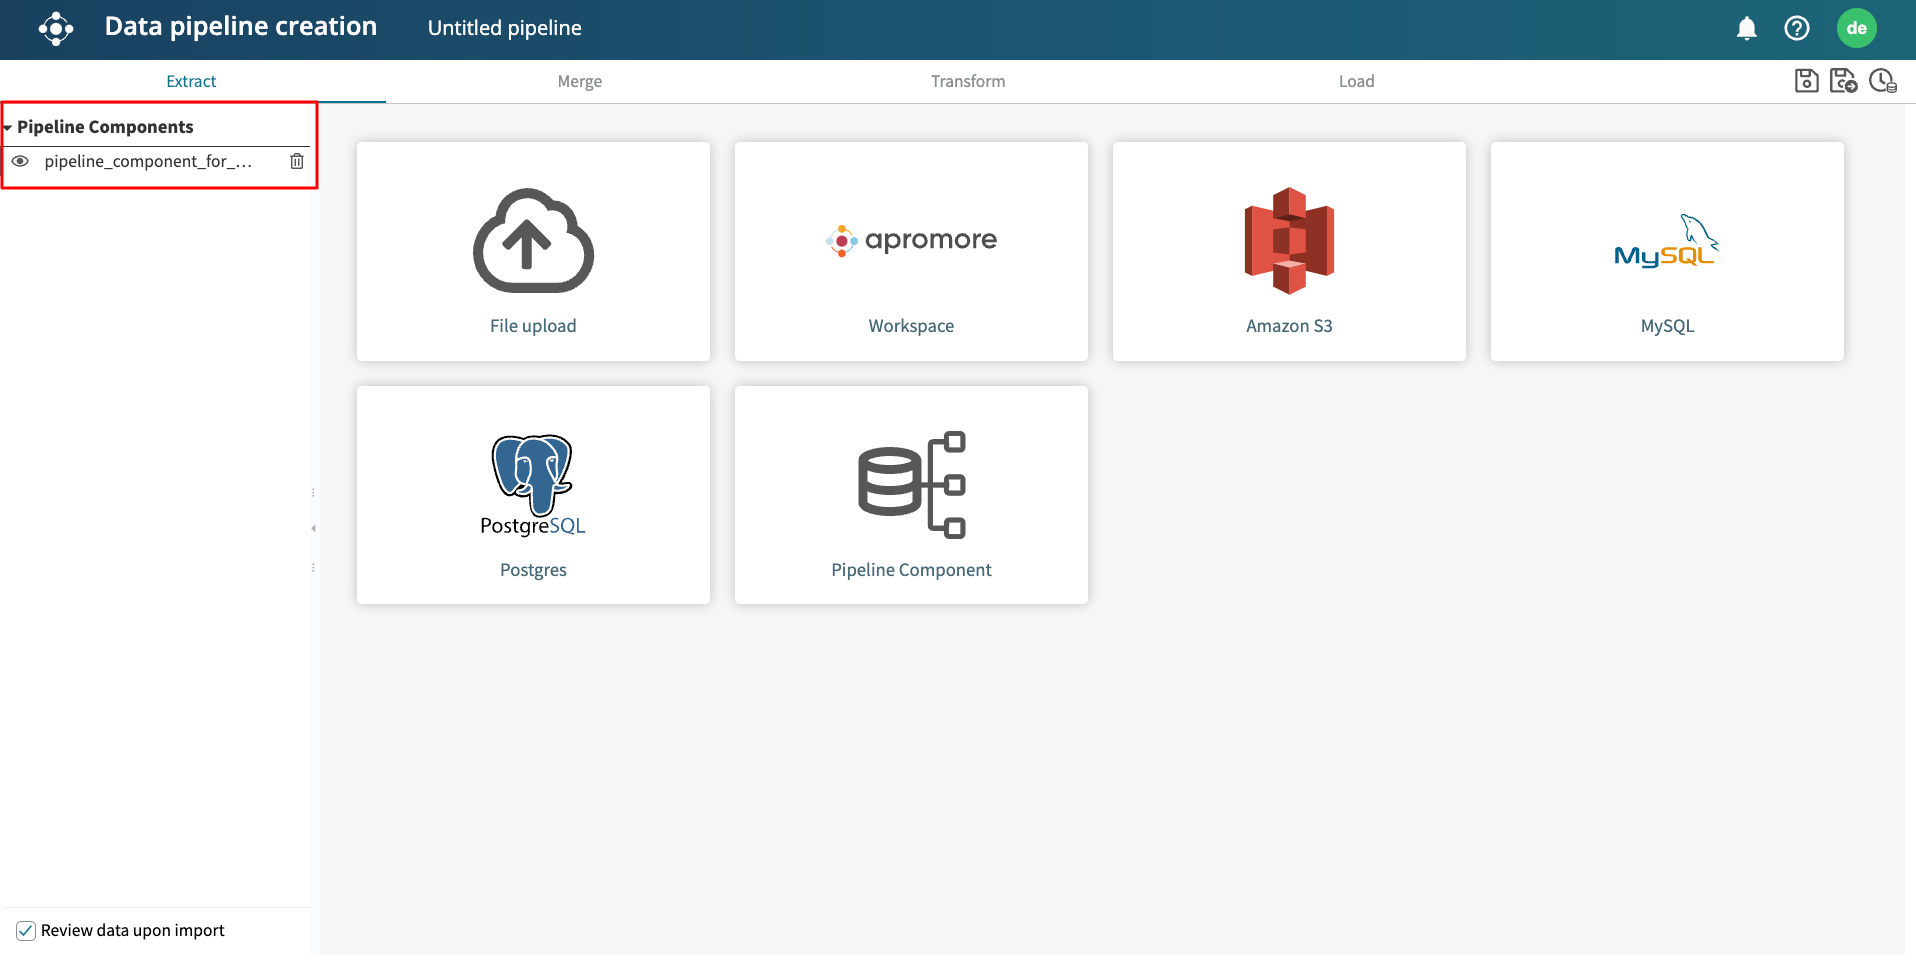
Pipeline components
Pipeline components allow us to create a data pipeline from one or more sub-pipelines. If a pipeline component has been created, we can use its output in the Extract step of a new pipeline. This allows us to create a data pipeline in a modular way, where the output of one pipeline is used as the input of another pipeline. To learn more about creating pipeline components, see Create pipeline component.
AWS S3 bucket
Every Apromore tenancy is connected to an Amazon S3 bucket that stores files in the tenancy. We can either extract the log from a file or folder in the S3 bucket.
Extract a file from the S3 bucket
To upload a file from an S3 bucket, click Amazon S3. The folders and files in the S3 bucket will appear in the window. Select the log file we wish to upload and click Extract.
Note
Extracting a log file through Amazon S3 bucket is only available to users with superuser or data engineer roles.
The path of the selected file is displayed. Click Extract.
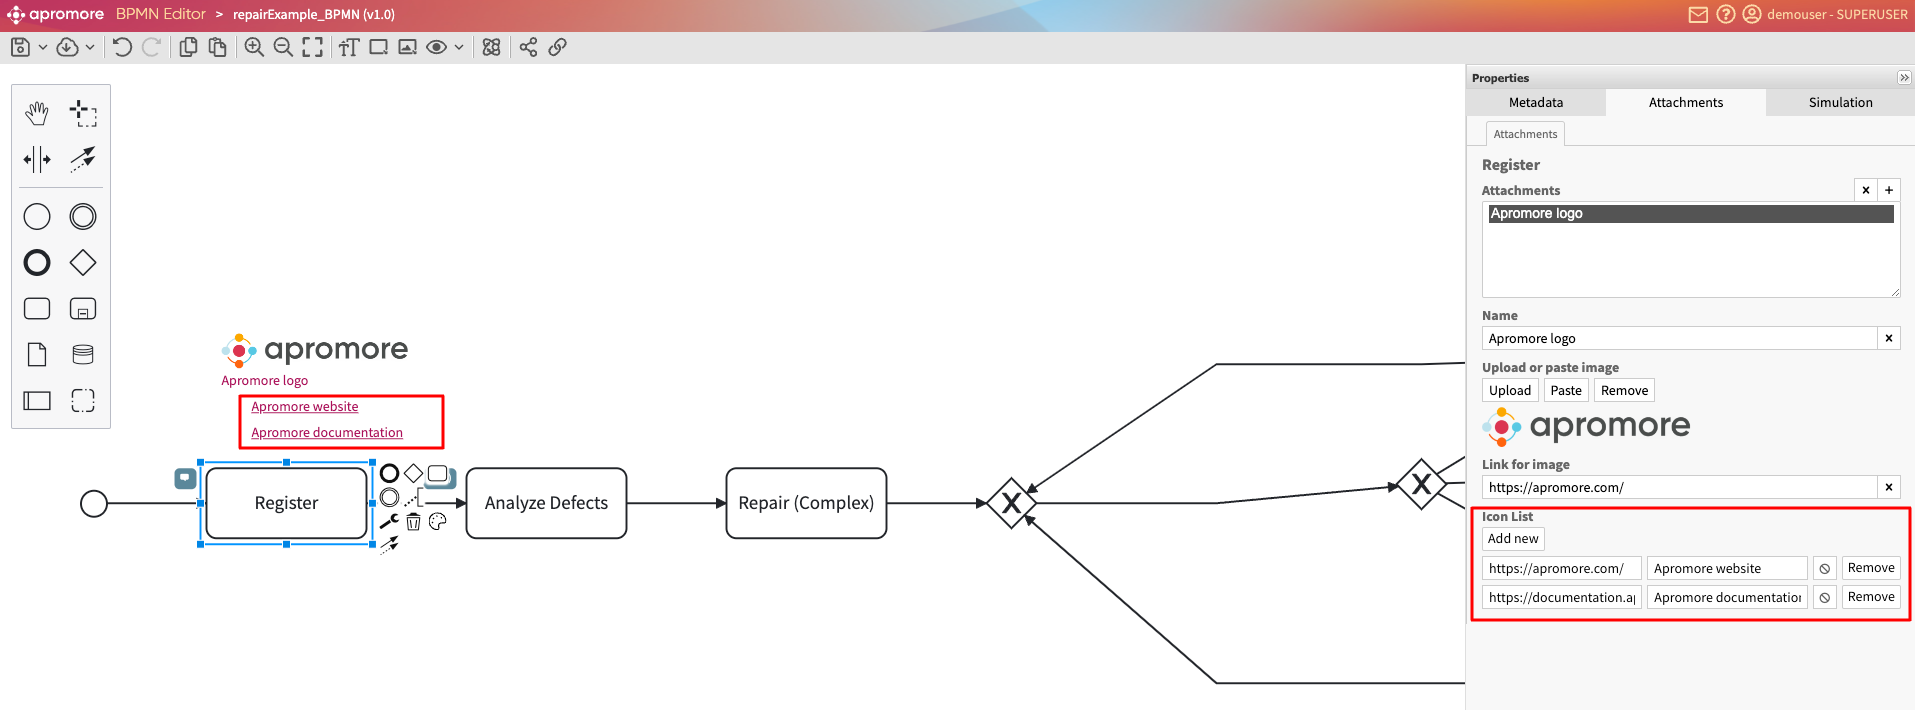
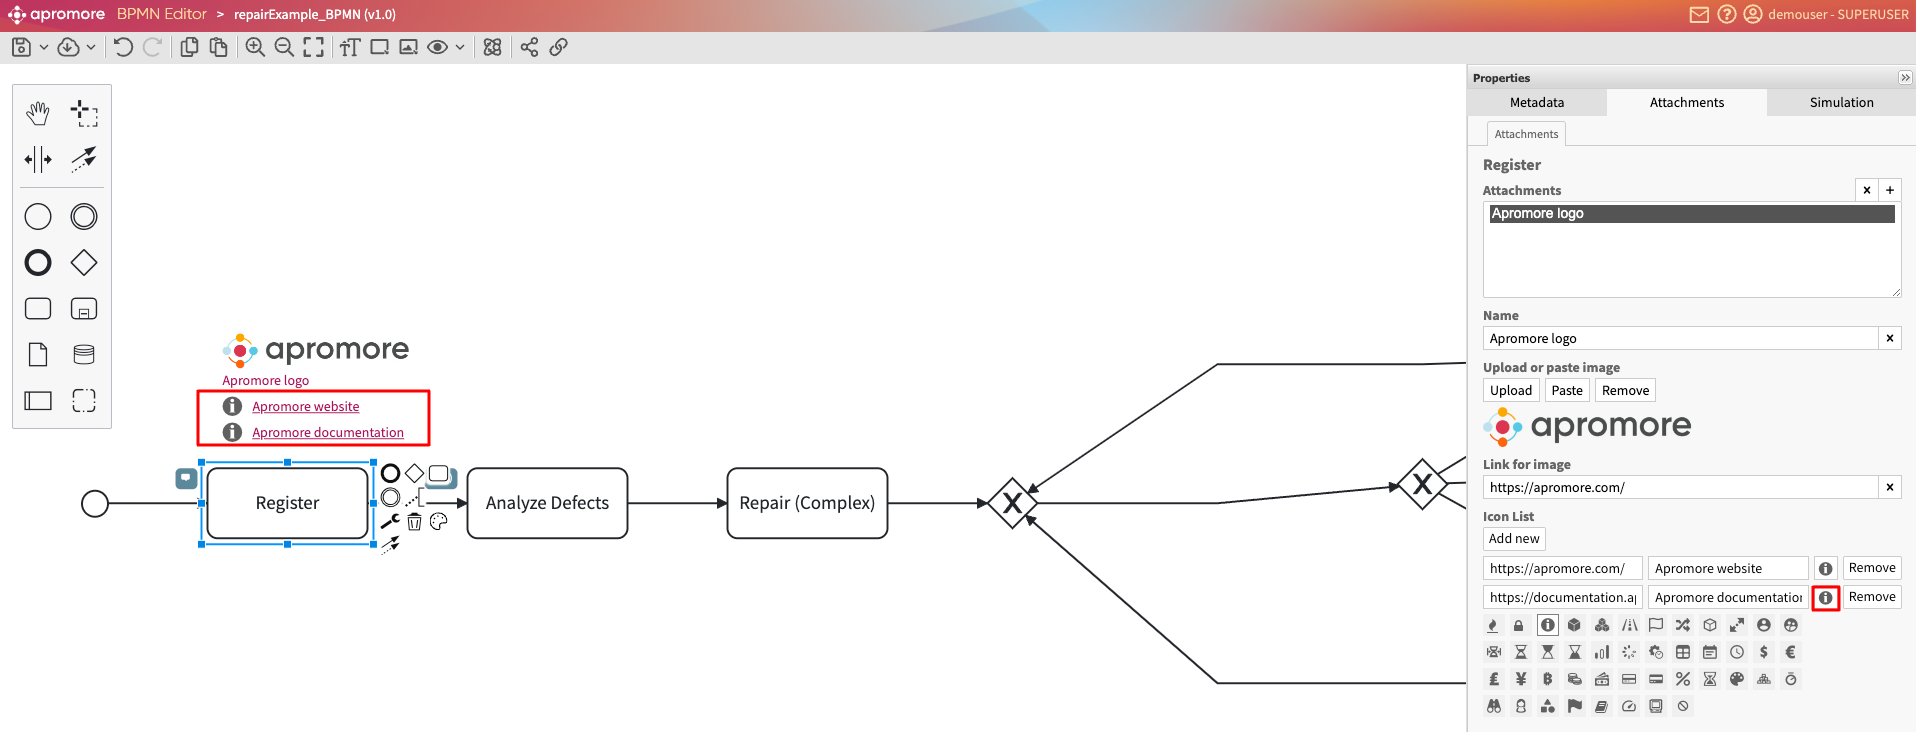
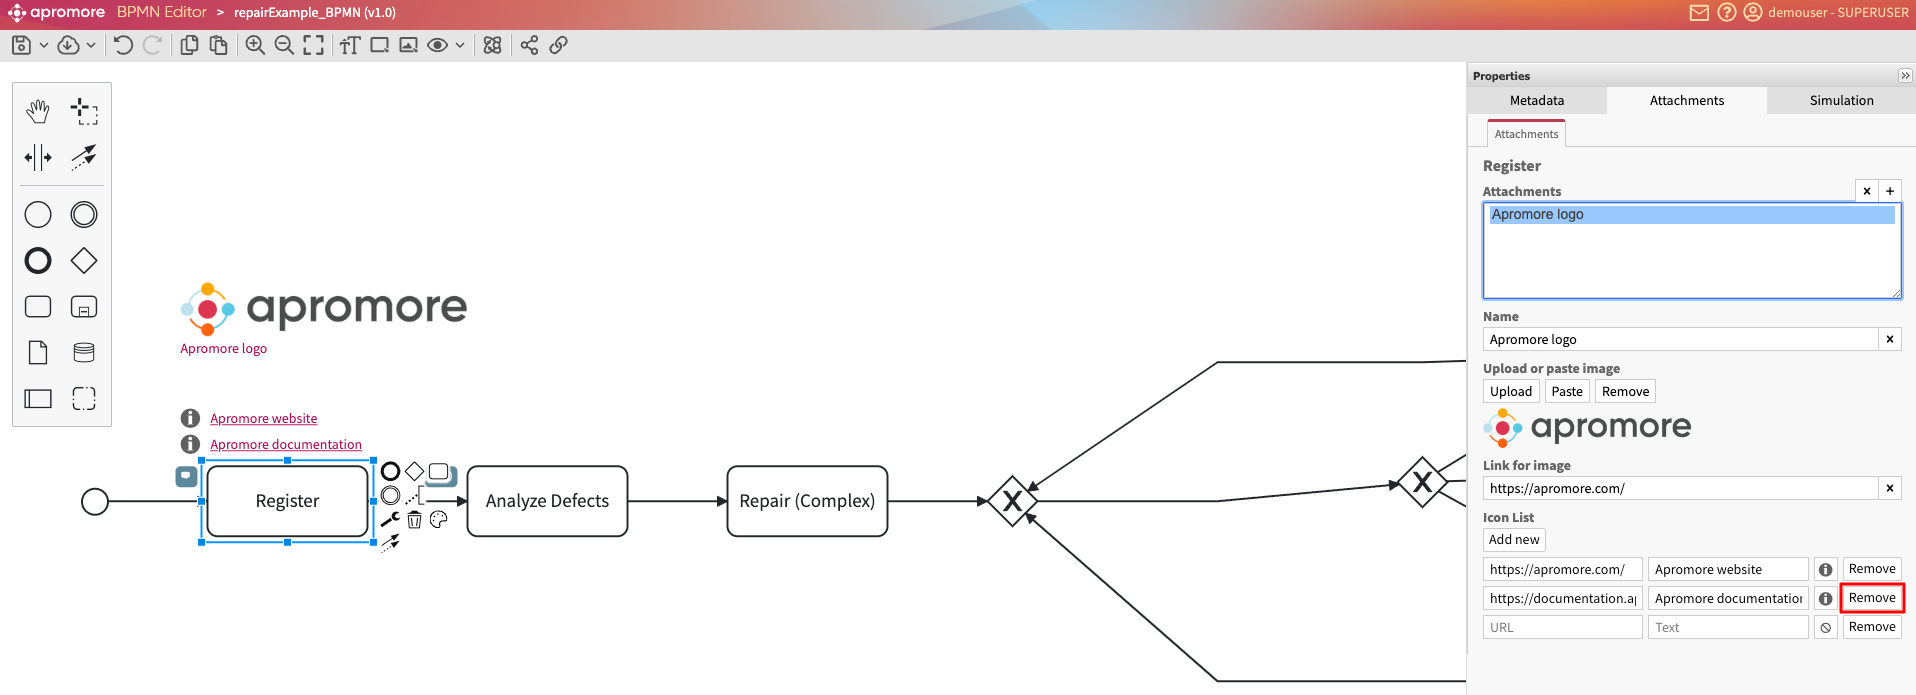
Once the file is successfully extracted using any of the method, the extracted file appears in the side bar.
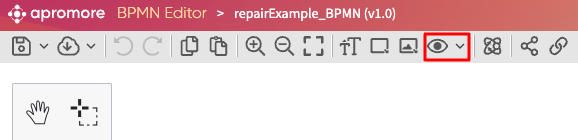
We can preview the extracted file by clicking on the eye icon  .
.
To delete a file, click on the Trash bin icon  next to the file name.
Note
The names of the files uploaded to a data pipeline in the Extract Phase should contain only alphanumeric characters and the underscore character. If a file name contains spaces, each space is automatically replaced by an underscore character when the file is uploaded. For example, a file name “Purchase Orders” is renamed to “Purchase_Orders”. Other characters besides alphanumeric, spaces, and underscores are ignored.
Extract micro-batches from an S3 folder
When scheduling an ETL pipeline, we may be required to load datasets from a folder at set intervals. Micro-batch ingestion is a method where data is ingested in small, manageable batches instead of being ingested in a single, large batch.
Apromore S3 Connector supports micro-batch ingestion. In the S3 Connector, a micro-batch is a file containing a relatively small number of rows. When adding a new table to a pipeline using the S3 connector, we can specify that this table must be ingested in micro-batches, instead of it being ingested in a single go from one single file.
To do so, instead of specifying that the rows of a table originate from a single file, we specify that the rows of the table originate from a folder. In this case, the S3 Connector treats each file in the designated folder as a micro-batch. The micro-batches in the folder are processed in First-In, First-Out (FIFO) order.
If a data pipeline includes a table associated to an S3 folder (a micro-batched table), every time the pipeline is executed, Apromore identifies all the micro-batches in the S3 folder that have not been previously processed. If this number is below the maximum number of micro-batches per pipeline run, all unprocessed micro-batches will be processed in the current pipeline run. If the number of unprocessed micro-batches exceeds this limit, the unprocessed micro-batches above the limit will remain unprocessed and will be handled by subsequent pipeline runs. By default, the maximum number of micro-batches per pipeline run is 3. This limit may be adjusted upon request.
If there are no unprocessed micro-batches at the start of a pipeline run, the pipeline run is not started. In this scenario, the pipeline run will show up as “failed” in the Pipeline Management Console with a message indicating that there were no micro- batches to be processed.
Note
By design, we consider a micro-batch unprocessed if its filename is different than any other filename of previously (tentatively or successfully) processed micro-batches. As such, re-uploading a micro-batch with the same filename as an already processed micro-batch (including the case of file replacement) will not add any additional new data during a pipeline run.
If the pipeline run fails for other reasons, the micro-batches included in the pipeline run are left unprocessed, an error message is reported in the Pipeline Management console. Apromore will re-attempt to ingest these micro-batches in subsequent pipeline runs. The maximum number of ingestion attempts is three. If the ingestion of a micro-batch is not successful after three attempts, this micro-batch will not be processed anymore. A data engineer or administrator may address the reported issues and re-upload these micro-batches for subsequent processing.
Limitations
In any given pipeline, at most one of the tables can be associated to an S3 folder. In other words, if we associate one table in a pipeline to an S3 folder, no other table in that same pipeline can be associated to an S3 folder.
If a pipeline includes a table associated with an S3 folder, then the pipeline cannot be chained with another pipeline.
The micro-batches must be uncompressed CSV files.
If a pipeline includes a micro-batched table, the only available loading strategy will be “Always append to the same log”.
As an example, let’s say we have a folder “demofiles” in our S3 bucket, and we want to create an ETL pipeline that loads the micro-batches from this folder. In the Extract step, select Amazon S3, also known as S3 connector. This allows us to browse the Apromore to an S3 bucket. This operation can only be performed by users with permission to access the S3 bucket, including users with data engineering or superuser roles.
Click the Folder icon to browse the S3 bucket.
Note
The selected folder must have some files to be configured for the pipeline, and the file names in the selected folder should be unique. It is also advisable that the file names consist of the timestamp and sequence number so we can track the uploads.
Apromore displays the files and subfolders in the connected bucket. In our case, we select the demofiles folder and click Extract. By extracting a folder, we indicate that this table will be ingested in micro-batches.
Note
Ensure the files are in CSV format and consistent with the schema and datatype.
After selecting the folder, Apromore displays the folder path we have selected. Click Extract to complete the extracting step.
The dataset importer opens with a preview of the first dataset in the folder. Review the data and click Import.
The folder name appears on the left side panel, indicating it has been successfully extracted.
Note
We can only import one S3 folder in a data pipeline.
Merge data
We can join two datasets based on an operation and specific keys in the two datasets. This can be useful when a file is incomplete, and the rest of the file is in a separate file. To join two files, go to the Merge tab.
Note
There has to be at least two datasets to perform a merge.
Assuming the initial dataset we extracted this does not have the Invoice column. However, there is another dataset that contain the Invoice date column. We can merge both datasets to form a complete dataset. To begin, go to the Extract view and import the second dataset. After importing the two datasets, go the Merge tab. Both datasets will appear in the side panel.
Select Table A and Table B from the drop down. In the Operator section, select the kind of merge operation to be performed.
There are six kinds of merge in the merge tab:
INNER JOIN - Returns records that have matching values in both tables.
FULL JOIN - Returns all records when there is a match in either left or right table.
LEFT JOIN - Returns all records from the left table, and the matched records from the right table.
RIGHT JOIN - Returns all records from the right table, and the matched records from the left table.
APPEND - This is used to join two event logs of a similar process. The join is done adding the second log (child process) to the end of the first log (parent process). This is useful when merging the event log of the same process but across different periods. For example, merging the order-to-cash process for the period January-March, with the event log of the same process for the period April-June.
PARENT CHILD APPEND - This is used where an instance of one process (the parent process) spawns one or more instances of another process (the child process). The Parent-Child union operator fills in any missing case identifiers (ID) of the parent process. This is so that we can use this ID as a case identifier when loading the resulting log into the Apromore workspace.
For illustration, below is a usage scenario of the Inner Join and Parent-Child Union.
Inner join
We consider an example with the following two tables:
A “Loan Application Header” table with information about each loan application, such as the Country and the Property value. This table has one row per loan application. Each loan application has a loan identifier.
A “Loan Application Log” table with information about each activity instance in a loan application process. For each activity instance, the tables give us the name of the activity, the start and end time, and information about the employee who performed the activity.
We can perform an inner join on the ID columns of both tables. This will combine the information from both tables by matching the ID columns.
To construct an event log from these two tables, select “Loan Application Header “as Table A, “Loan Application Log” as Table B, select the “Inner Join” operator, and select the “ID” column as the join key (both for Table A and Table B).
Click Submit.
The output of this operation can be loaded into Apromore using ID from any of the tables as the case identifier.

Note
In the Transform step, we should select only one ID column to avoid duplicate column names.
The files corresponding to the above example are here.
Parent-child append
We consider an example with the following two tables:
A table corresponding to an event log of Business Travel Permit Applications (the parent table). The case identifier of this log is the business travel identifier.
A table corresponding to an event log of Business Travel Expense Declarations (the Child table). The case identifier of this log is the expense declaration identifier.
For every declaration, there is an activity called “Declaration Submitted”. The rows corresponding to this activity contain both the business travel ID and the expense declaration ID
None of the other events in the Business Travel Expense Declarations table contains a reference to the business travel ID. Only the activity “Declaration Submitted” contains a reference both to the business travel ID and to the expense declaration ID.
In this scenario:
Business Travel Permit Applications is the Parent Table. This should be marked as “Table A” in the Merge step.
Expense Declaration is the Child table (every business travel is the “parent” of an expense declaration). The Expense Declaration table should be marked as Table B in the Merge step.
The Parent Key (Key A) is Permit ID.
The Child Key (Key B) is Declaration ID.
Click Submit. The Parent-Child union will construct a table that contains:
Every row in the parent table (every activity instance of the business travel process)
Every row in the child table (every activity instance of the expense declaration process).
Every row in the output table will contain the attributes of the parent table and the attributes of the child table.
The output, with all columns included, can be loaded to Apromore using the Permit ID as the case identifier.
The files corresponding to this example are below:
Transform data
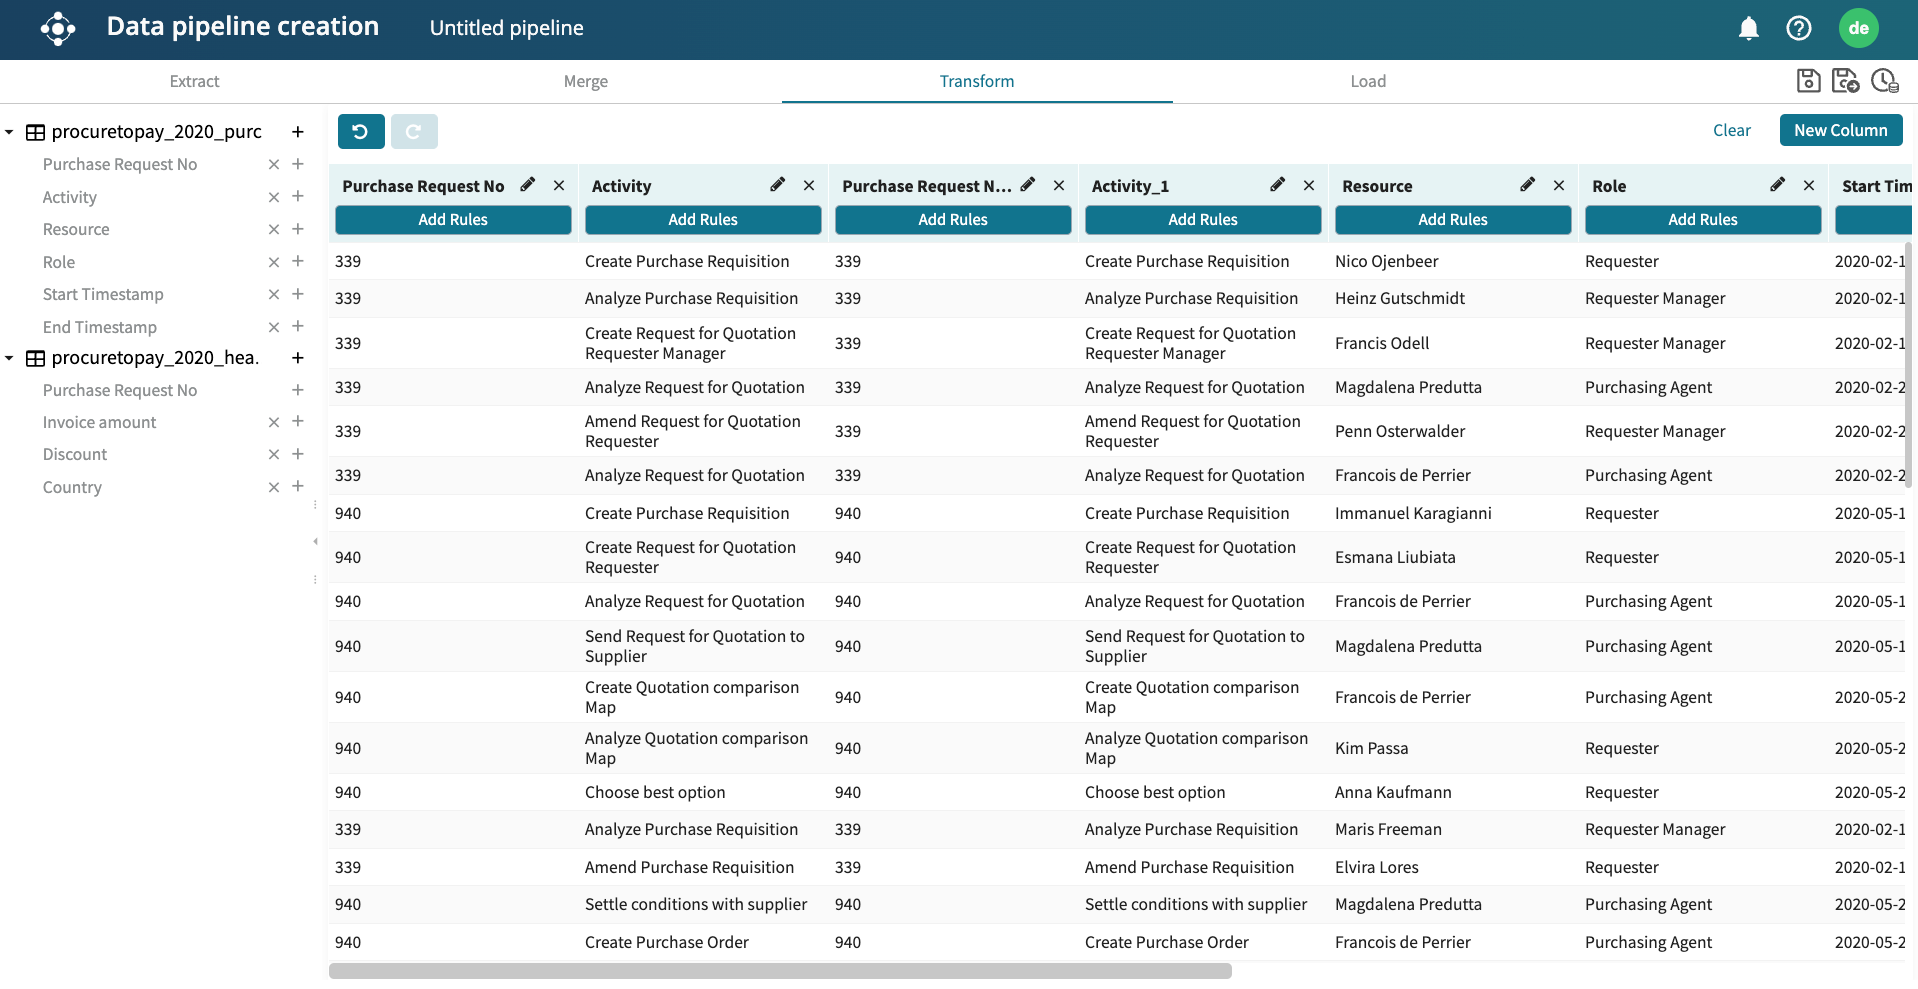
The Transform view is where data transformation is done. The list of tables and columns appears on the left.
We use this list to select the columns we wish to have in the data pipeline output. Click the “+” sign to add a column. As the columns are added, the table containing the column values is updated.
To delete a column from the Transformation table, click on the “X” button next to the column name.
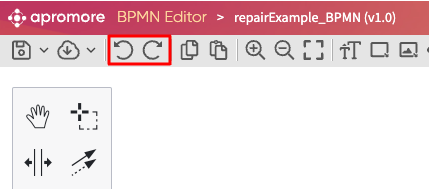
At any point in the transformation step, we can undo and redo a previous action by using the undo and redo buttons, respectively.
Note
To complete the transform step, the case ID, activity, and end timestamp columns must be added.
Warning
If we click + from a column multiple times, the column will be added multiple times. In the case of large logs, the addition of columns might take some time. Be sure not to click the same column several times to prevent column duplicates in the transformed table.
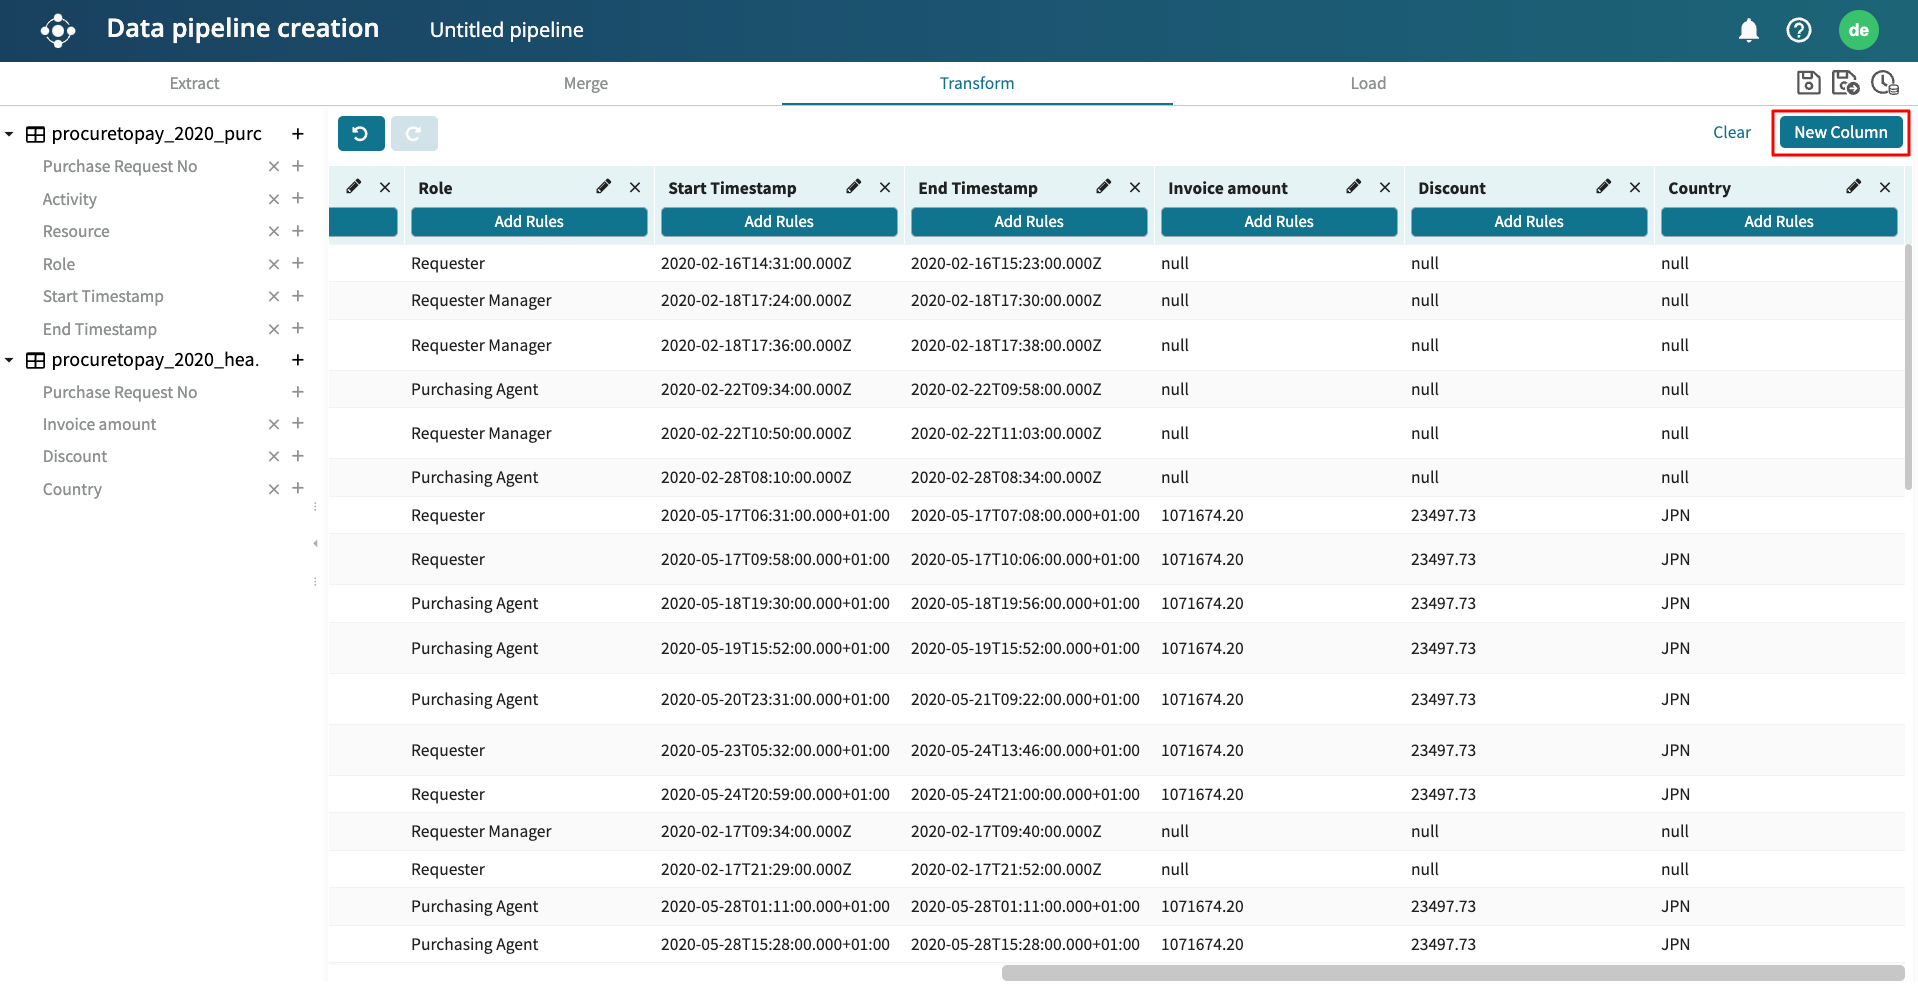
To add the whole extracted table to the Transformed table, click the bold “+” button next to the table name.

We can add all the columns in Table A and the Invoice_amount, Discount, and Country columns in Table B.
We can create a new column based on a set condition. Based on the added column, we can transform the values therein or create a new column that will be populated by a transformation rule.
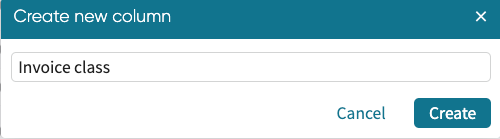
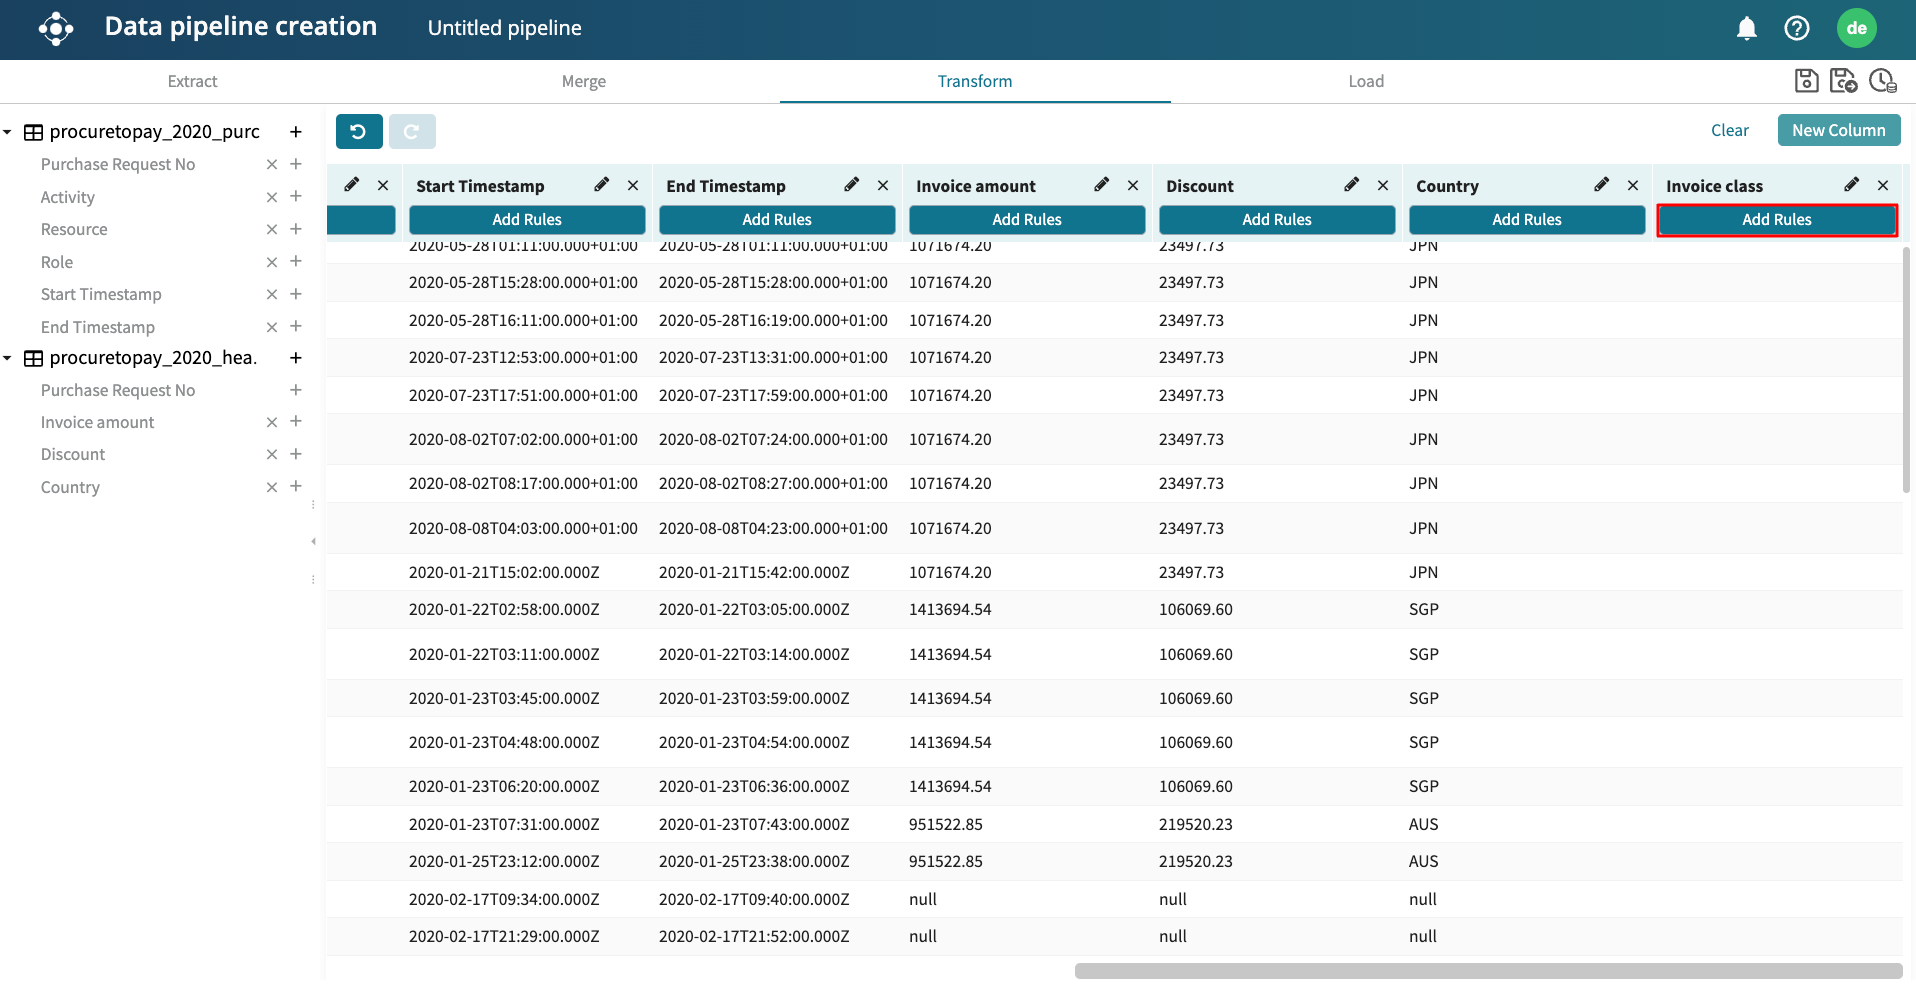
Suppose we wish to create a new column called Invoice_class. In this column, any case with an invoice less than 1100000 is filled with “Low value”, while those higher than 1100000 are filled with “High value”. To do this, click New Column in the upper right corner.
Enter the name of the new column and click Create.
A new column is created.
Define the rules for the column by clicking Add Rules.
A window will appear to define the transformation rule. This rule determines the value that will be inputted in the column. A transformation rule consists of an optional IF <Conditional Operation> THEN <Transformation Operation> ELSE … statement.
To create a rule based on a condition, click +IF.

This restructures the Edit rules window to allow us to create an if-else condition.
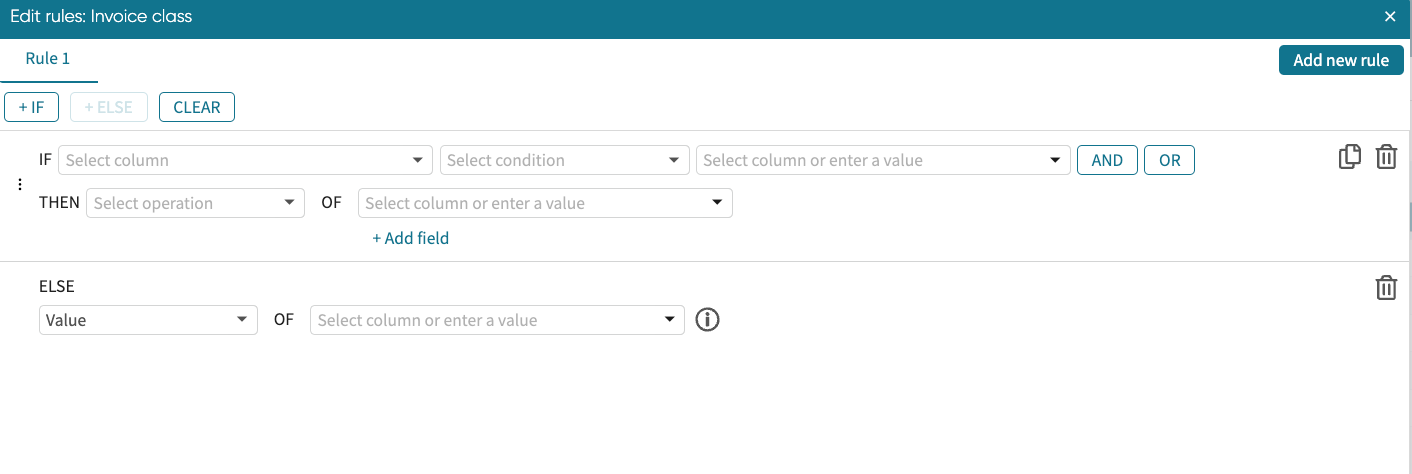
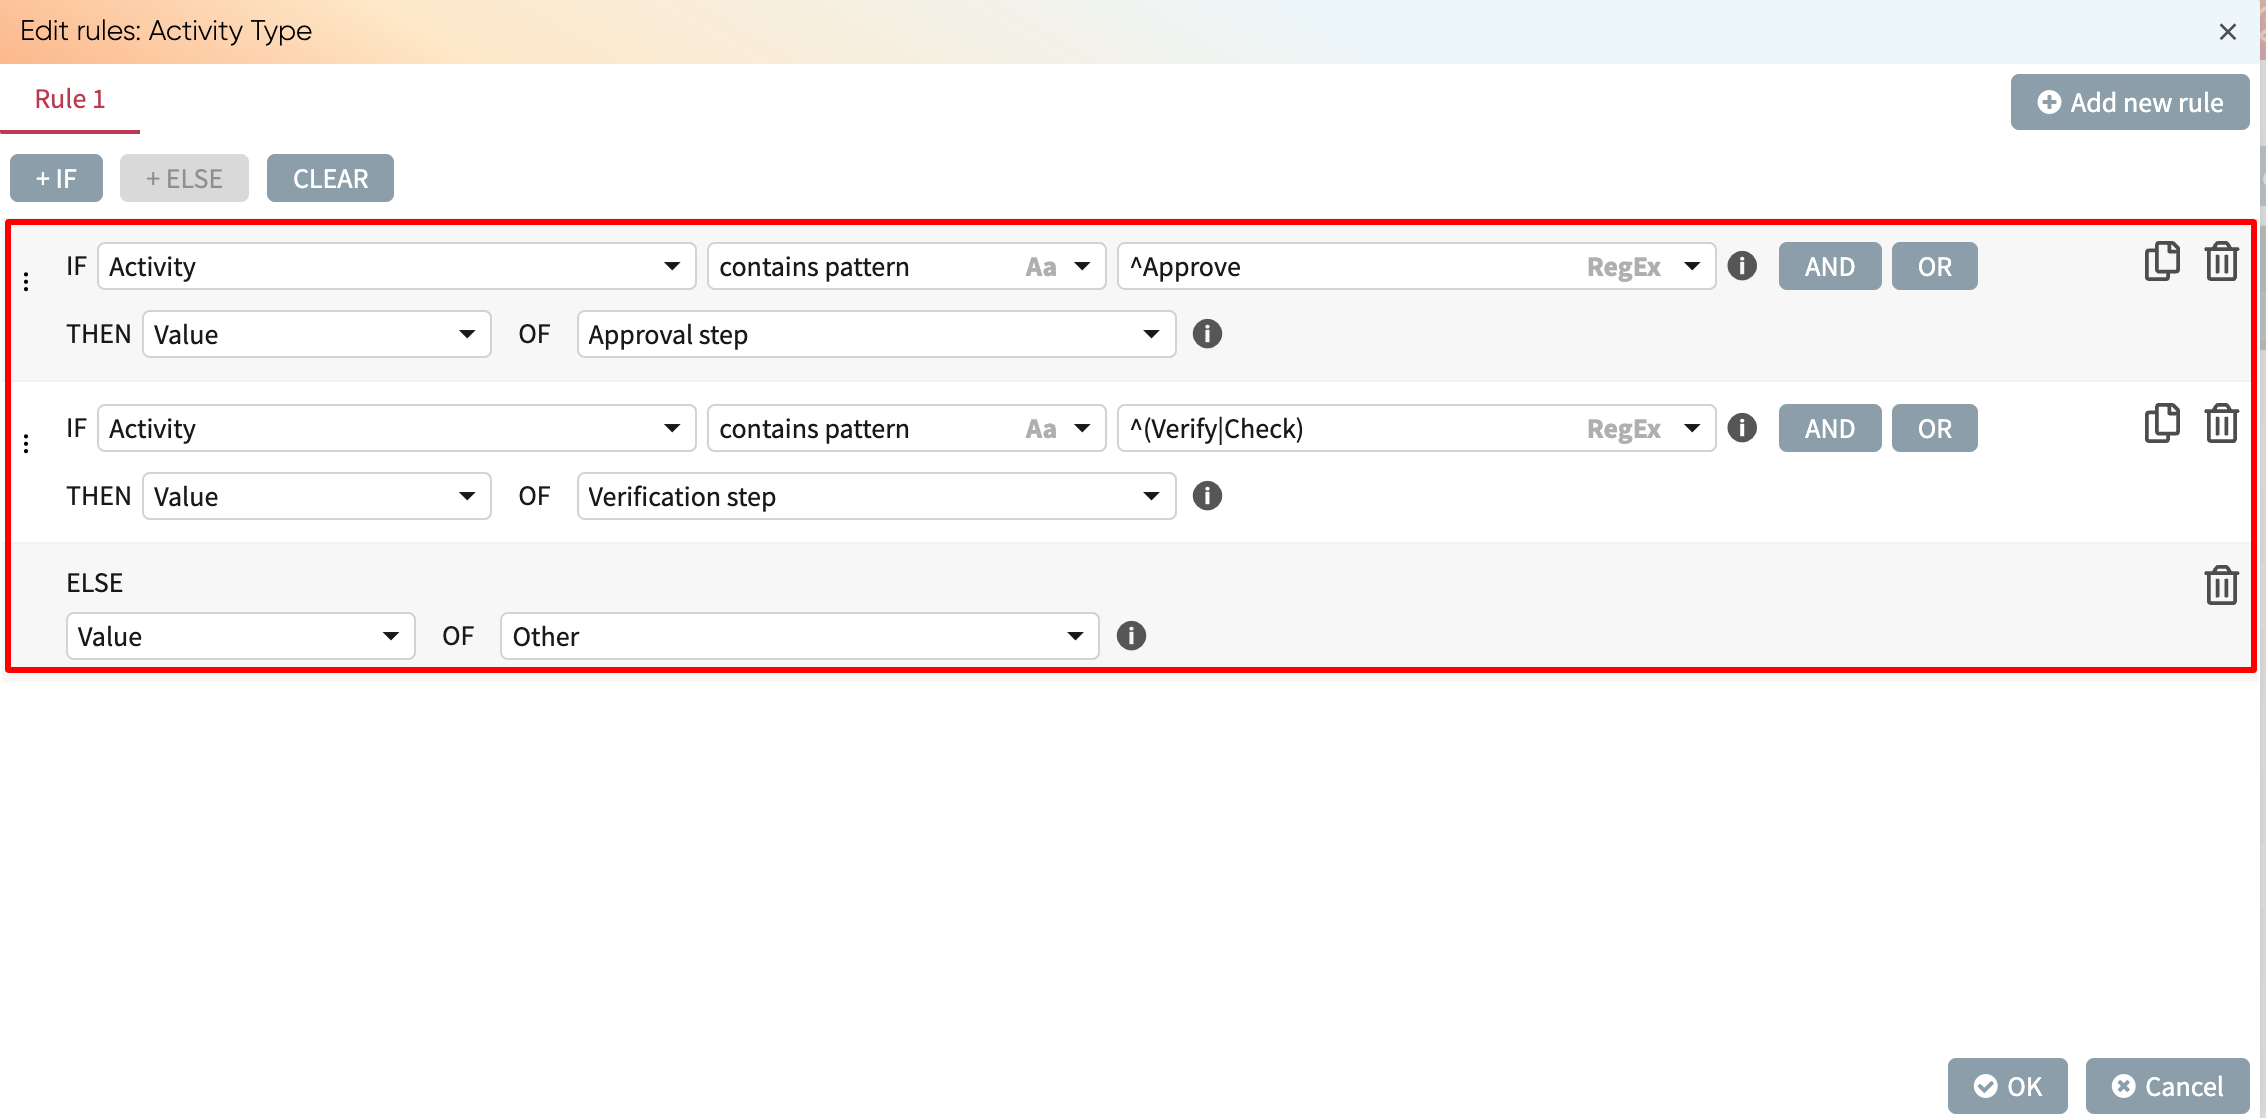
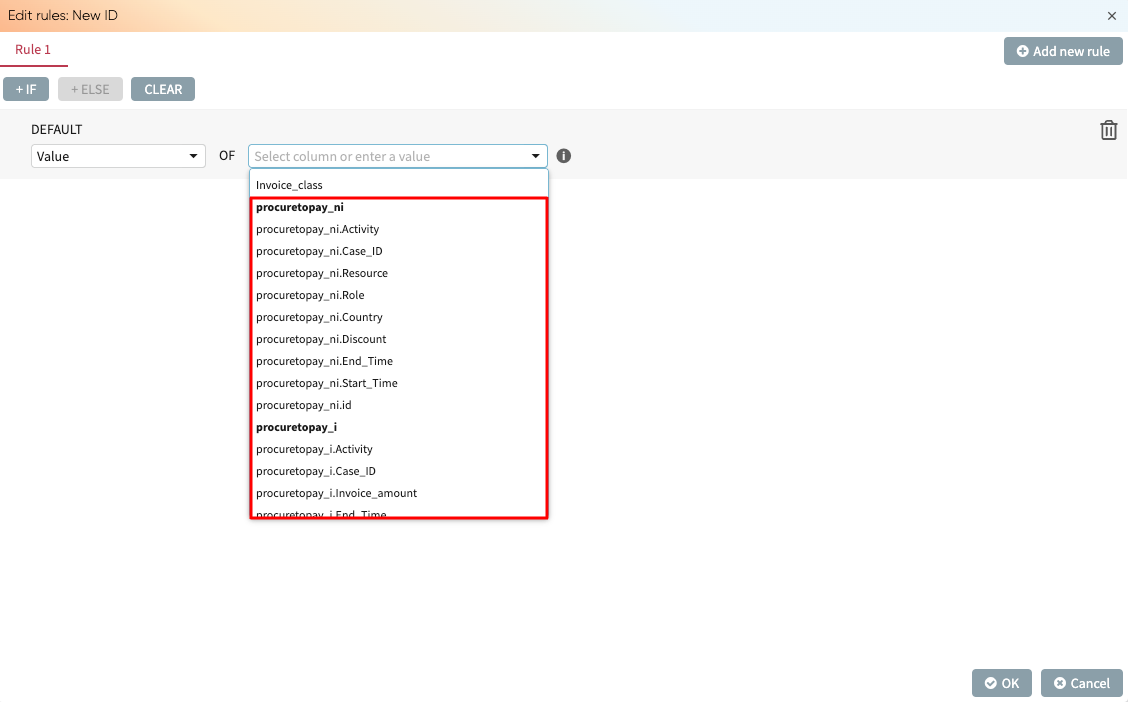
In the IF section, select the column that will be used to evaluate the condition. Since we want to fill the values of the column based on the “Invoice amount” column, we select Invoice amount from the dropdown.
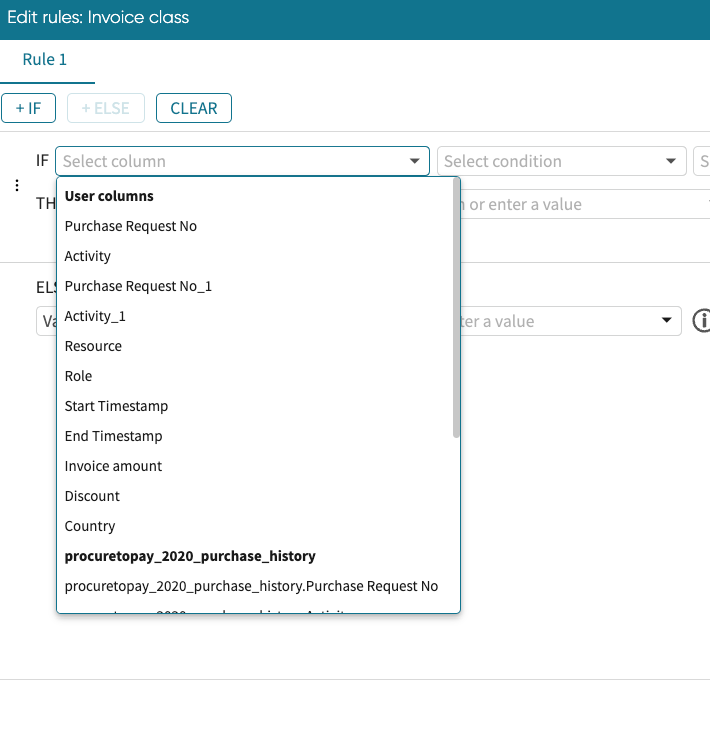
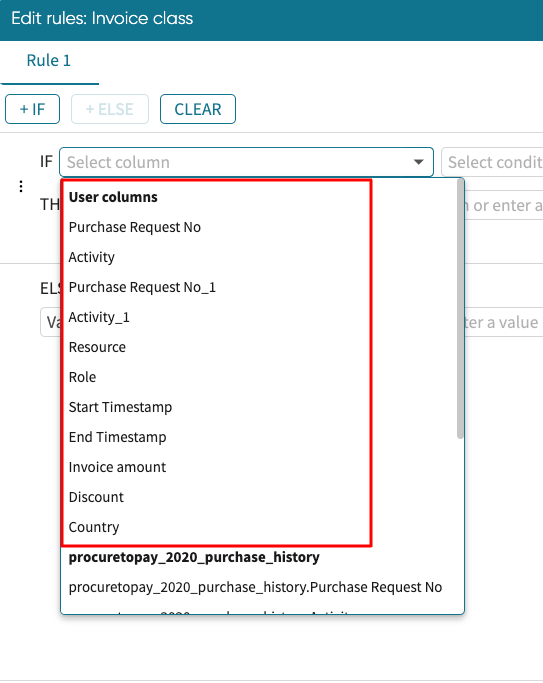
But columns in the dropdown are classified into two:
User columns: These are the columns as-is in the transform step. When we create a rule based on a user column, the rule is based on values as they appear in the transform step. For example, if values in a column are modified during the transform step or become “null” during the merge step, these updated values will be used to compute the rule.
Original columns: These include all columns from the initial extracted logs. Rules based on original columns use the values in the extracted log, regardless of any changes made during the merge or transform step. This allows us to create transformation rules based on the initial data, even if some columns are not included or are modified in the transform step.
Original columns are denoted by <name_of_log>.<column_name>
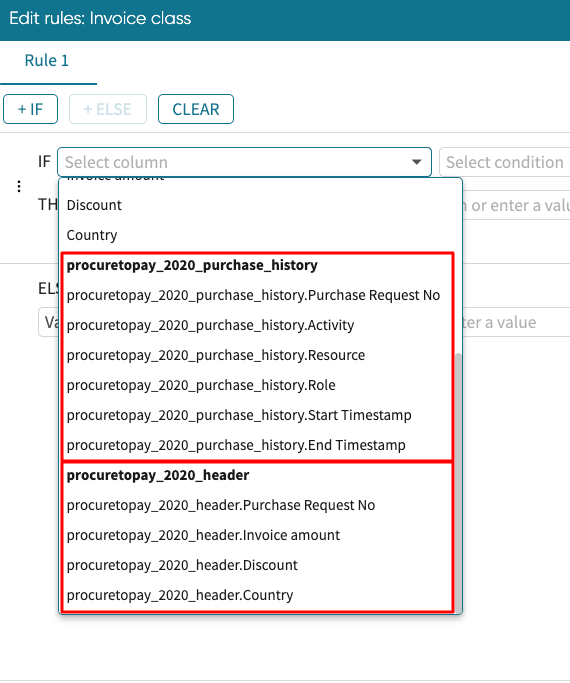
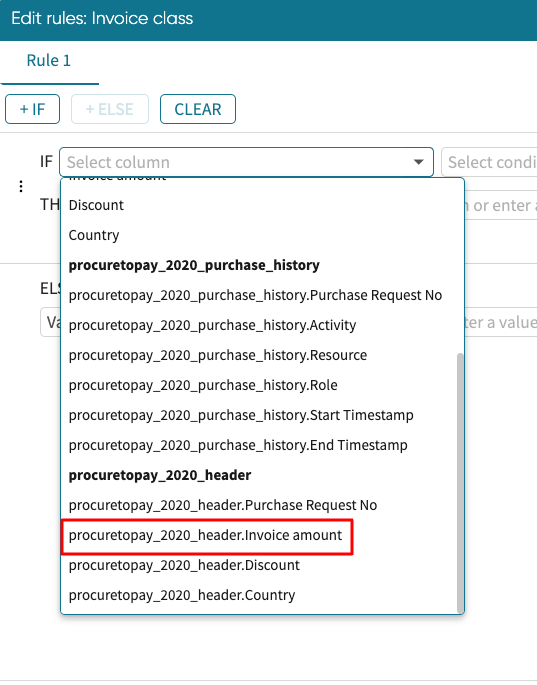
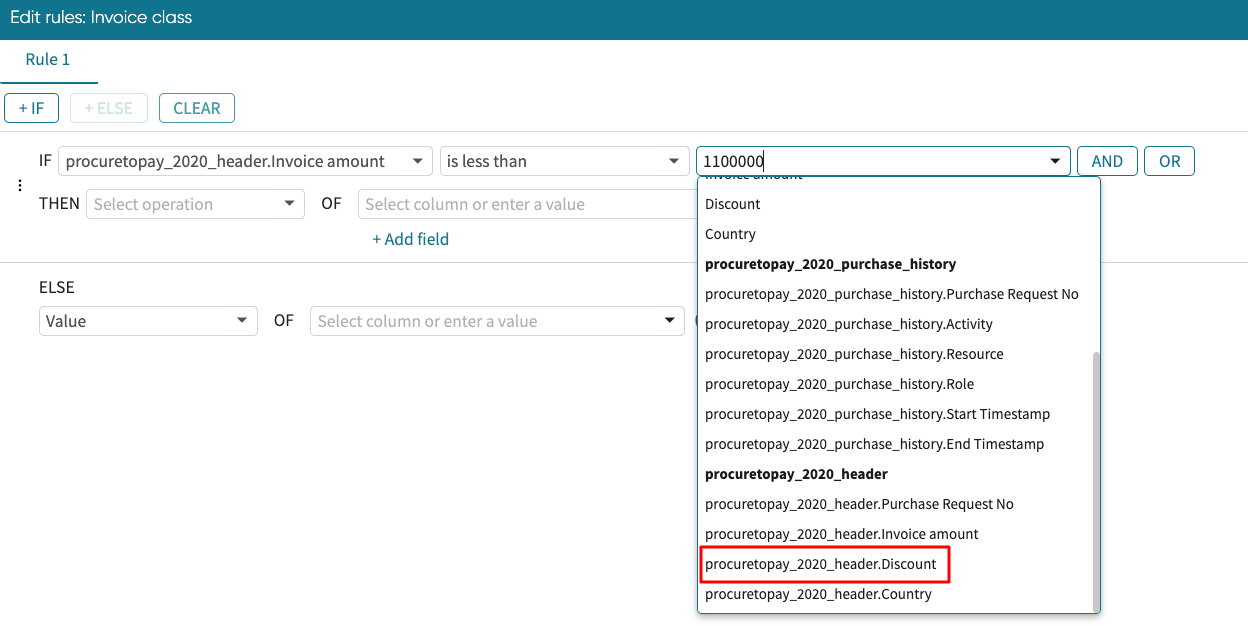
We want to create this rule based on the original column. We select the Invoice amount original column from the dropdown.
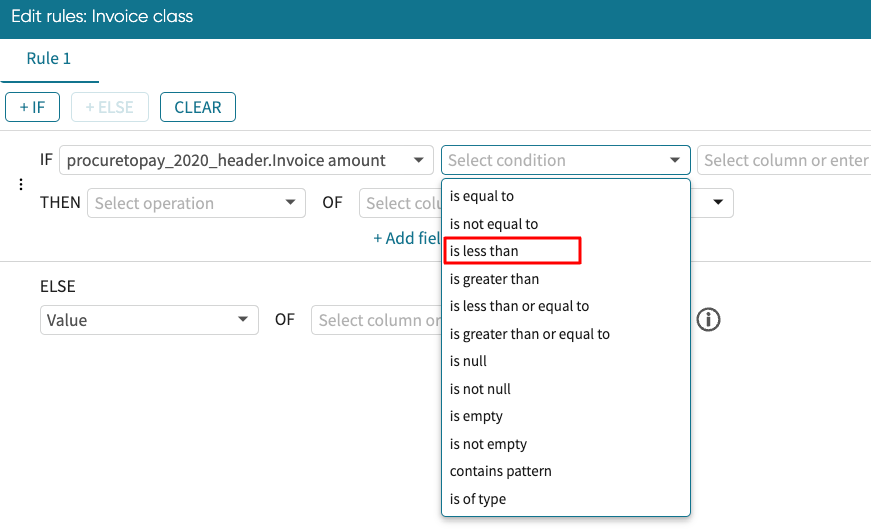
Next, we specify the condition.
The following operations can be used in the <Conditional Operation>:
Is equal, not equal, less than, greater than, less than or equal to, greater than or equal to: This checks whether the value of the attribute is equal, not equal, less than, greater than, less than or equal to, greater than or equal to a given value respectively.
Is null or is not null: This checks whether or not the value of the attribute is explicitly “null”.
Is empty or is not empty: This checks whether or not the value of the attribute is empty, i.e., has no character.
Is of type: This operator returns True if the contents of a cell match the pattern expected from a value of type date time, numerical, or string, respectively. For example, when applied to a cell such as 123.4, the operation “Is of type” returns True.
Contains pattern: This conditional operator returns True if the contents of a cell contain a given string, for example, if a cell contains the string “Invoice”. It is also possible to specify a regular expression by clicking Regex. When the Regex option is selected, the pattern must be defined using the syntax of regular expressions of the Java programming language.
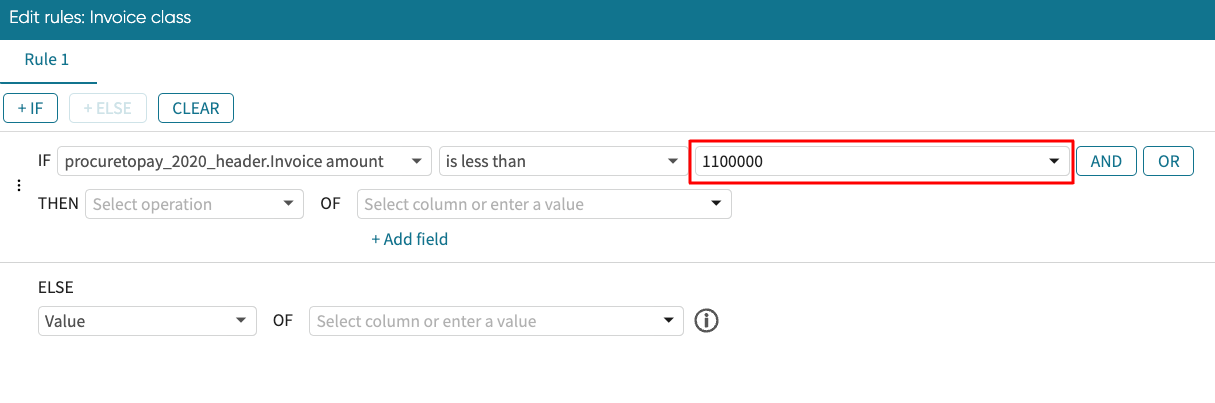
In our case, we select less than.
We complete the condition by specifying what the invoice amount is less than. In our example, we check if it is less than 1100000. We enter 1100000.
While we can enter our values to specify a condition, we can also specify a condition based on values in a column. To do so, select the column from the dropdown rather than entering a value. For instance, assuming we want to check that the invoice amount is less than the discount, we simply select the Discount column.
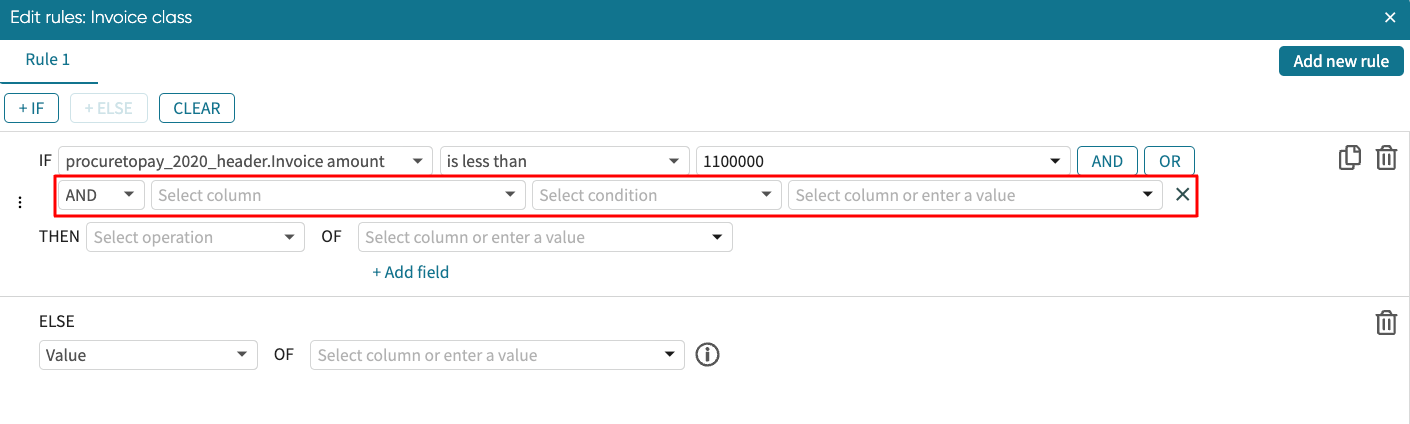
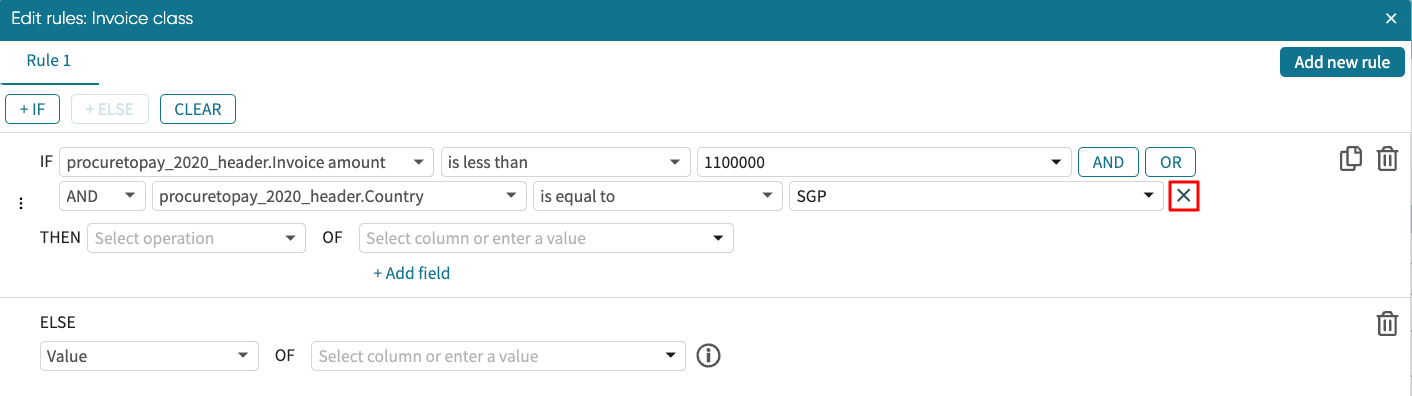
We can combine multiple conditions in an IF statement using AND or OR. Click AND or OR to extend the if condition.
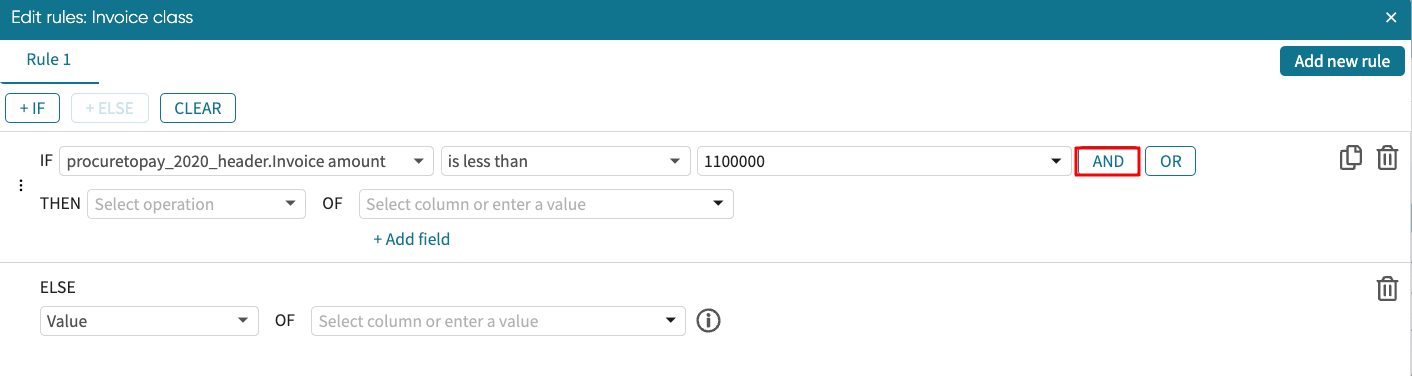
A new condition block appears where we can specify the additional condition.
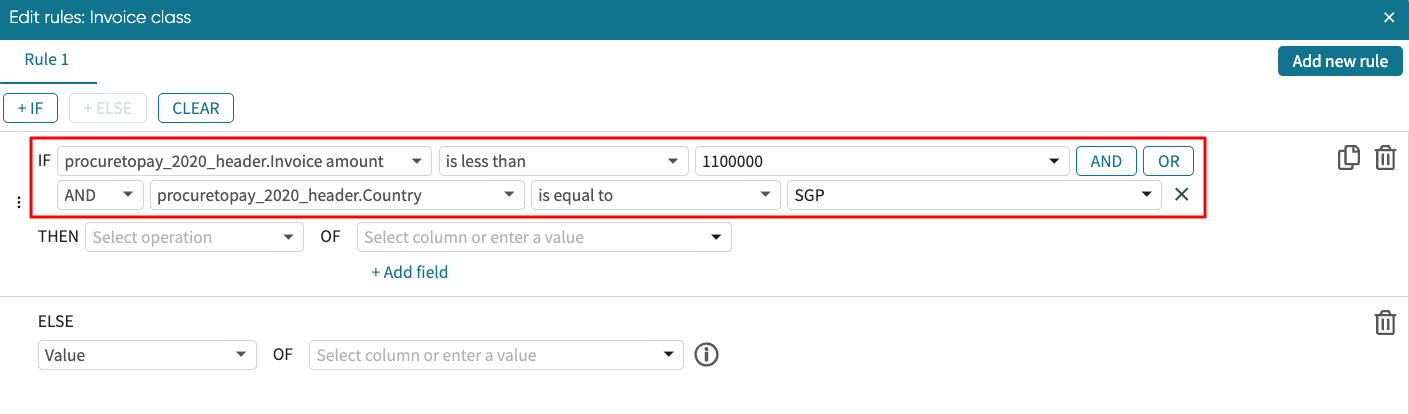
For instance, assuming we want to check that the invoice amount is less than 1100000 and the country is SGP, we can specify the condition as shown below.
At any point, we can delete the additional condition by clicking X.
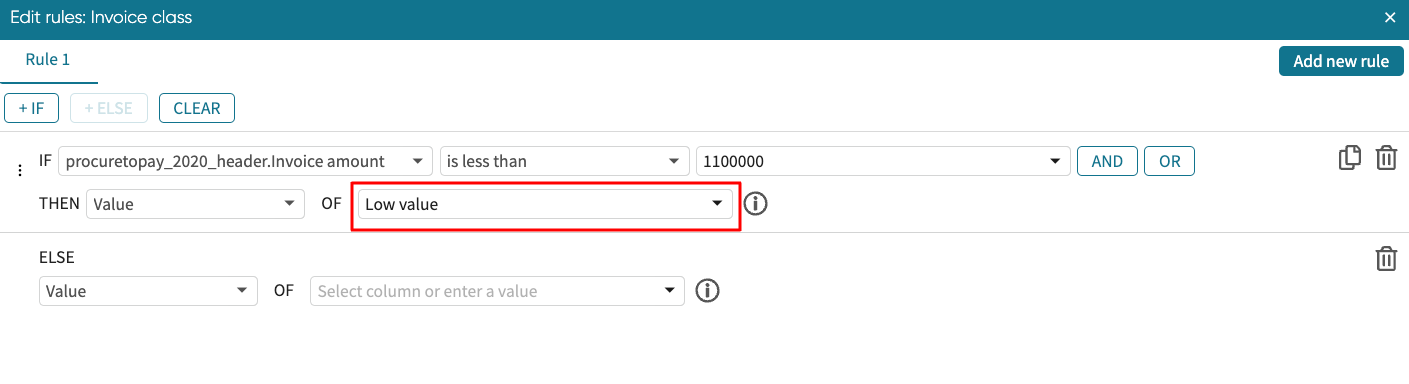
Now that we have successfully specified the condition, we need to specify how the column should be filled out if the condition is true. We define the <Transformation Operation>. In our example, we want to fill it with “Low value” if the invoice amount is less than 1100000.
Since we are filling out our own values, select the Value operation from the dropdown.

And enter the value, Low value.
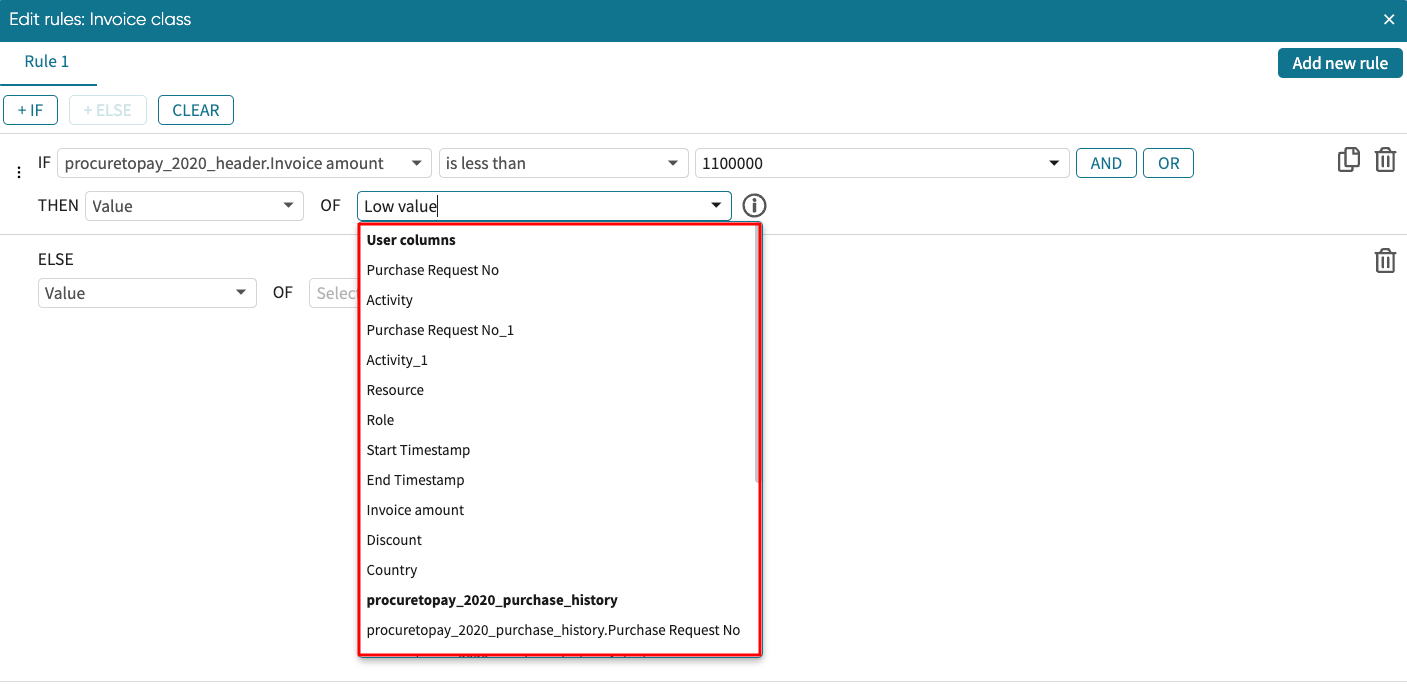
Note that rather than typing a value, we can also populate with a value from a column. For instance, if the condition is true, we may want to populate this new column with the values in an existing column XYZ. We select the desired column from the dropdown.
The following are the operations that can be used in the <Transformation Operation>:
Value: Returns either a fixed string or the value of the selected column
Delete entire row: Delete the entire row if the condition is true.
Concatenation: Returns the concatenation of two columns. It is also possible to add a separator between the values of the concatenated columns.
Find and replace: Replace the occurrences of a string with those of another. For example, below is an example where all the occurrences of the word “Center” in the System column are replaced with an empty string in such a way that the word “Center” is removed in the resulting column.
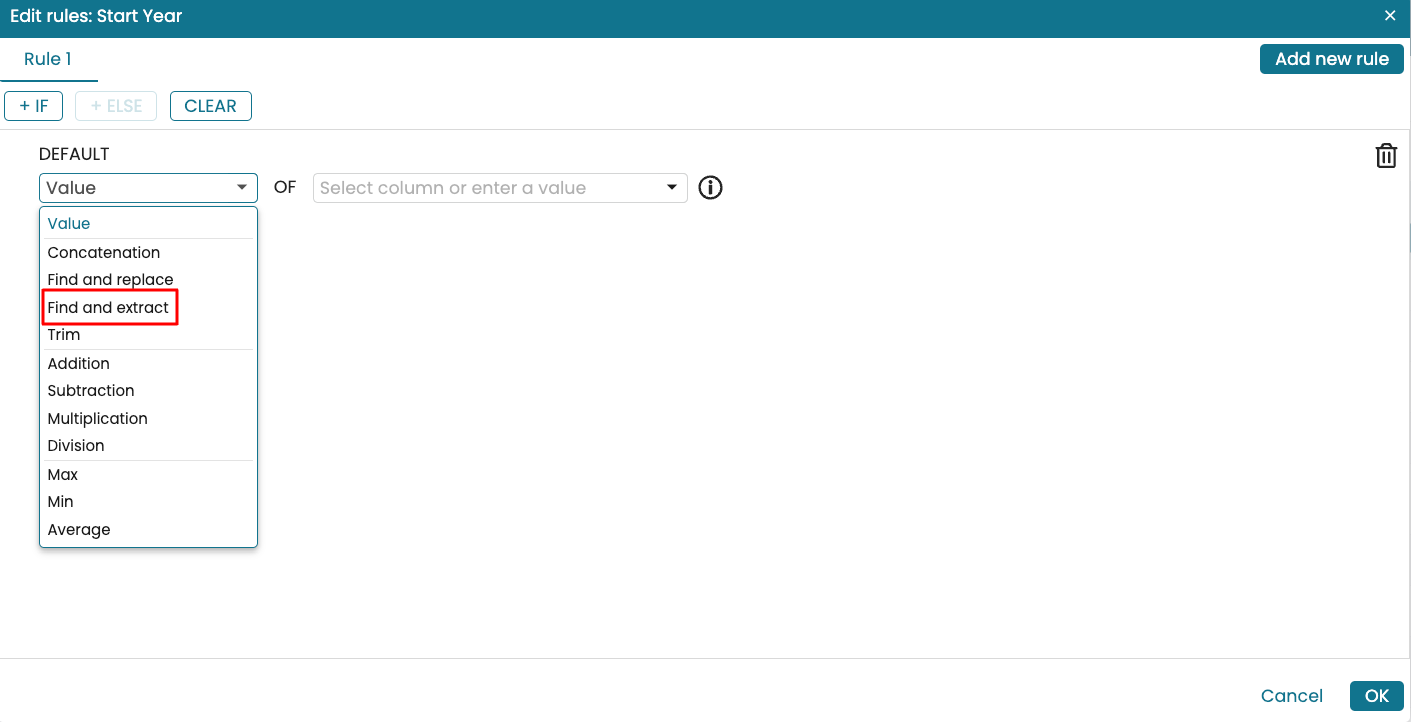
Find and extract: Extracts a substring from a column based on a Java regular expression. For example, if a column contains timestamps, we can extract and populate a separate column with just the date component.
Trim: Removes the N first characters or the last N characters of a string
Arithmetic operators: Addition, Subtraction, Multiplication, or Division
Max of two columns, Min of two columns, or Average of two columns
Note
When defining a rule to populate a column, we can refer to any other user column or original column. However, the rule to populate a column XYZ cannot refer to the column XYZ itself.
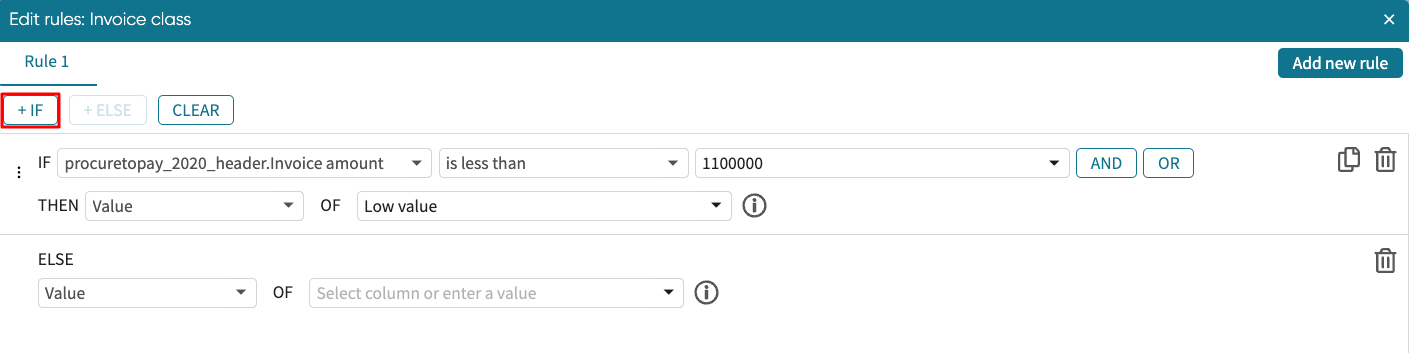
After defining the if statement, we can define the else statement. However, we can have multiple if statements. Let’s add a new if statement.
Say we want to remove rows where the invoice amount is null. Click +IF to add another if statement.
We can use this Delete entire row operation as shown below.

We can now specify the ELSE statement. In our case, it is filled with High value.
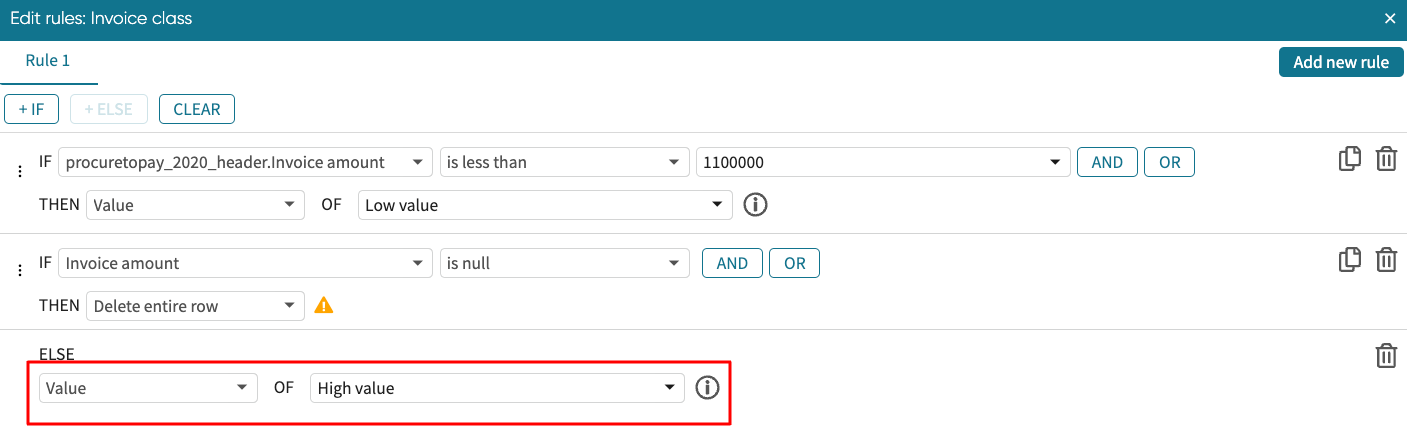
Click OK to apply the rule.
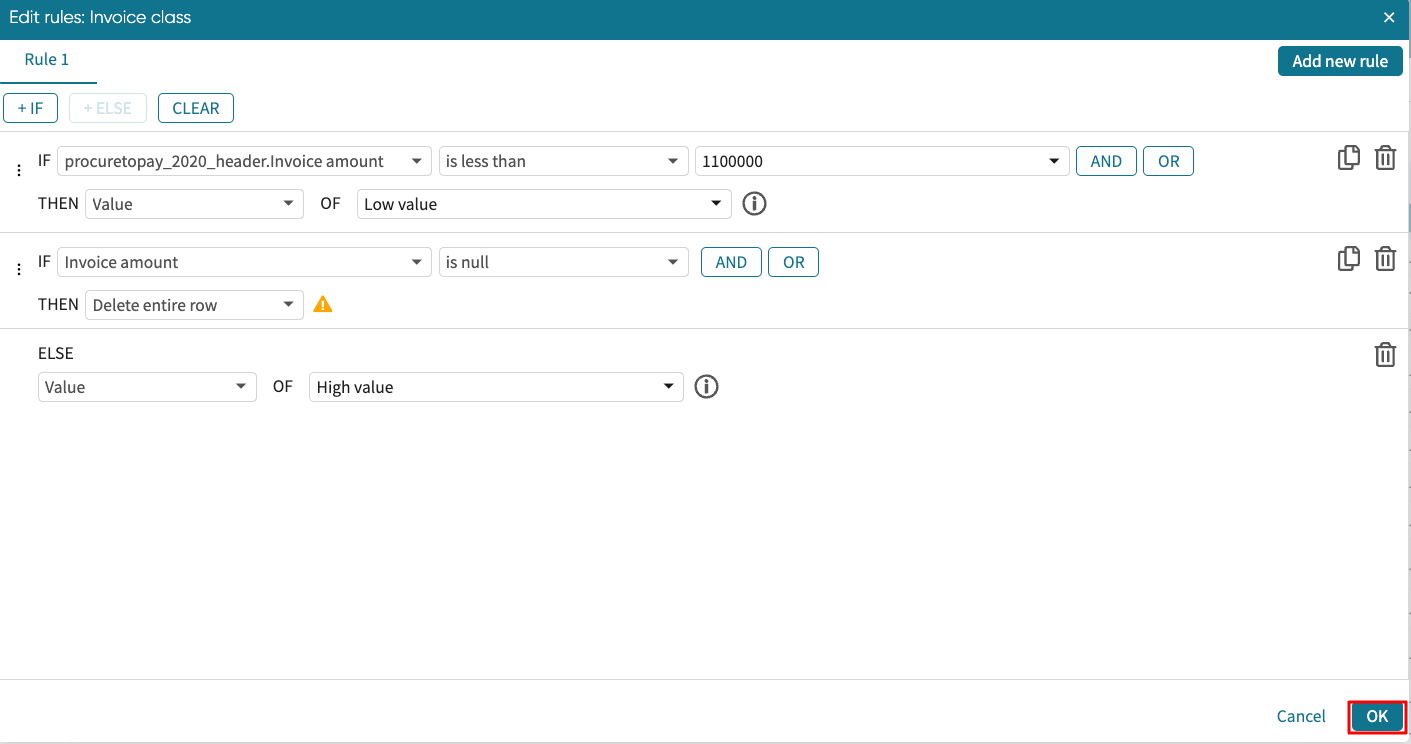
The column is now populated based on the rule we have defined.
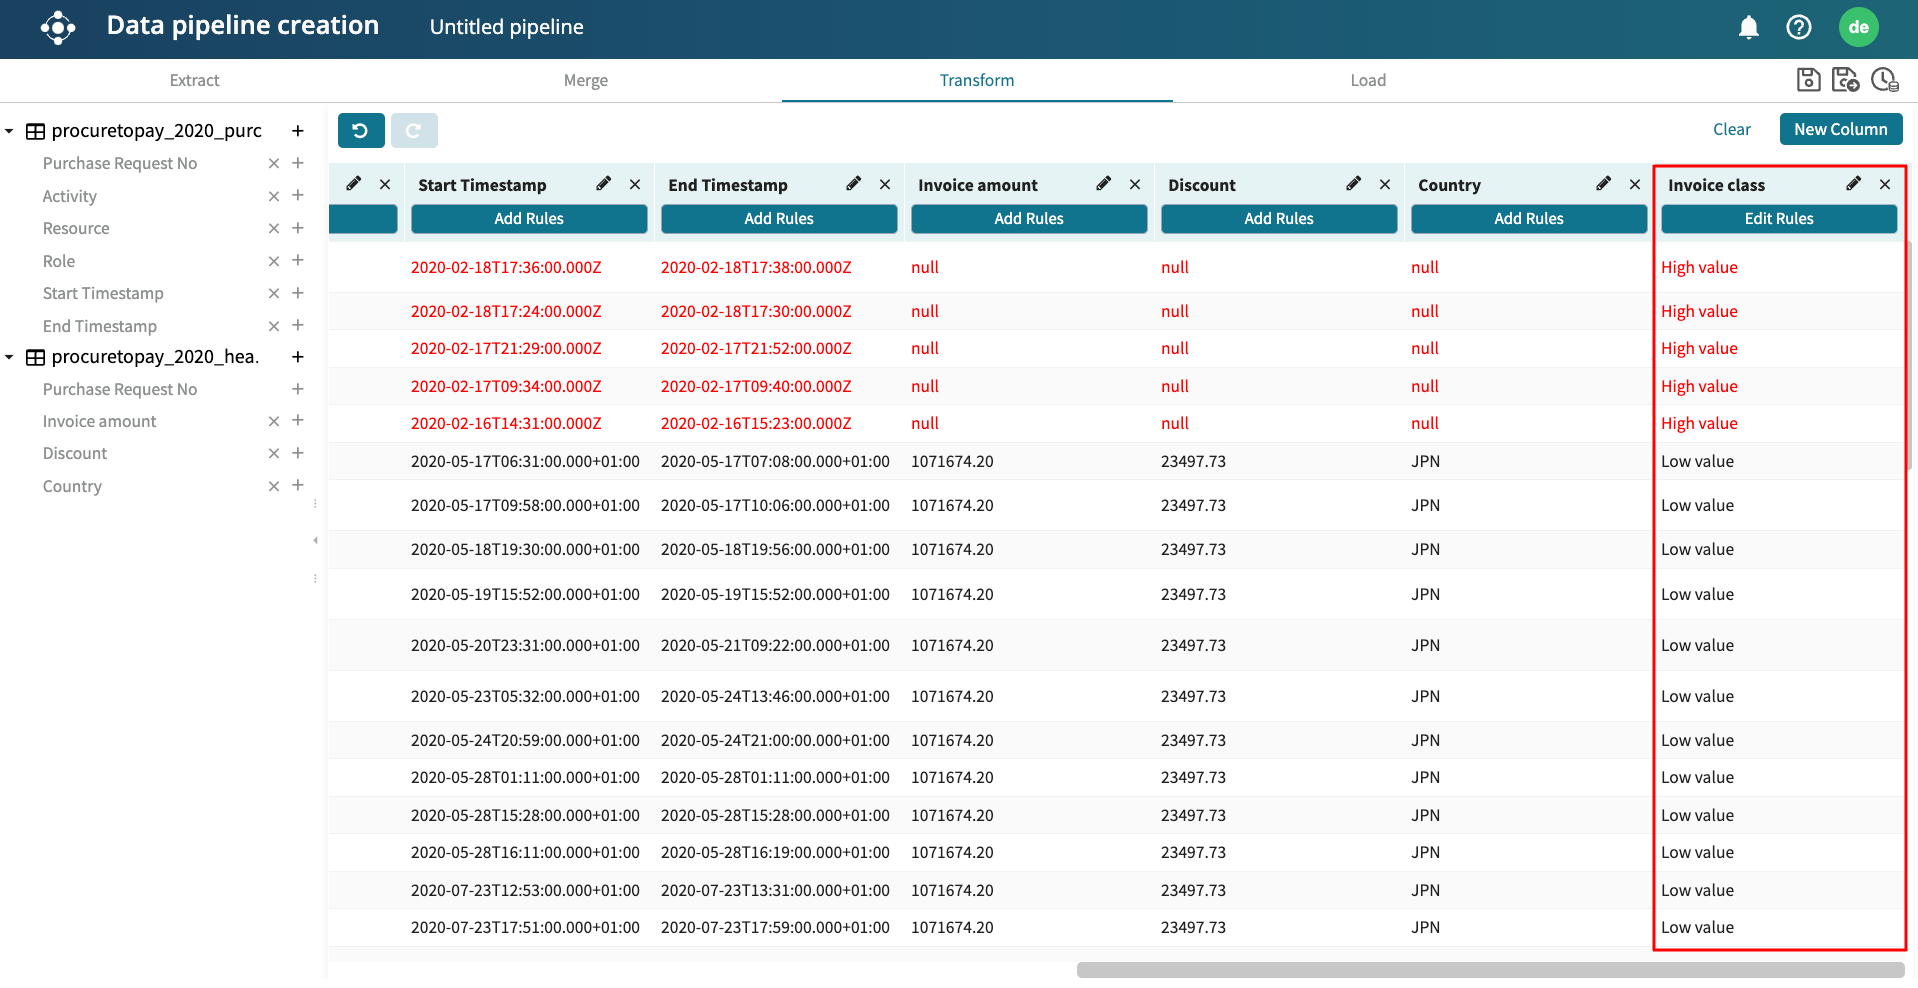
The rows in red indicate that the row will be deleted because the invoice amount is null. This is as stated in our transformation rule.
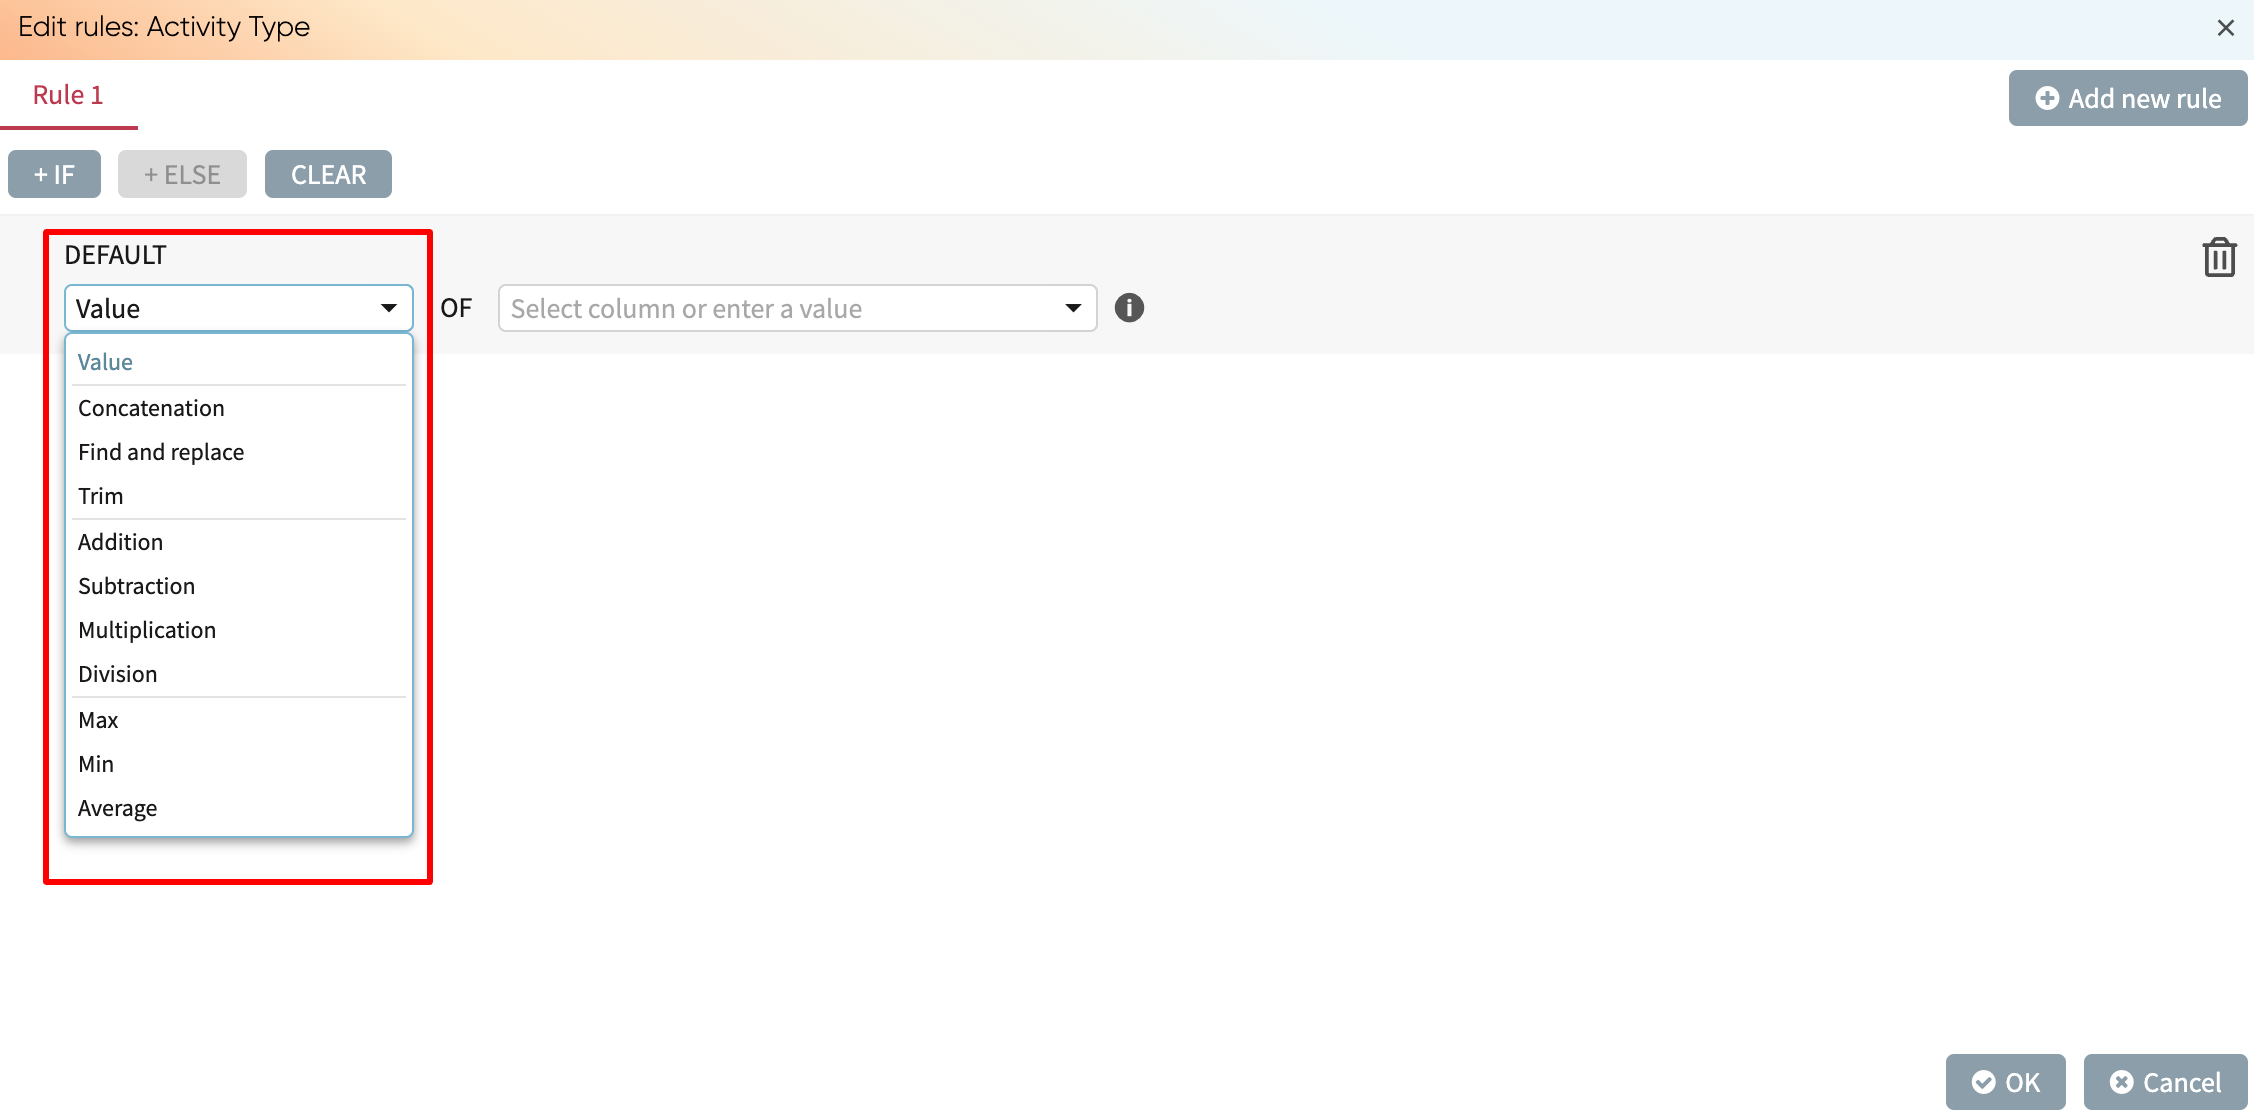
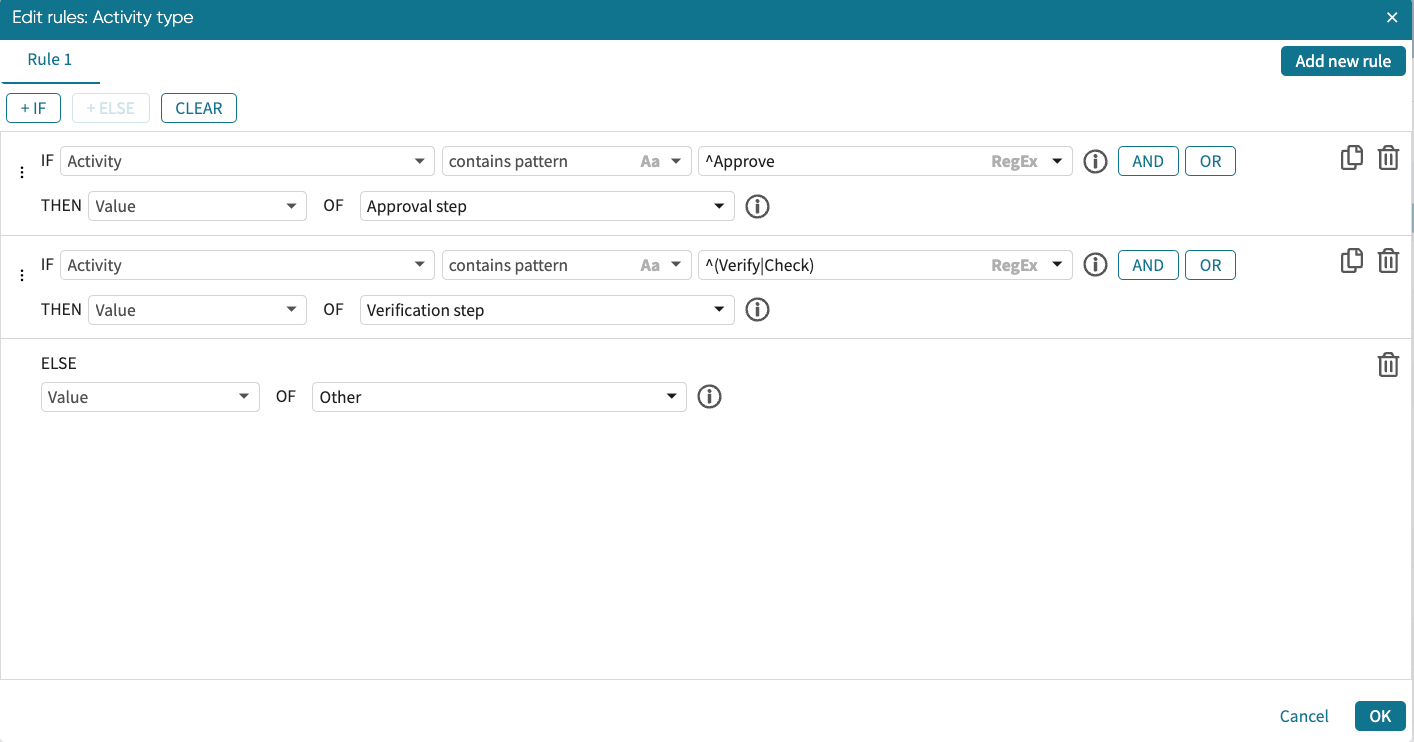
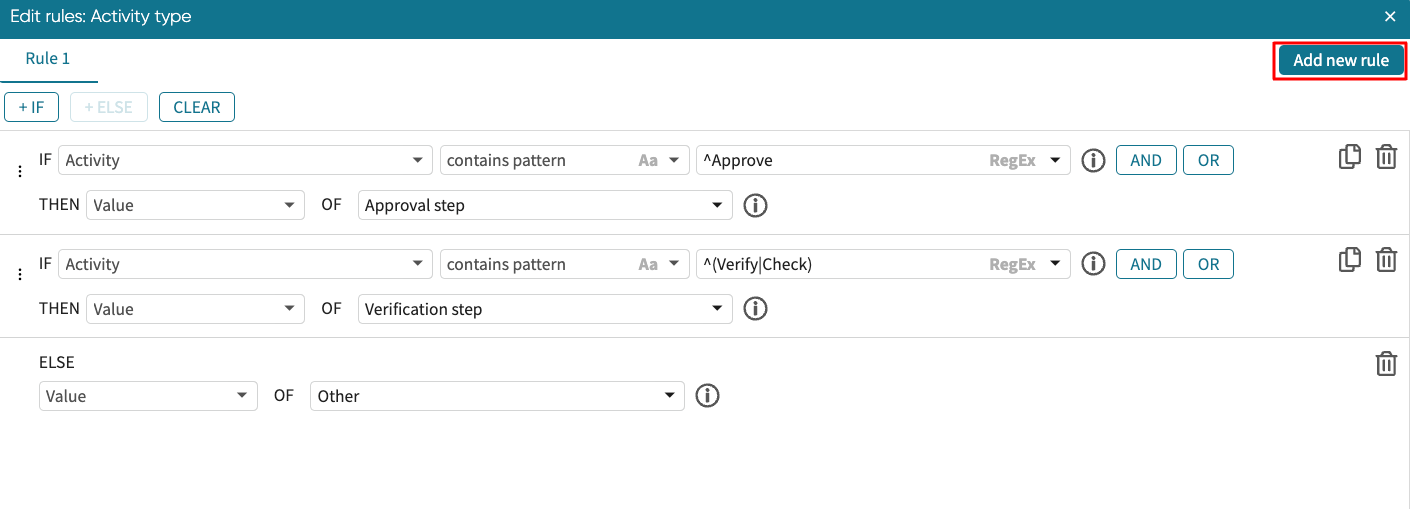
Below is a different example of the Regex option being selected in the conditional expressions. The IF condition of this rule matches a cell in the Activity column if the cell starts with the word Approve (Java regex: “^Approve”). The ELSE IF condition matches a cell in the Activity column if the cell starts with either the word Verify or with the word Check (Java regex “^(Verify|Check).”).
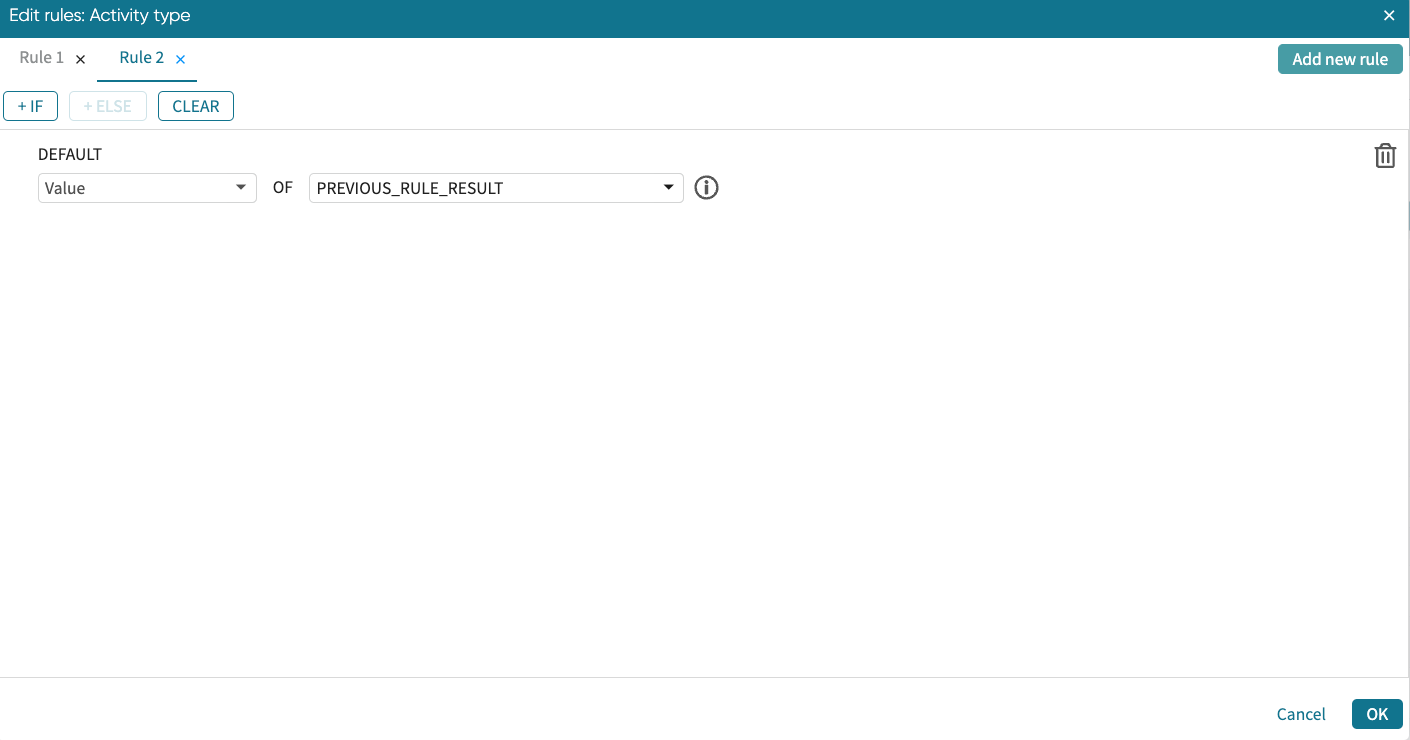
We can add new rules to a rule. This allows us to use the result of the existing rule in the new rule. For instance, if we want further “Approval step” to be populated with “Decision making activity”, while the “Verification” step and “Others” are called “Support activity”. We can do this by adding a new rule.
Click Add new rule.
This opens a new rule window where “PREVIOUS_RULE_RESULT” is an option for creating conditions.
We can create our condition as shown below.
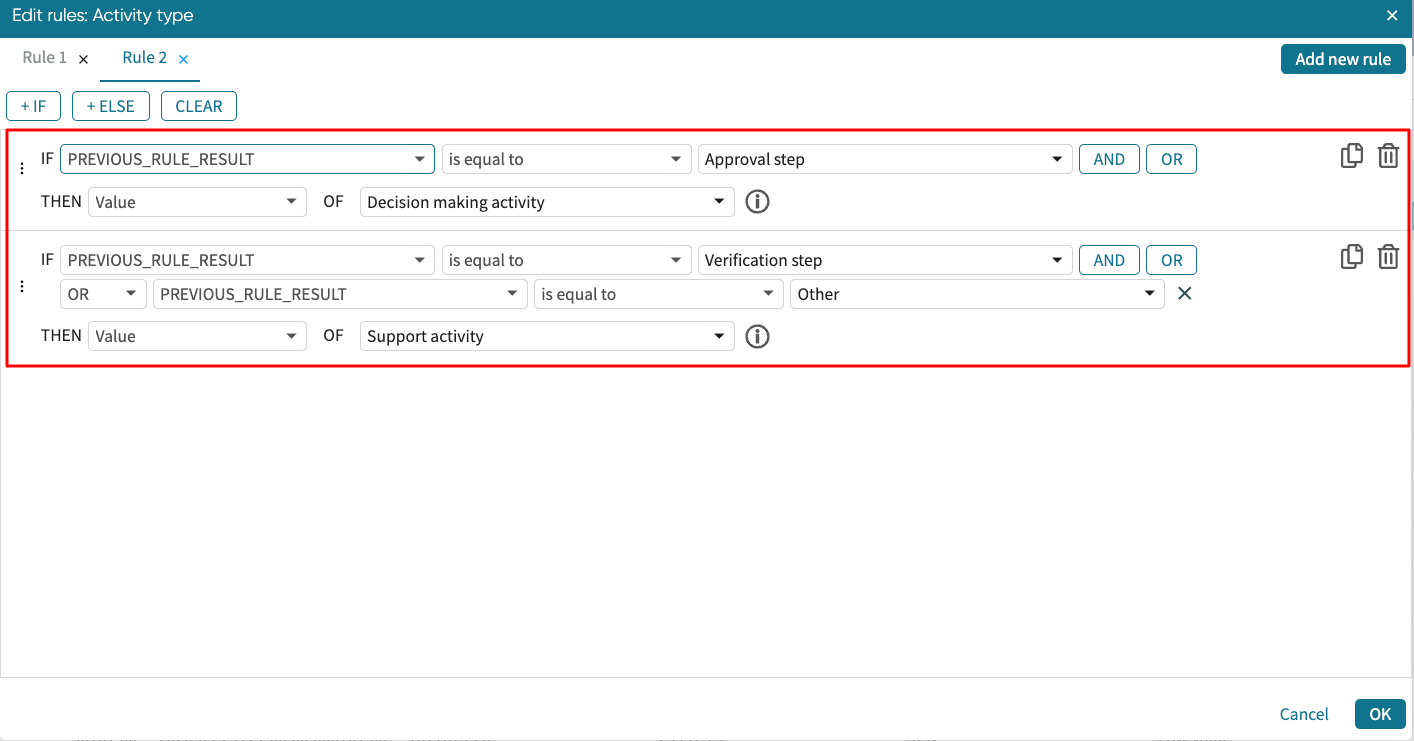
Click OK to apply it. The column is populated based on the transformation rule.

We can also use the find and extract capability to extract a substring from a column based on a regular expression. For example, if a column contains timestamps, we can extract and populate a separate column with just the date component. Similarly, given a column that contains email addresses, we can create another column that contains the domain names of those email addresses.
To use the operation within a transformation rule, select the option Find and Extract in the dropdown menu and then enter a regular expression, using the Java regular expression language.
Let us say we wish to extract a column called Start Year from the Start Timestamp column. Create a new column and add a rule. In the rule dropdown, select Find and extract.
Select the column from which the substring will be extracted.
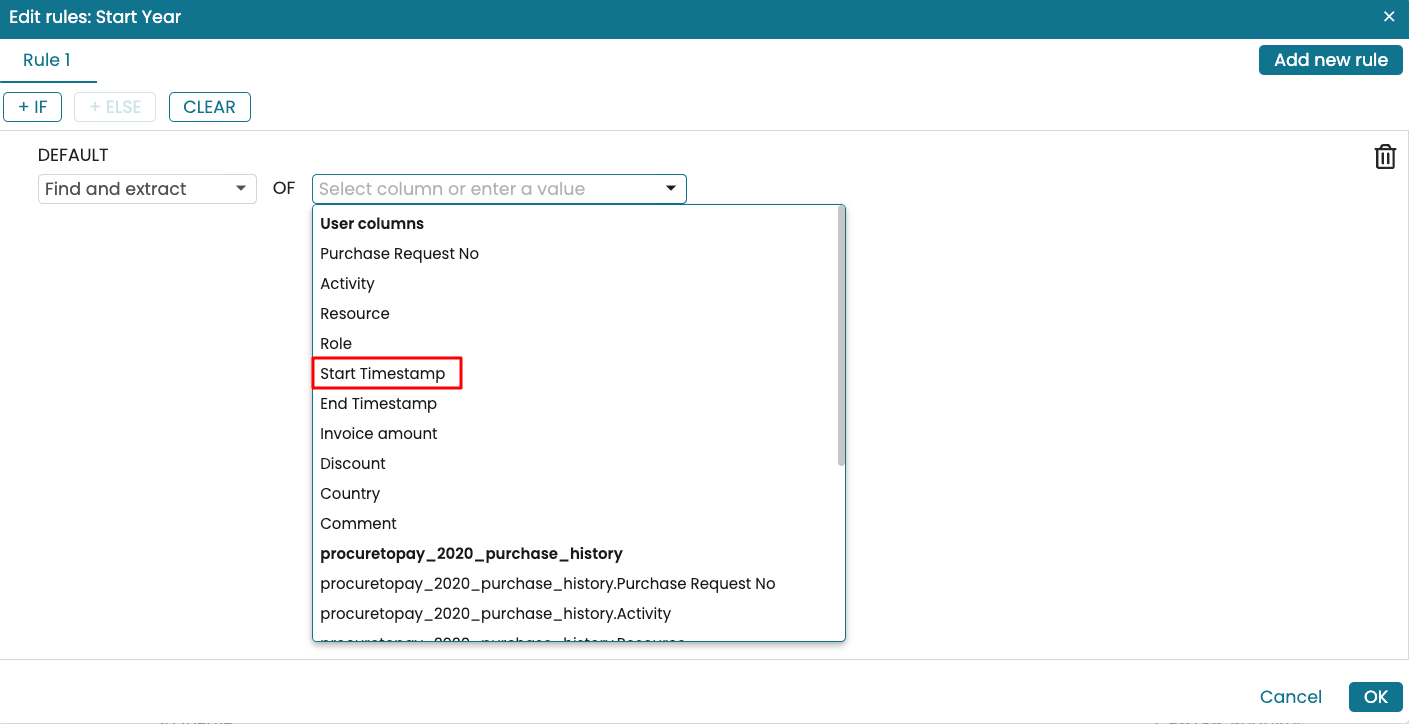
Apromore offers the following regular expressions in the dropdown list for quick selection.
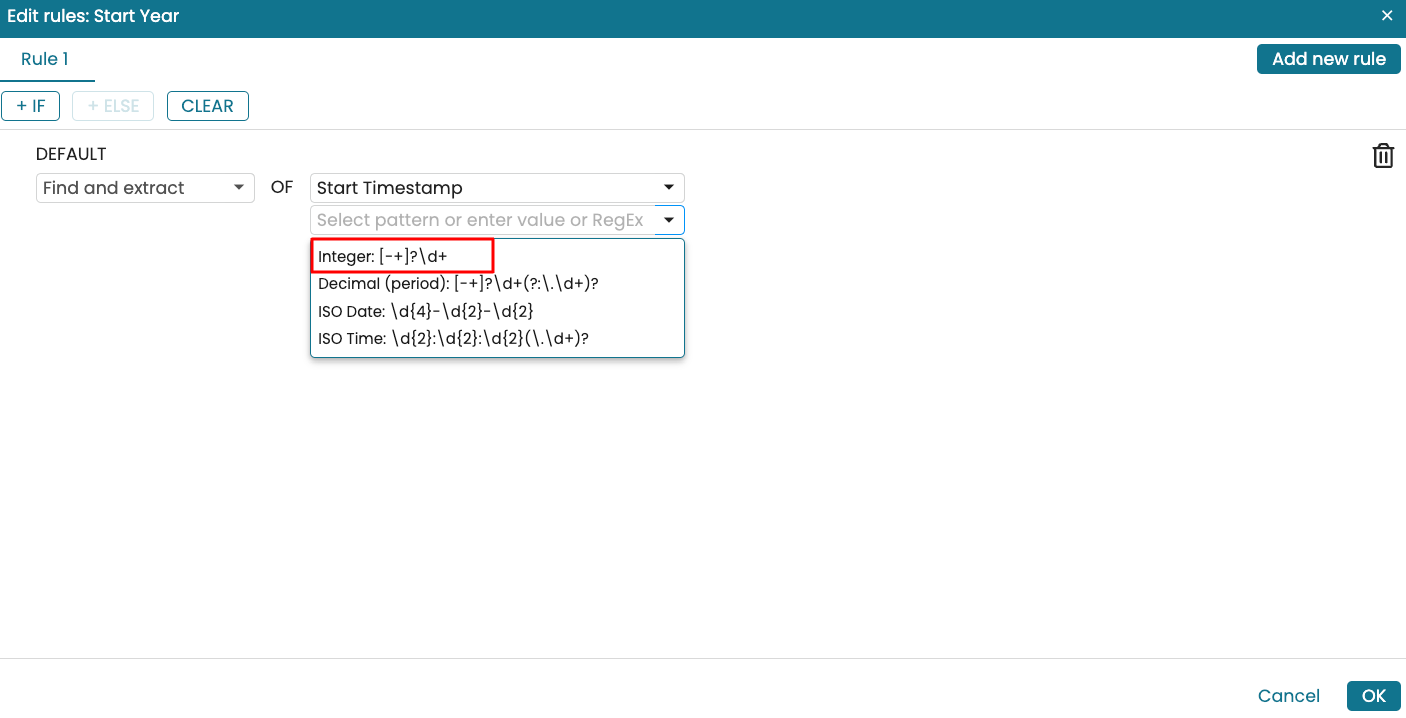
[-+]?\d+ : This extracts whole numbers with an optional + or - sign. For example, it extracts 2020 from a timestamp like 2020-01-01.
[-+]?\d*(\.\d+)? : This extracts numbers, including decimals, from texts. For example, it extracts 10.2 from the text Apromore 10.2 release.
\d{4}-\d{2}-\d{2} : This extracts dates in the format yyyy-MM-dd. For example, it extracts 2020-01-01 from a full timestamp.
\d{2}:\d{2}:\d{2}(\.\d+)? : This extracts times in the format HH:mm:ss with optional milliseconds. For example, it extracts 12:00:00.123 from a timestamp.
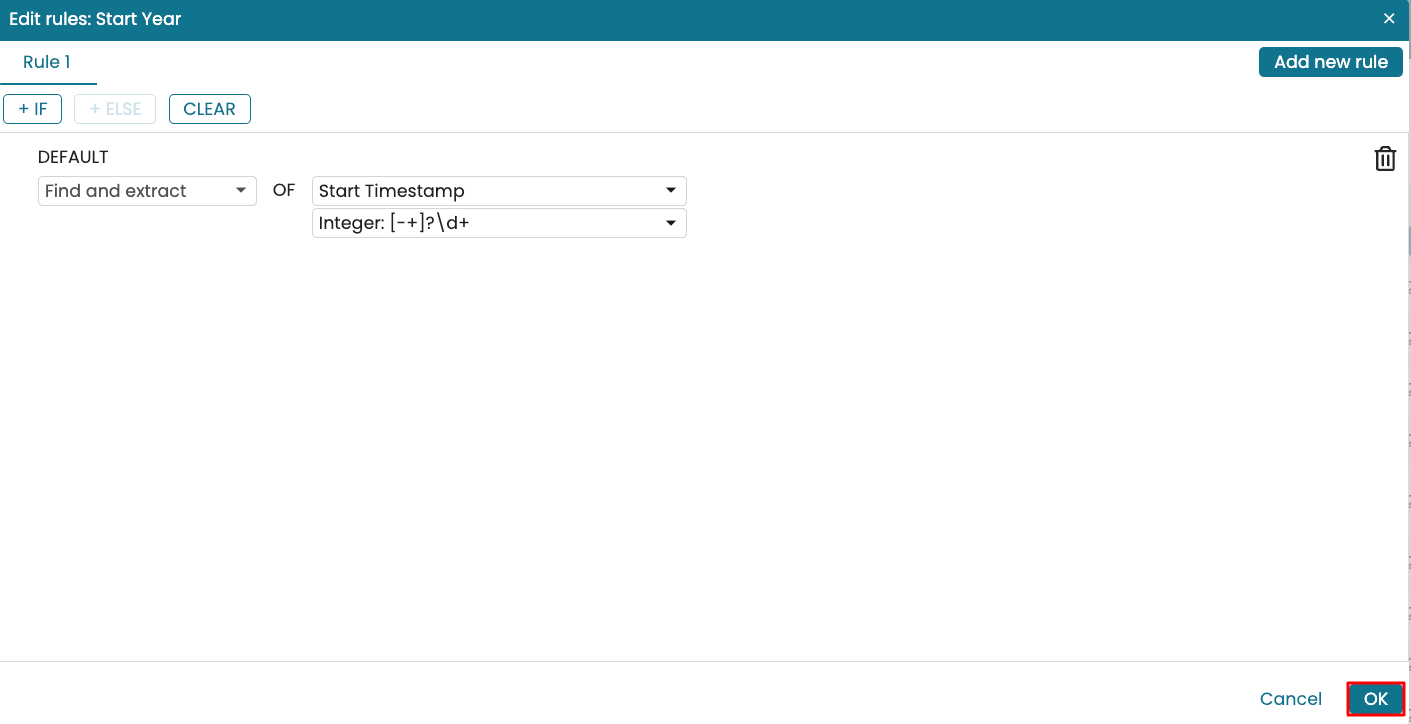
We can simply select the predefined option Integer: [-+]?\d+ to extract the year from a timestamp.
Click OK.
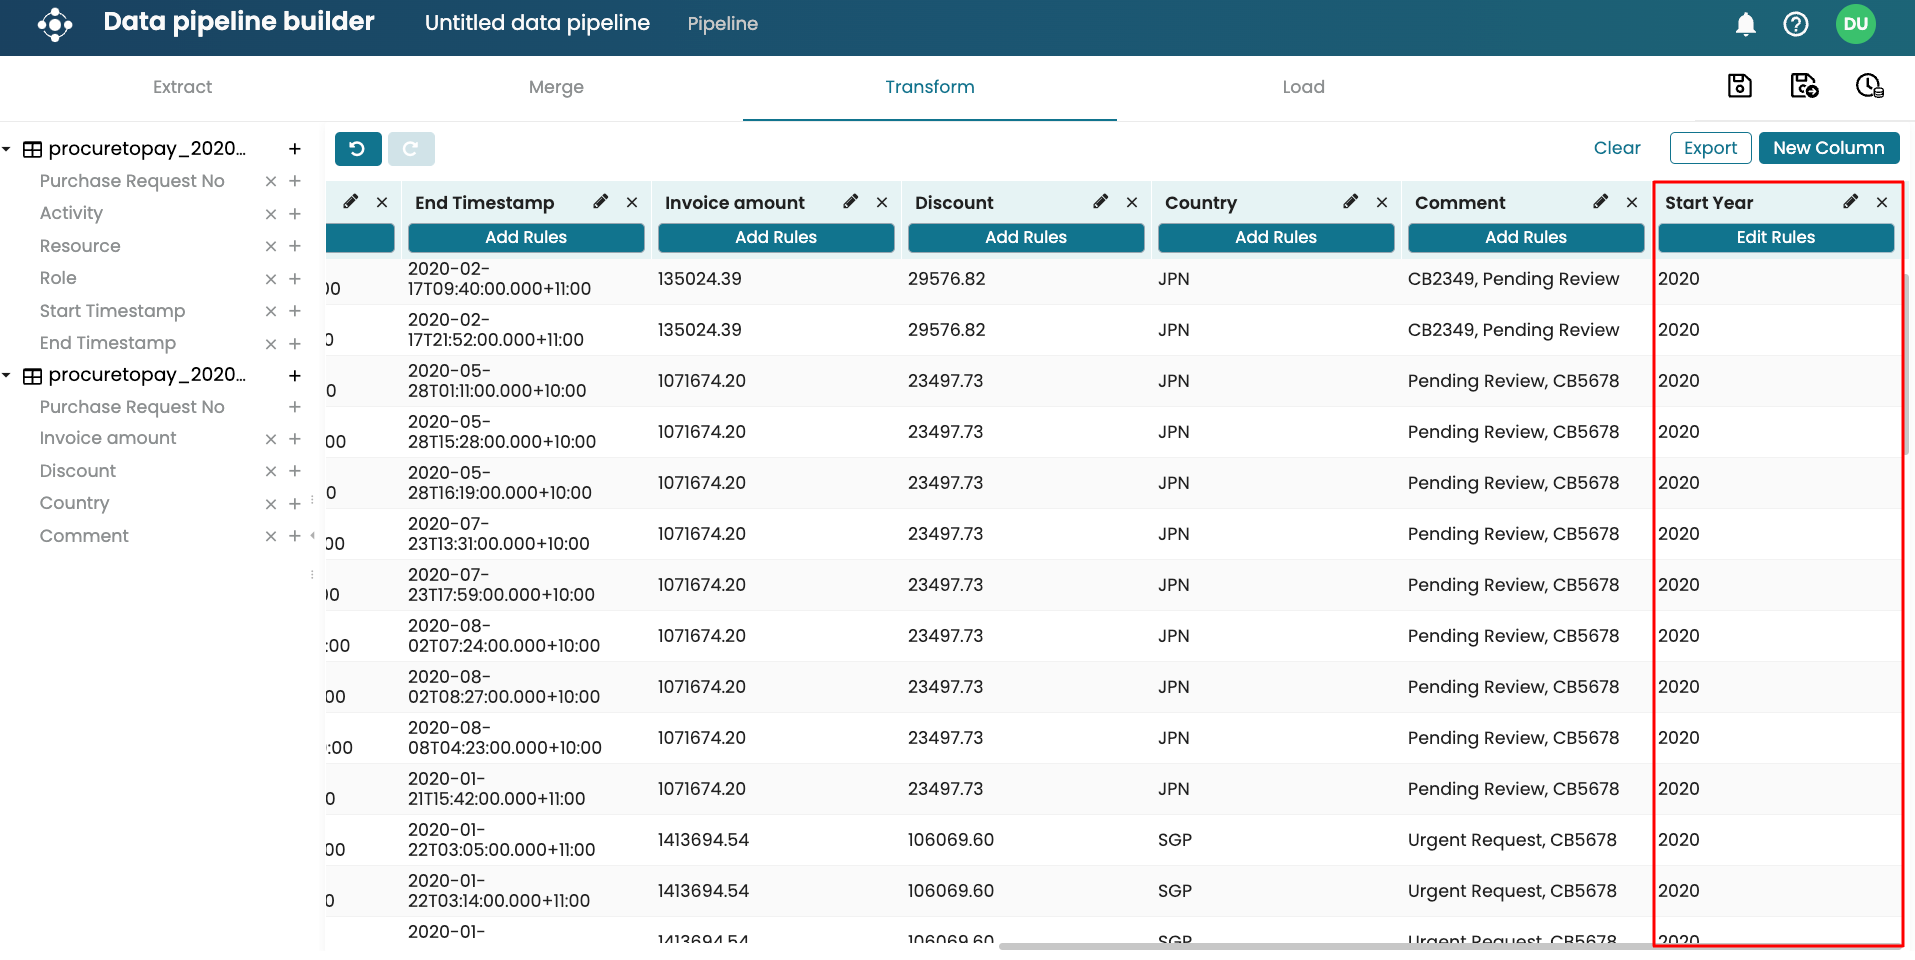
The ‘Start Year’ column is now populated based on the defined regular expression.
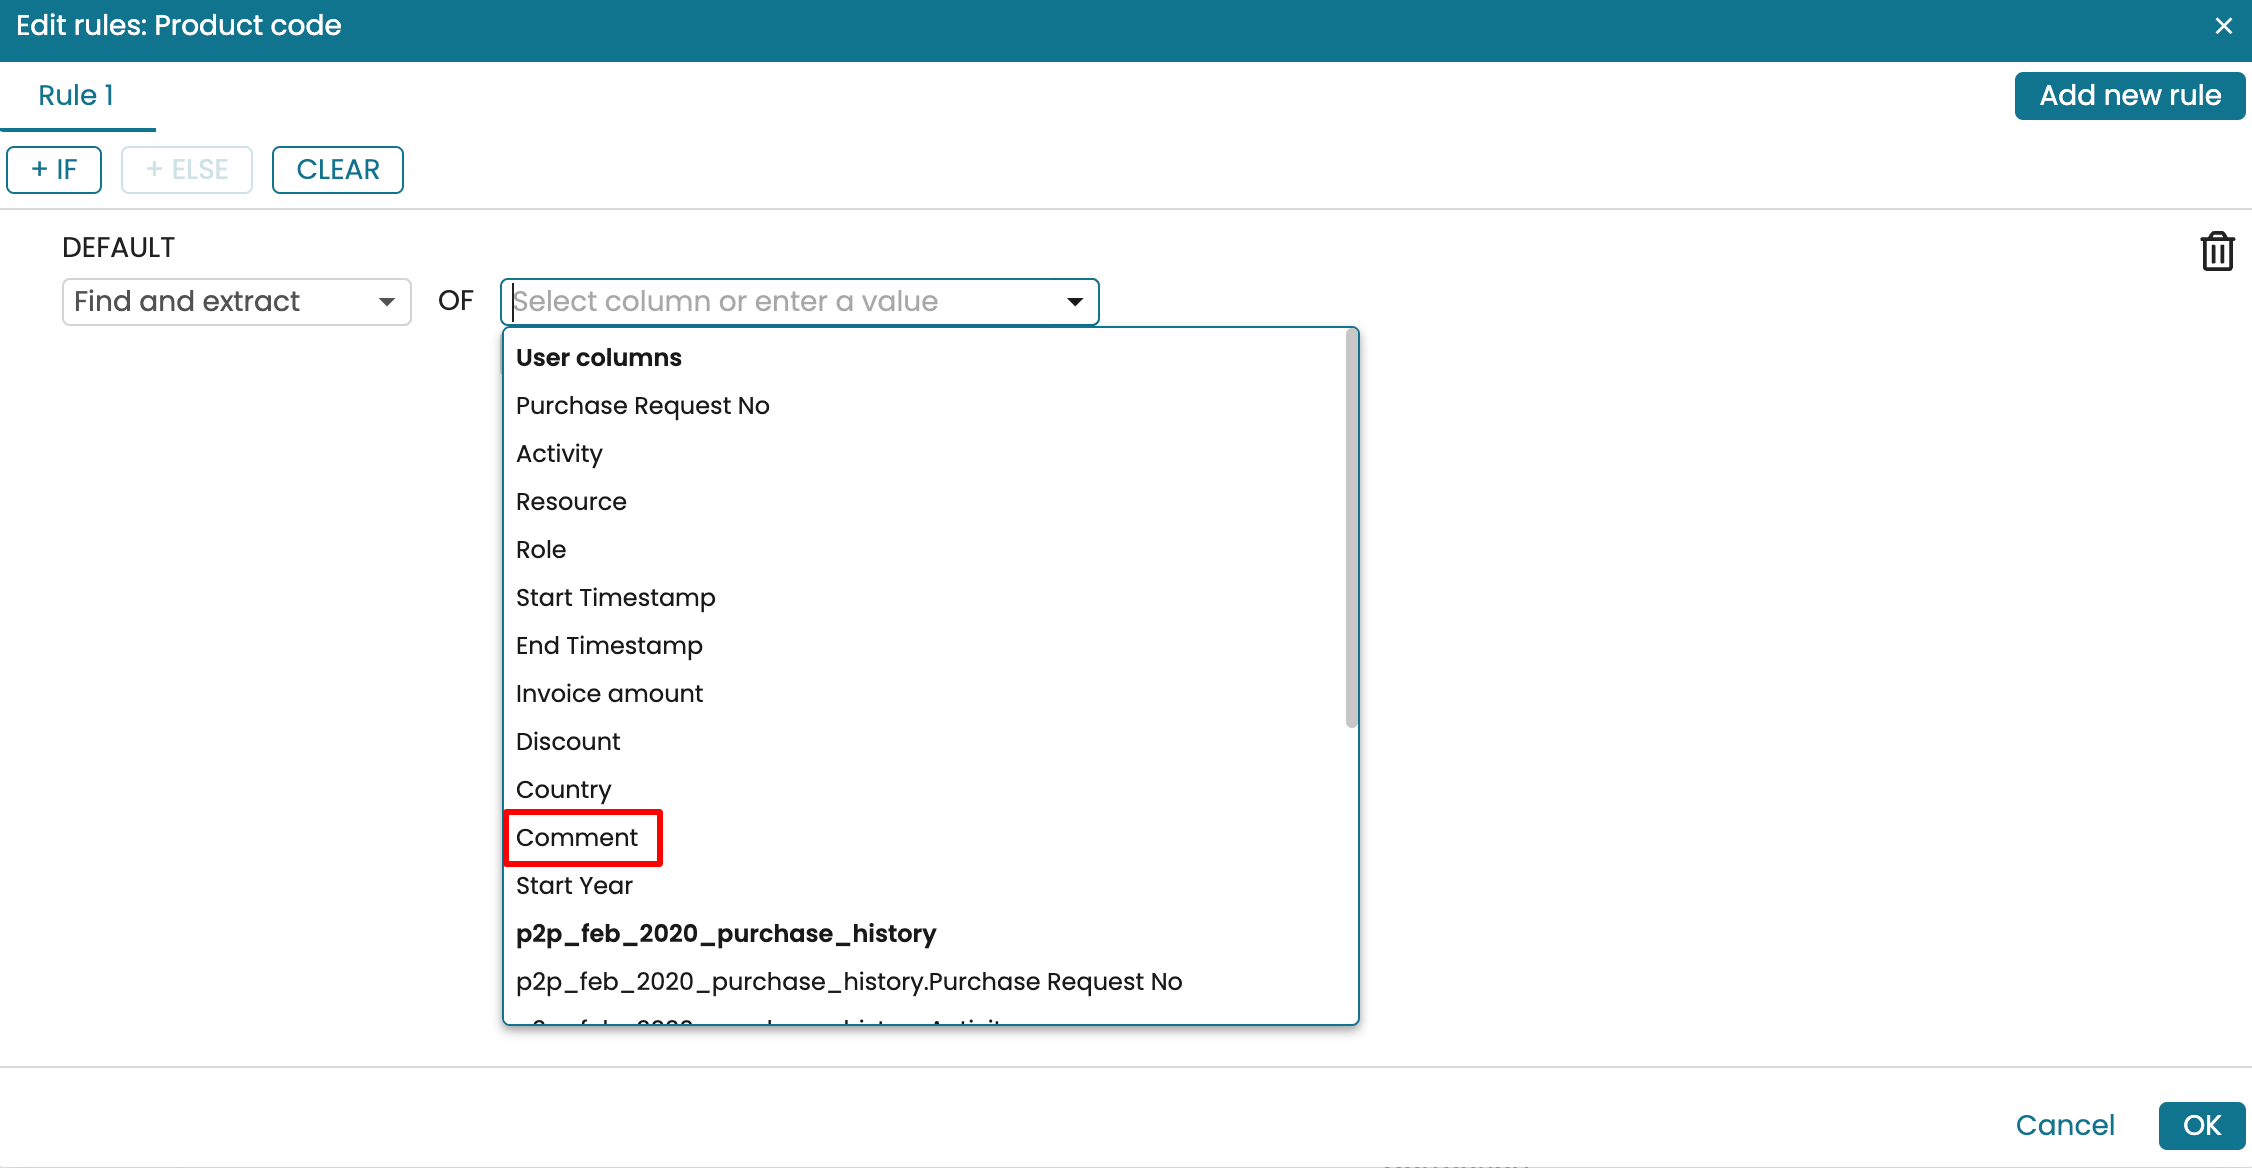
As another example, let’s assume that we have a “Comment” column that contains a product code and procurement status. The product code begins with “CB”. We can find only the product code and extract it into another column. Create a new “Product code” column and add a rule. Select Find and extract as the rule.
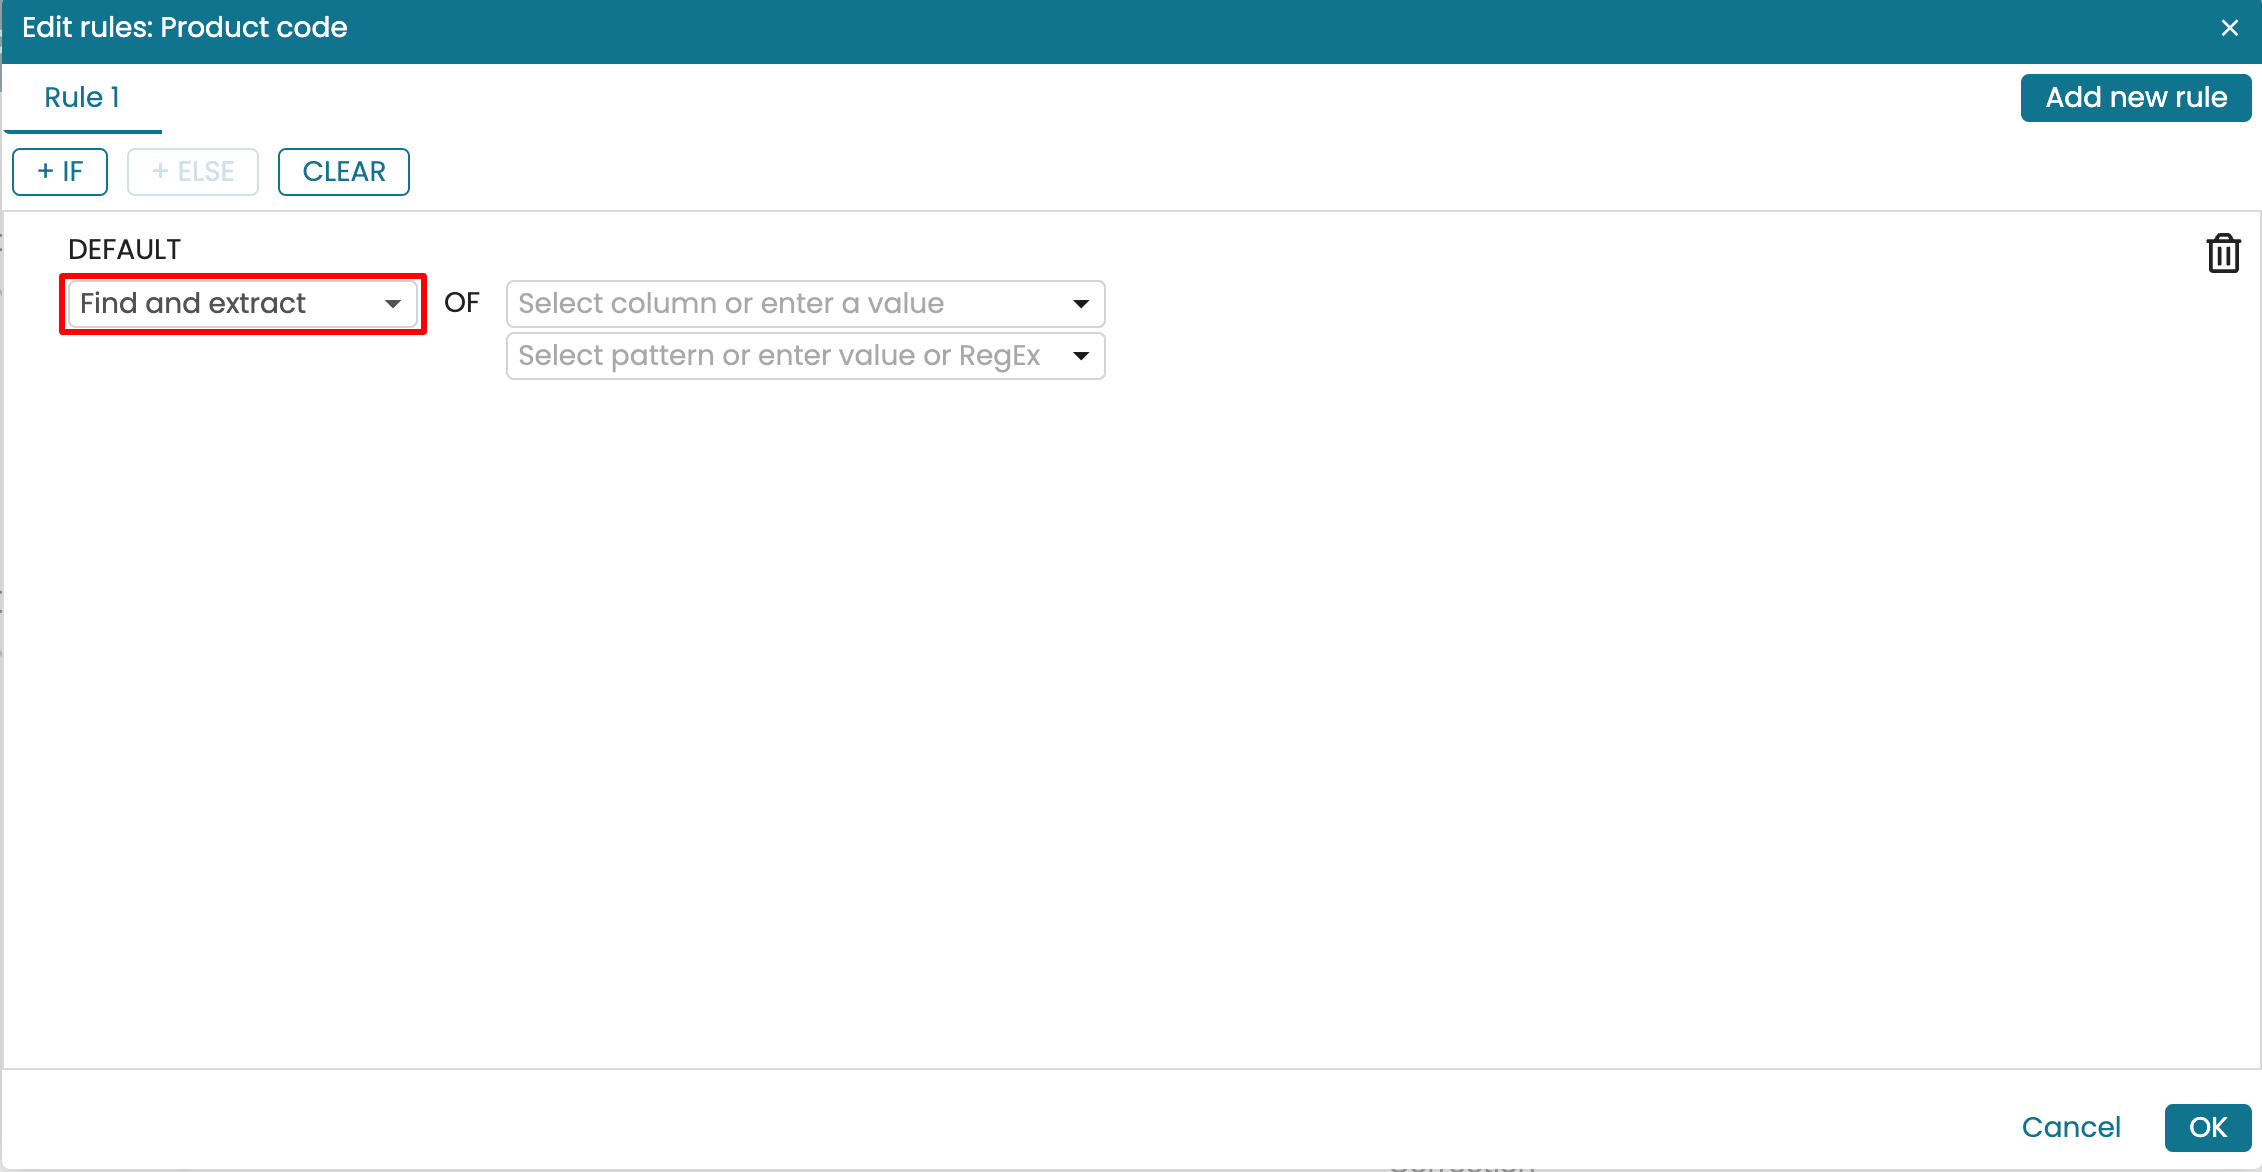
Select the column we wish to extract from. In our case, it is the “Comment” column.
Enter the regular expression that selects a word that begins with CB. The RegEx that does this is (\bCB\d+\b)
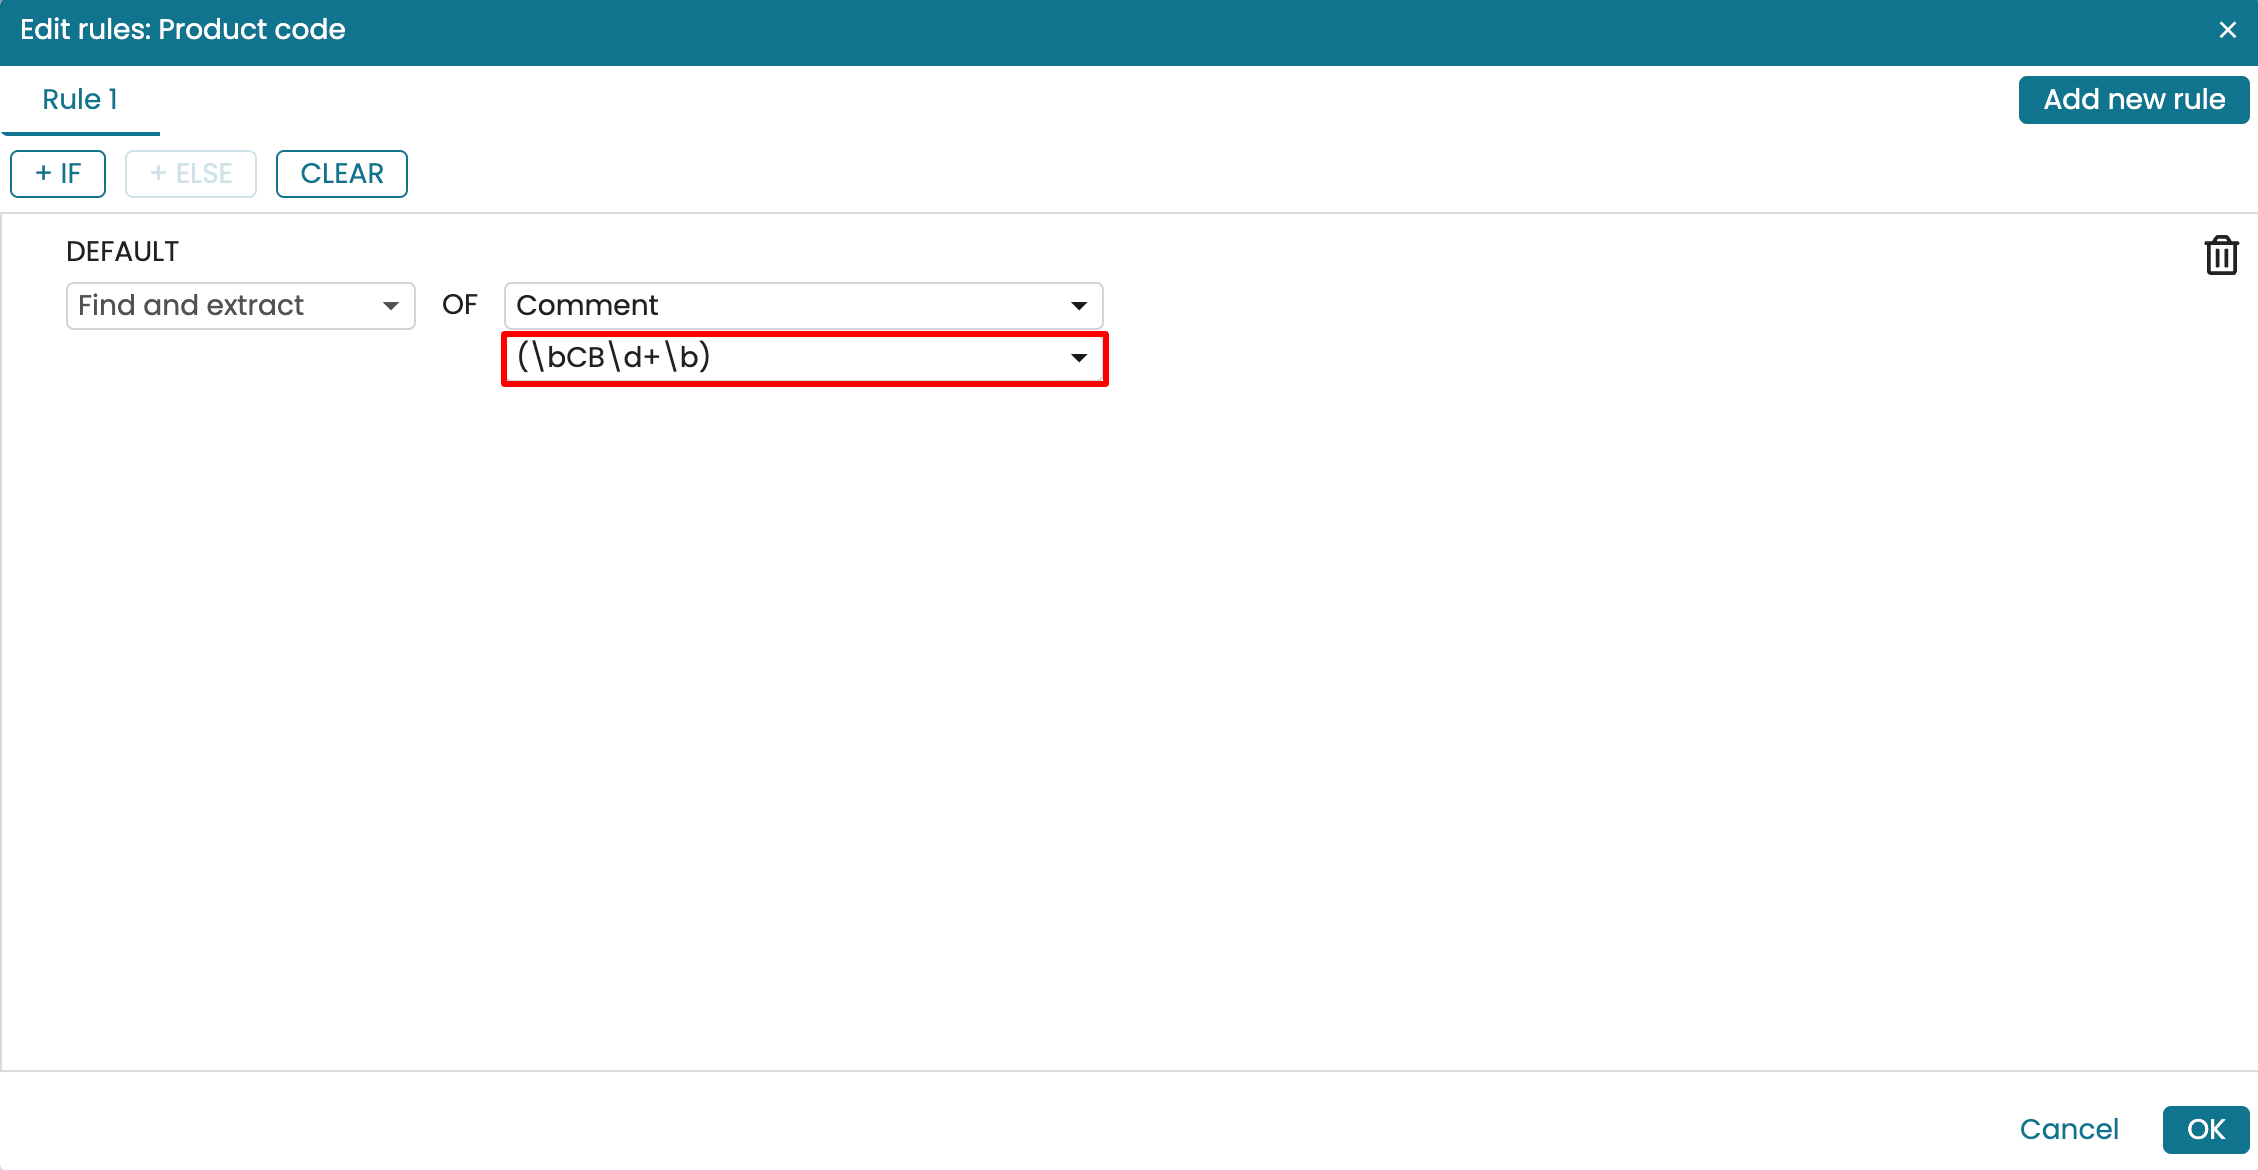
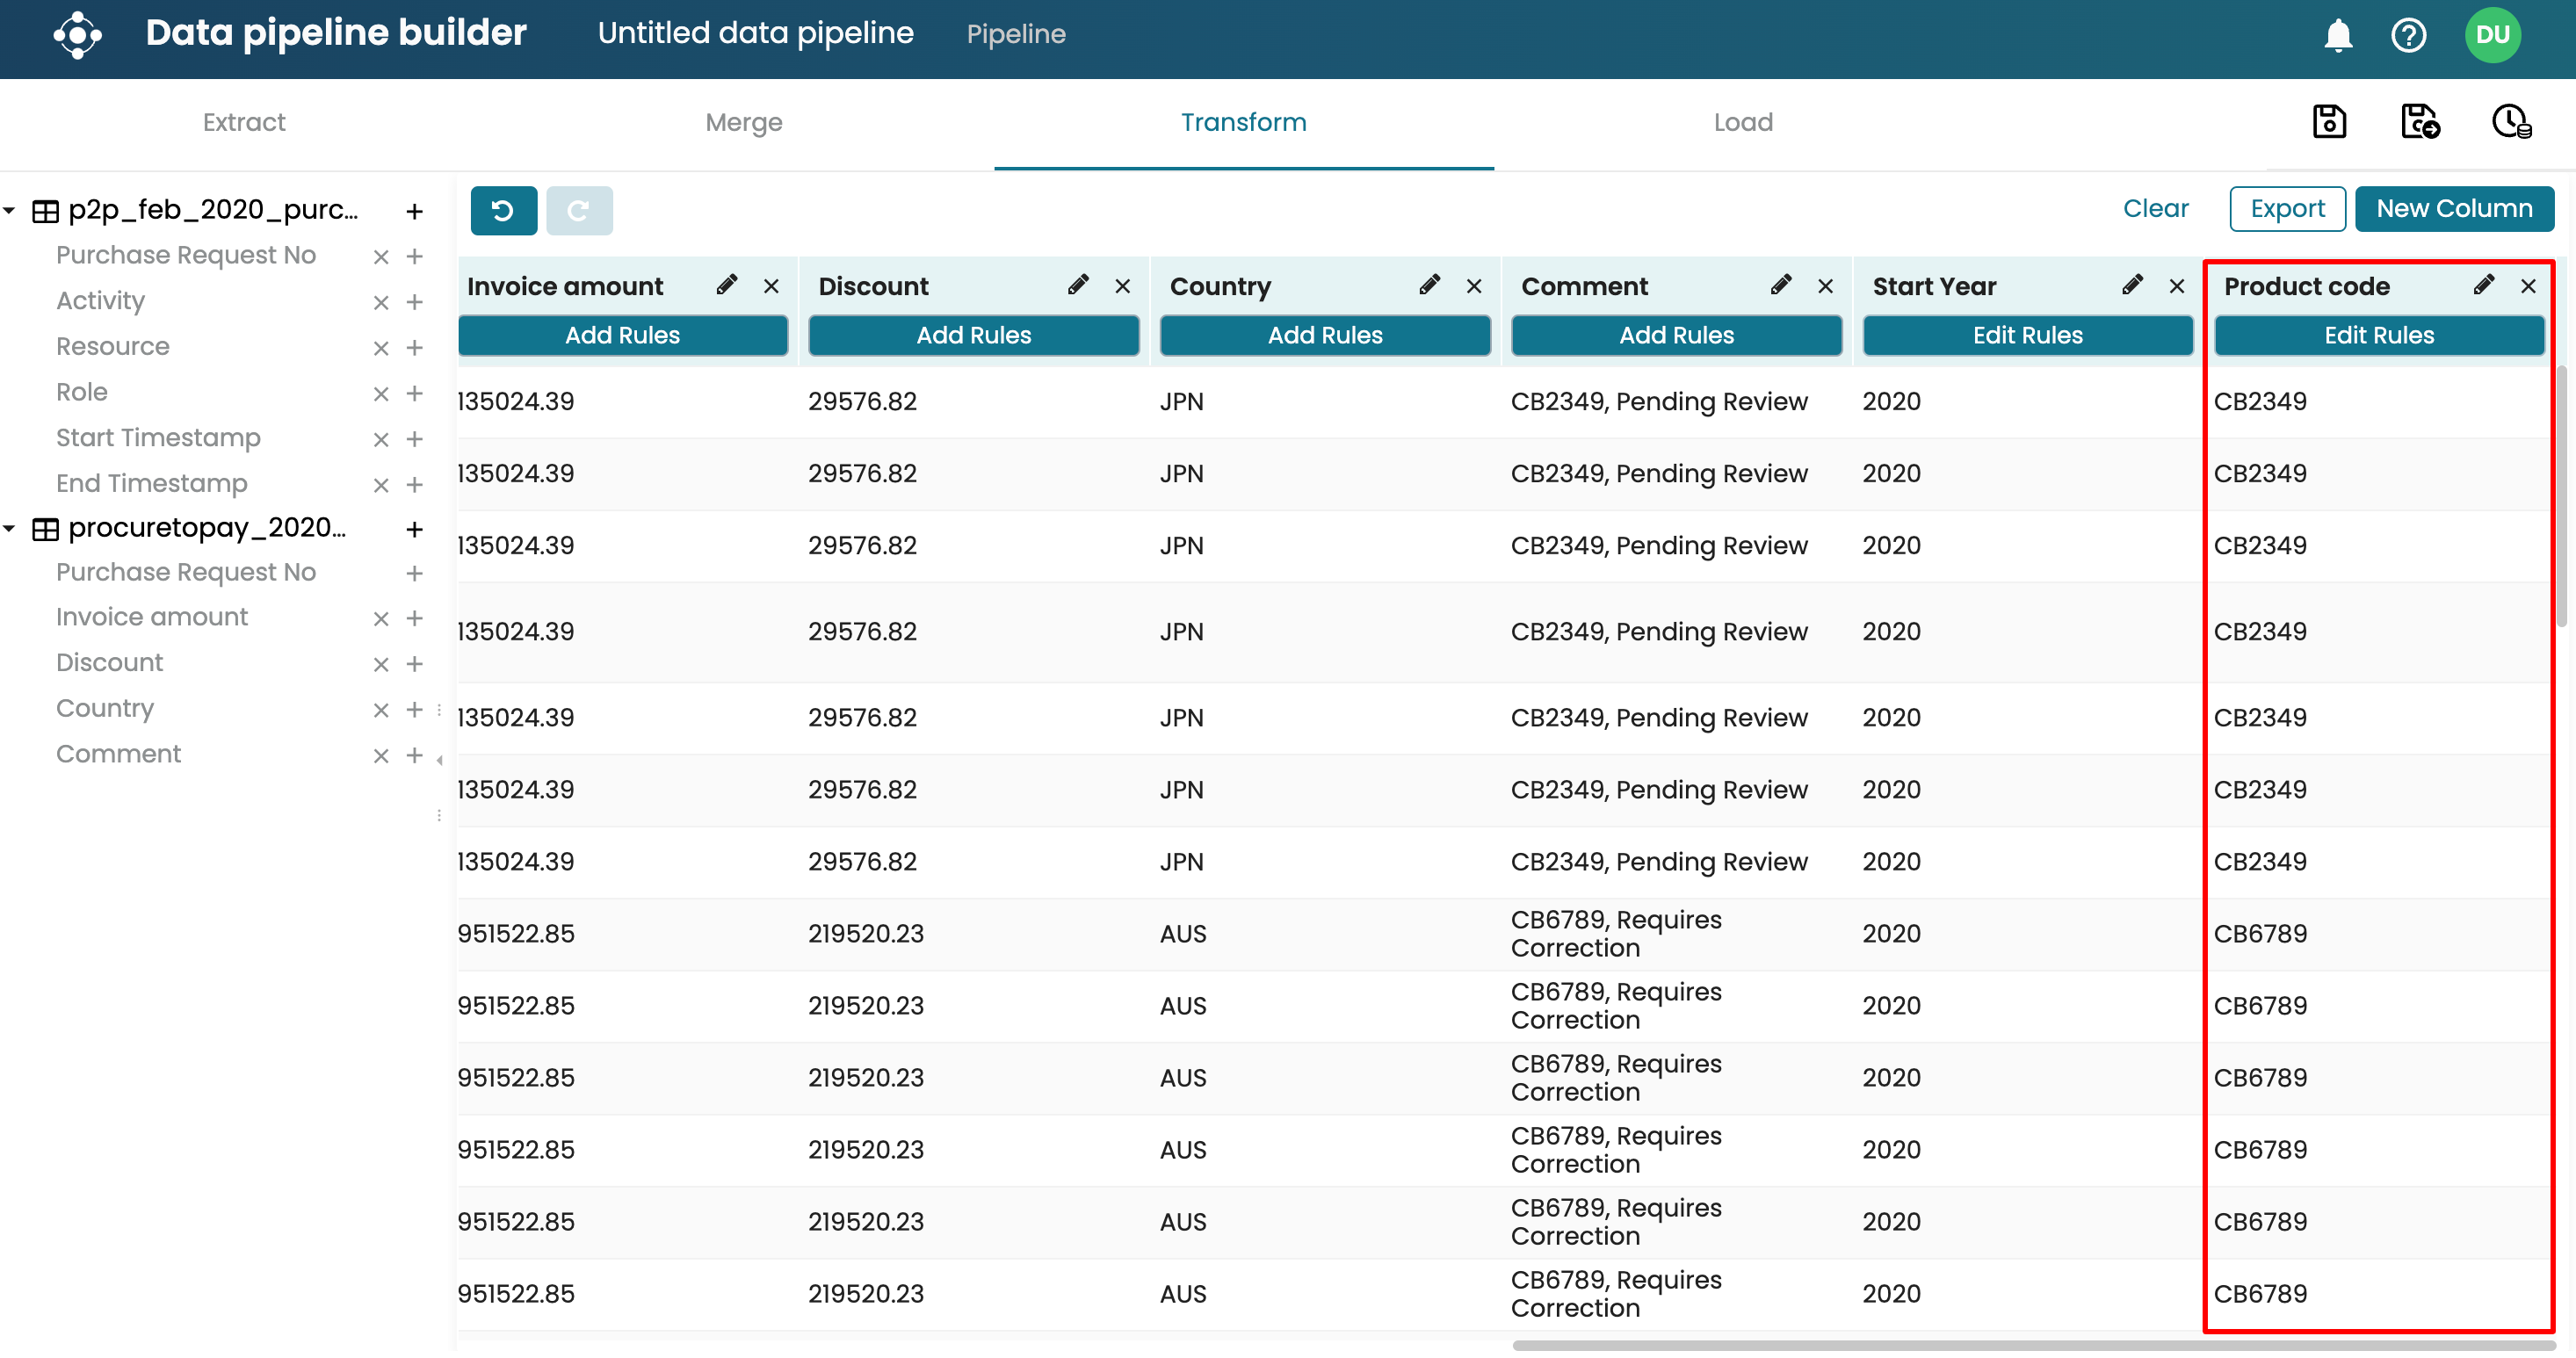
Click OK. We see the “Product code” column populated with only the product codes from the “Comment” column.
Load data
The load view is used to load the transformed data to Apromore workspace. In other words, it saves the transformed data. To load the transformed data, click the Load view. The transformed log is displayed.
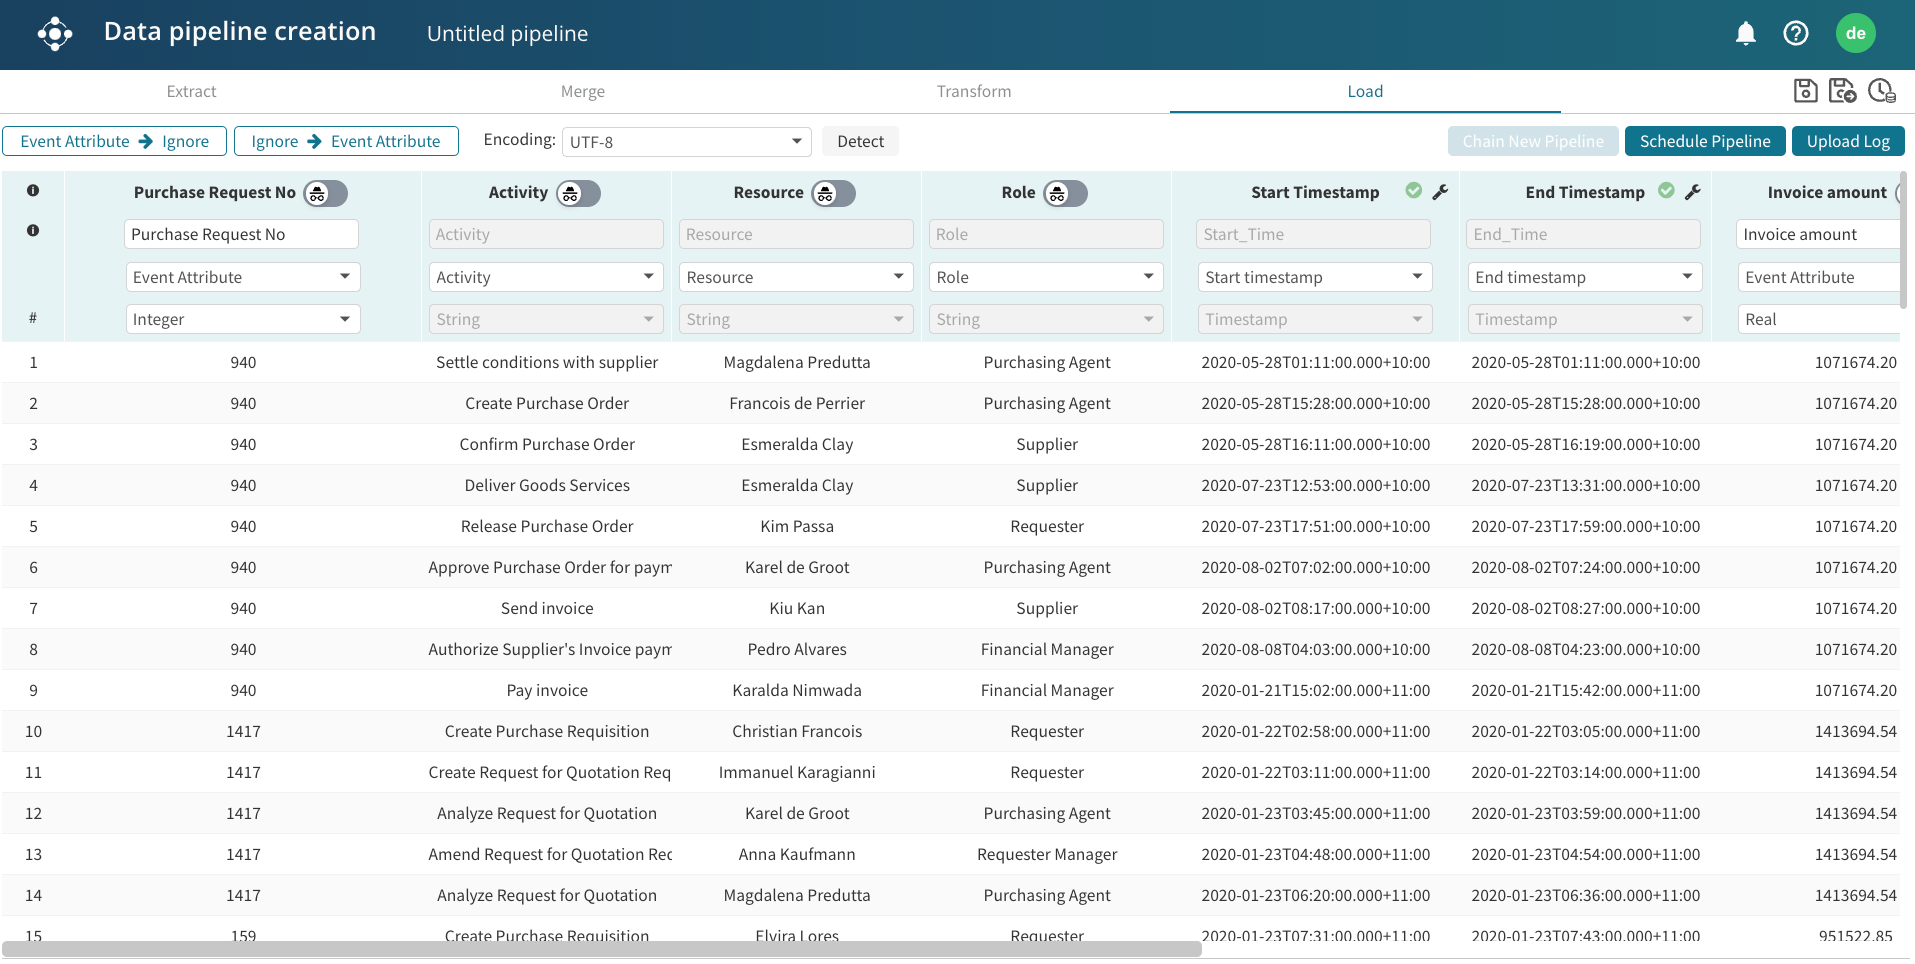
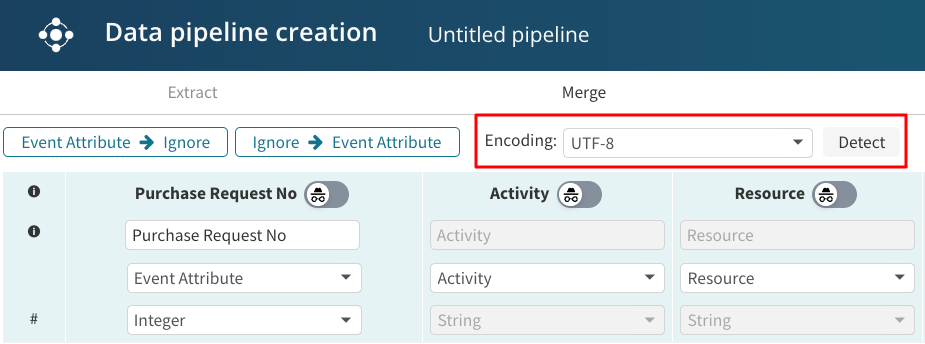
Apromore automatically detect and applies the encoding of the data. To change the encoding, select the Encoding dropdown and click Detect.
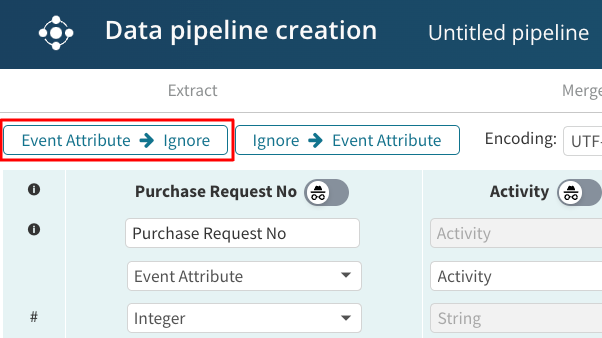
We can decide not to import a column by attaching the Ignore tag to it. To make it easier to ignore multiple selected event attribute columns, click on the Event attribute -> Ignore button at the upper-left corner. From that point on, the selected event attribute columns are tagged as Ignore.
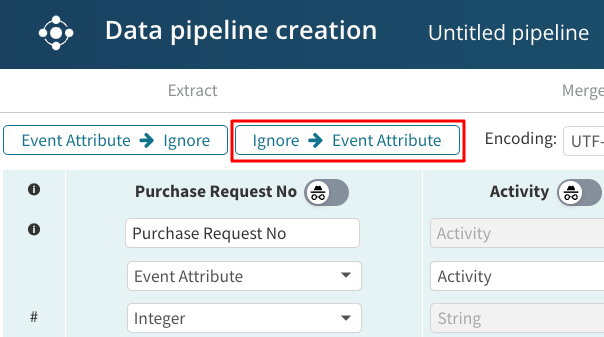
Similarly, if we need to tag multiple columns as Event attribute, we can click on Ignore –> Event Attribute in the upper-left corner next to Event attribute -> Ignore. From that point on, the selected event attribute columns are tagged as Event Attribute.
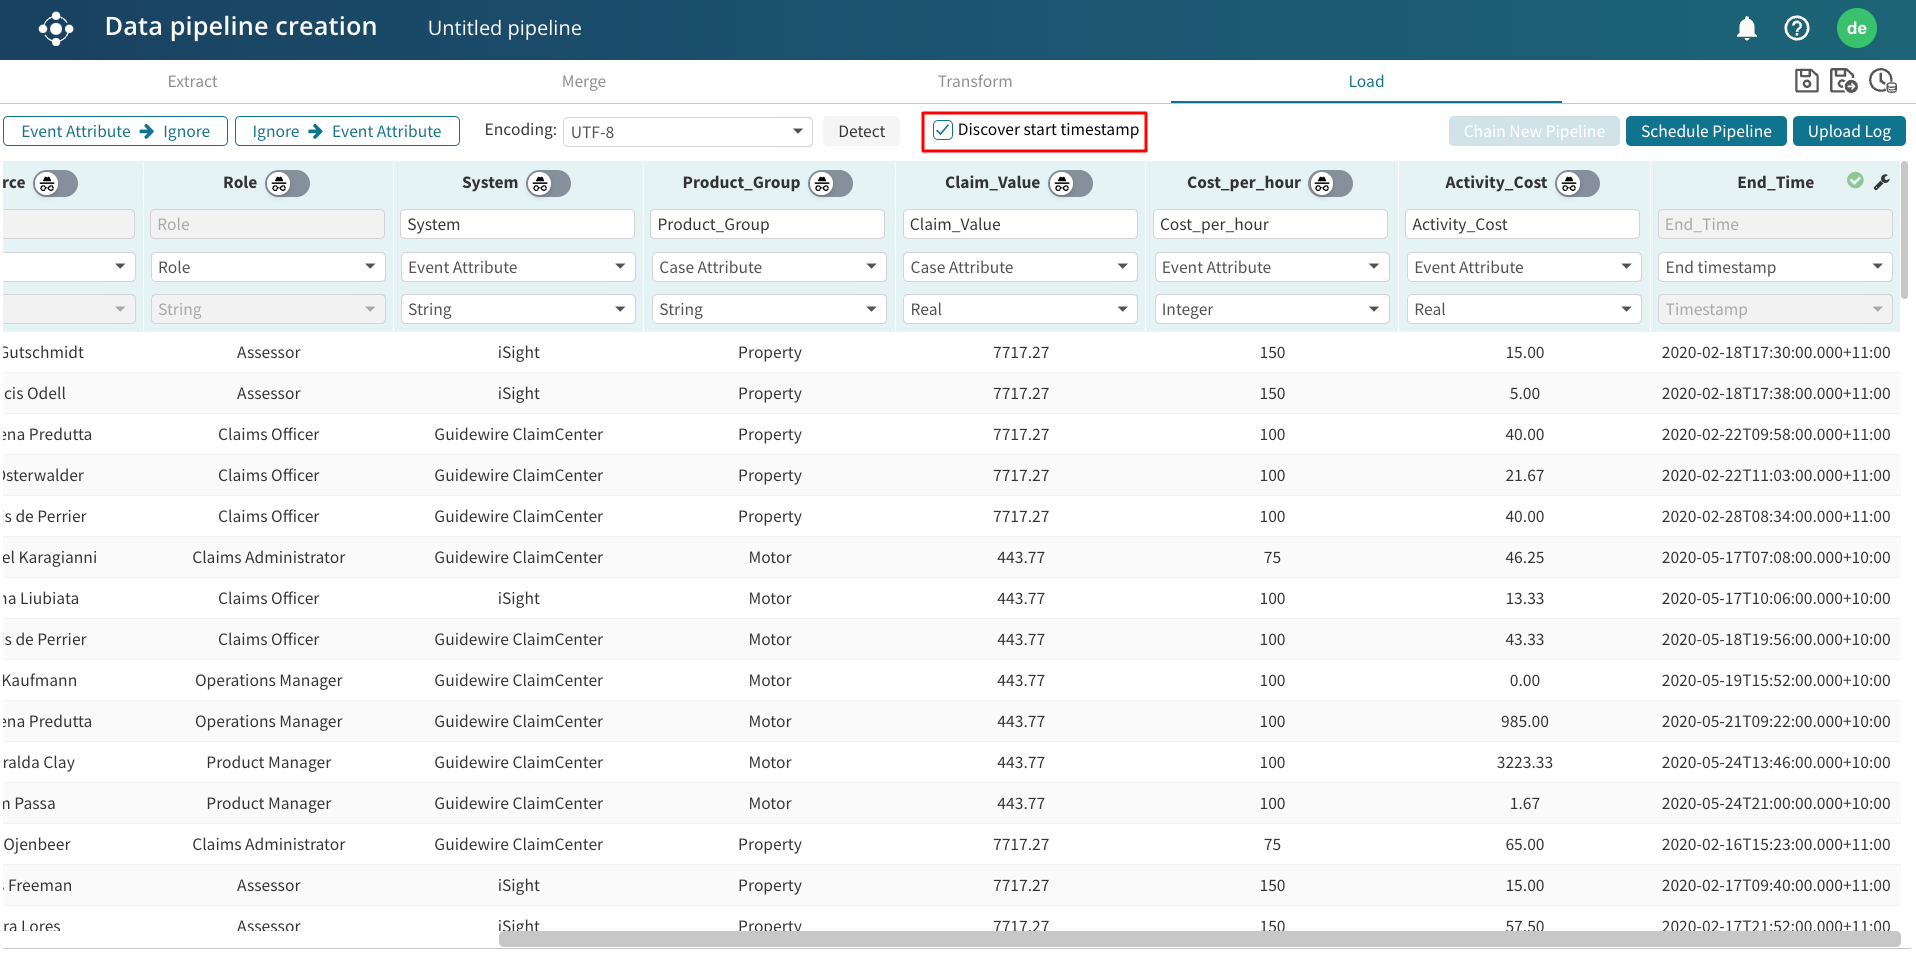
If the data pipeline in the Load step does not have a start timestamp column, we can automatically discover the start timestamps.
To discover the timestamp, tick the Discover start timestamp checkbox.
Note
To automatically discover start timestamps, the log must have a resource column in the Load step.
There are three approaches to loading a data pipeline in Apromore.
Uploading the log.
Scheduling the pipeline.
Chaining the pipeline to another pipeline.
Upload log
We use Upload log when we wish to run the pipeline once and upload the resulting log to our Apromore workspace. To upload the pipeline resulting log, click Upload Log.
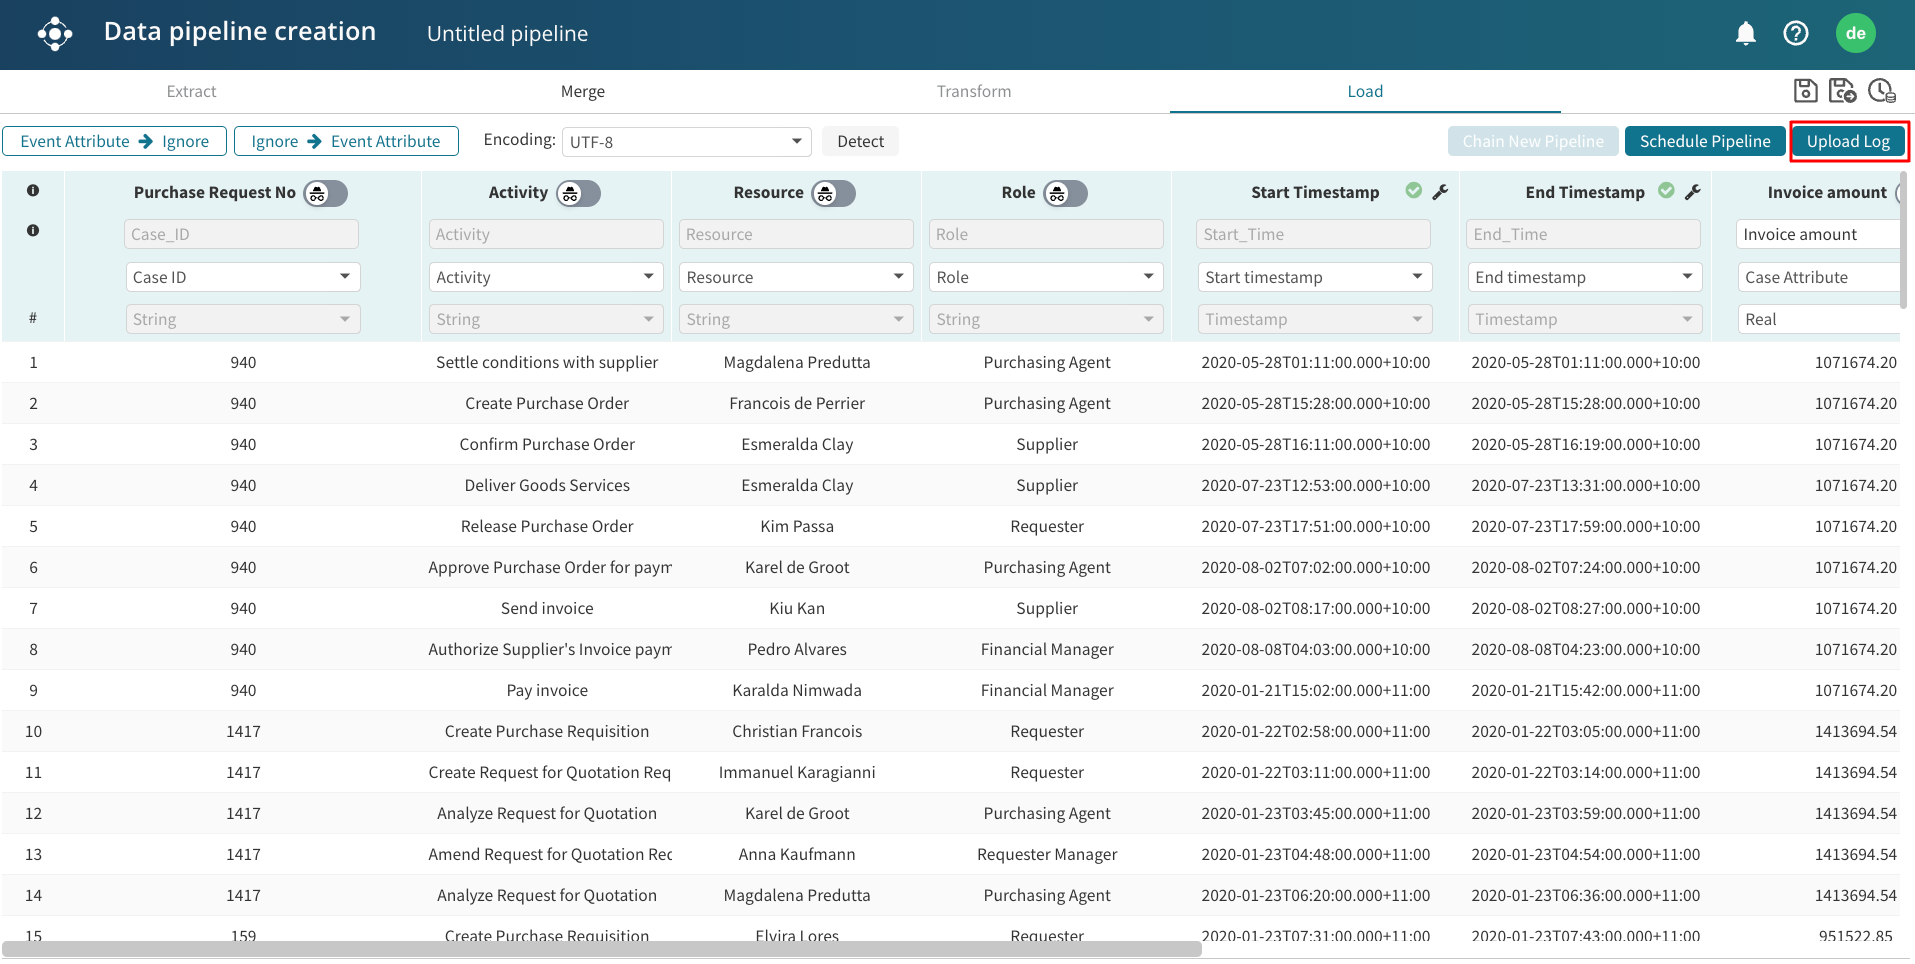
We will be prompted to enter the log name and specify a path where the log will be saved.
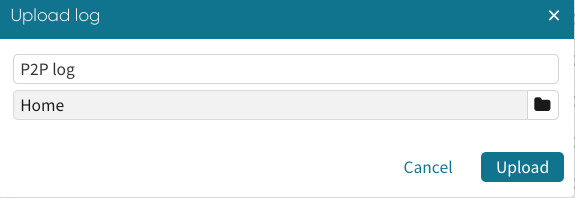
Apromore runs the pipeline, and the log file will be saved to the specified path in our Apromore Workspace.
Schedule pipelines
We use Schedule Pipeline when we wish to run the pipeline at regular intervals and upload the resulting log to our Apromore workspace.
To do this, click Schedule Pipeline.
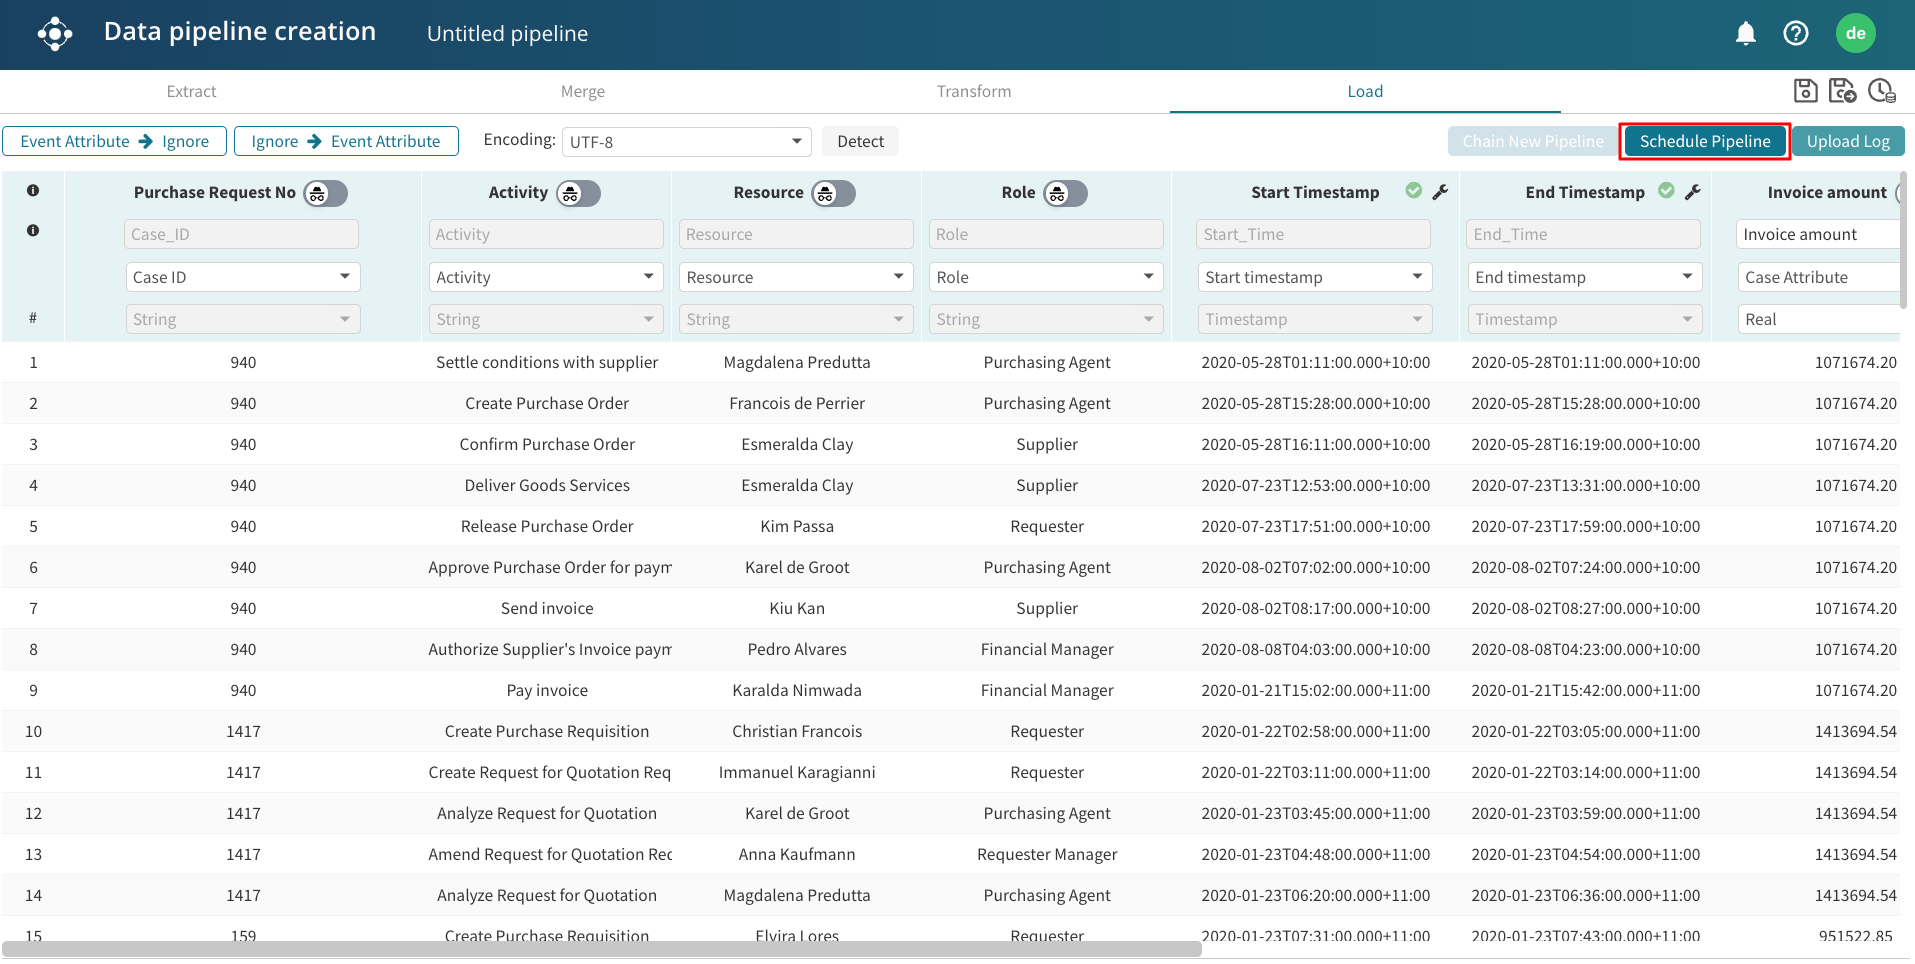
A dialog box appears where we fill the scheduling details.
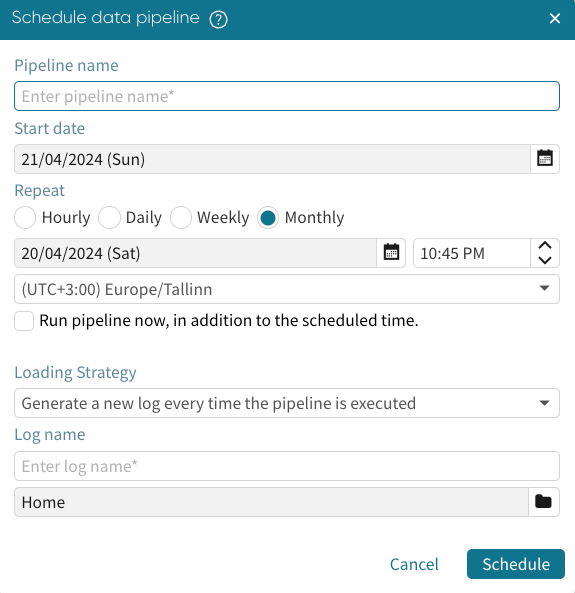
To learn more about scheduling a pipeline, see Schedule data pipeline.
Tip
When scheduling a pipeline with a micro-batched table, the schedule frequency of the pipeline should be consistent with the frequency of arrival of new micro-batches to the S3 folder. For instance, if an external extraction process automatically uploads a micro-batch every hour, we can set the pipeline schedule to run hourly. To learn more about micro-batch ingestion, see Extract micro-batches from an S3 folder.
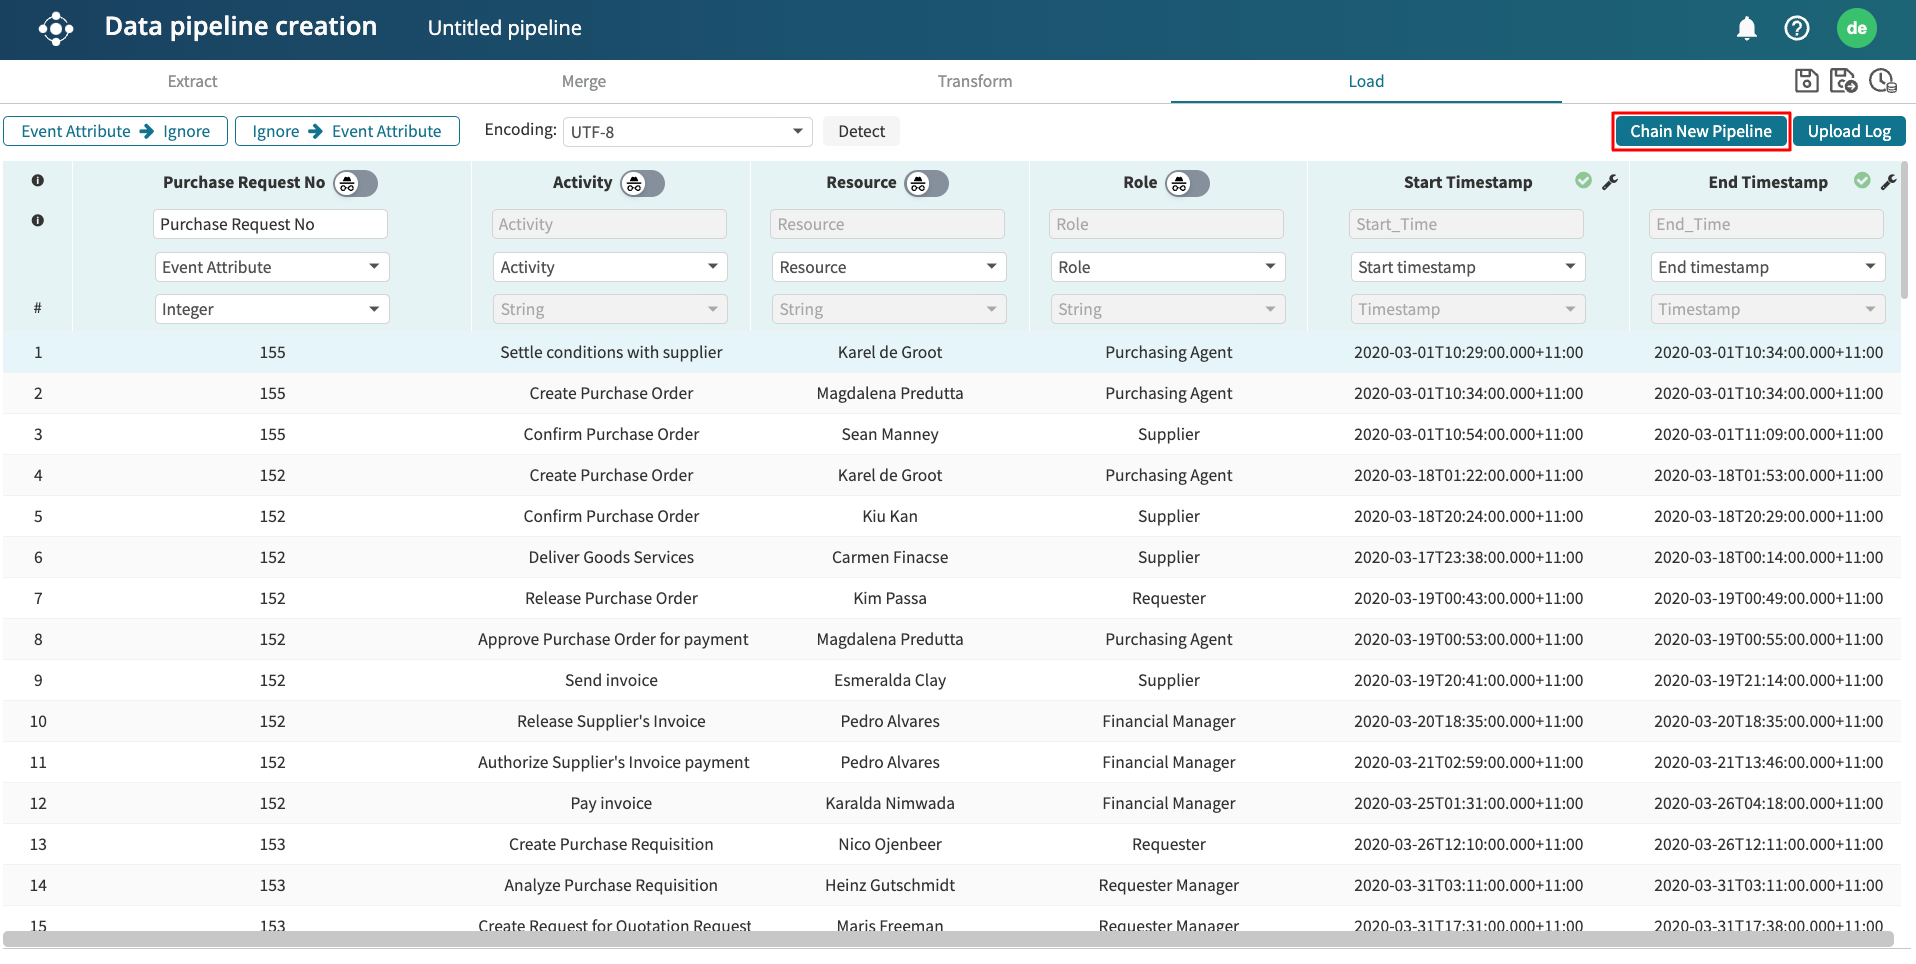
Chaining pipelines
We use Chain New Pipeline when we wish to chain a pipeline component to another data pipeline. This means that the output of the current pipeline component will be given as one of the inputs to another pipeline, allowing us to define our pipelines modularly. For example, a pipeline component that appends the history tables of a procure-to-pay process can be chained to a pipeline that joins the history table to a header table from a legacy system
To chain a pipeline component to another ETL pipeline, click Chain New Pipeline.
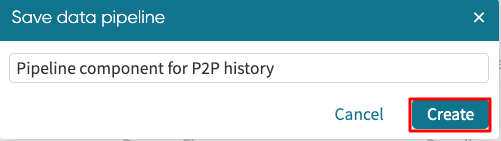
The Save data pipeline window appears. Enter a name for the pipeline component. Click Create.
This saves the pipeline component and returns its output in the Extract view of the new ETL pipeline. We can then create a new pipeline using the pipeline component as one of the extracted data.
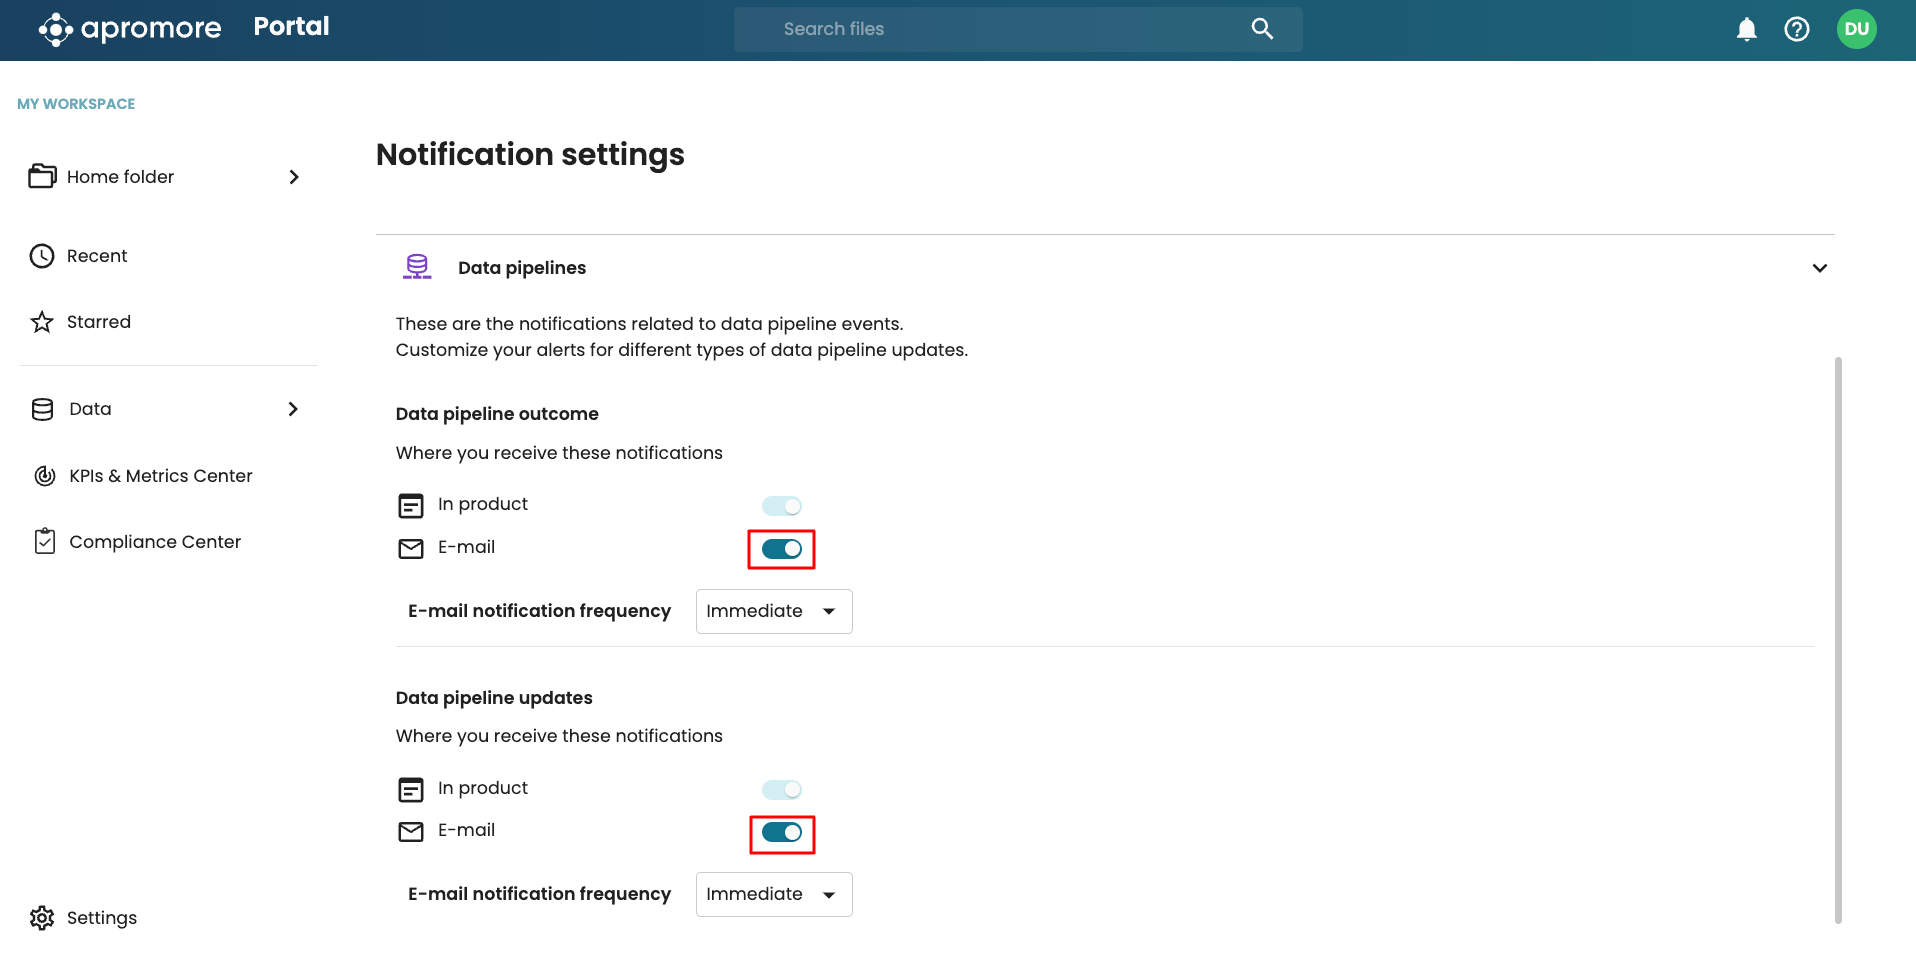
To enable us to get real-time alerts to data pipelines, we receive notifications on the status of pipeline runs. We get a notification when a pipeline run is successful or fails. In addition, when a pipeline is updated and the schema changes, owners and editors will be notified.
We can subscribe to email notifications for pipeline runs. Go to Notification settings, click Data pipelines, and toggle on the notification of interest.
Note
Please contact your account executive to enable email notifications for Data pipelines.