Types of filter criteria
Apromore allows us to apply various filters to slice and dice an event log in different ways and focus on the filtering results. For example, we can use it to segregate specific process cases that fulfill certain conditions, e.g., all cases that transit via a particular activity, or segregate two variants of the same process, e.g., the first variant containing slow cases and the second one containing fast cases.
We can perform log filtering from various places:
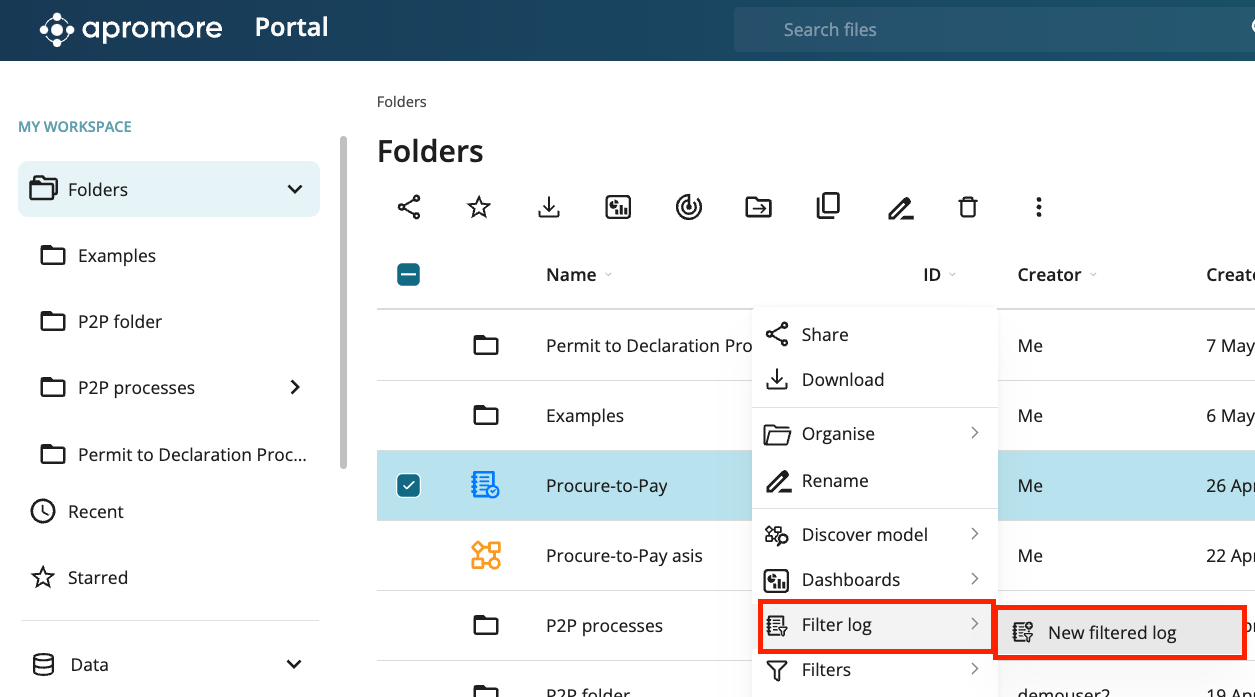
From Portal: In the Portal, right-click an event log and click on Filter log > New filtered log.
From Process Discoverer: In Process Discoverer, click the Filter icon
 from the top toolbar.

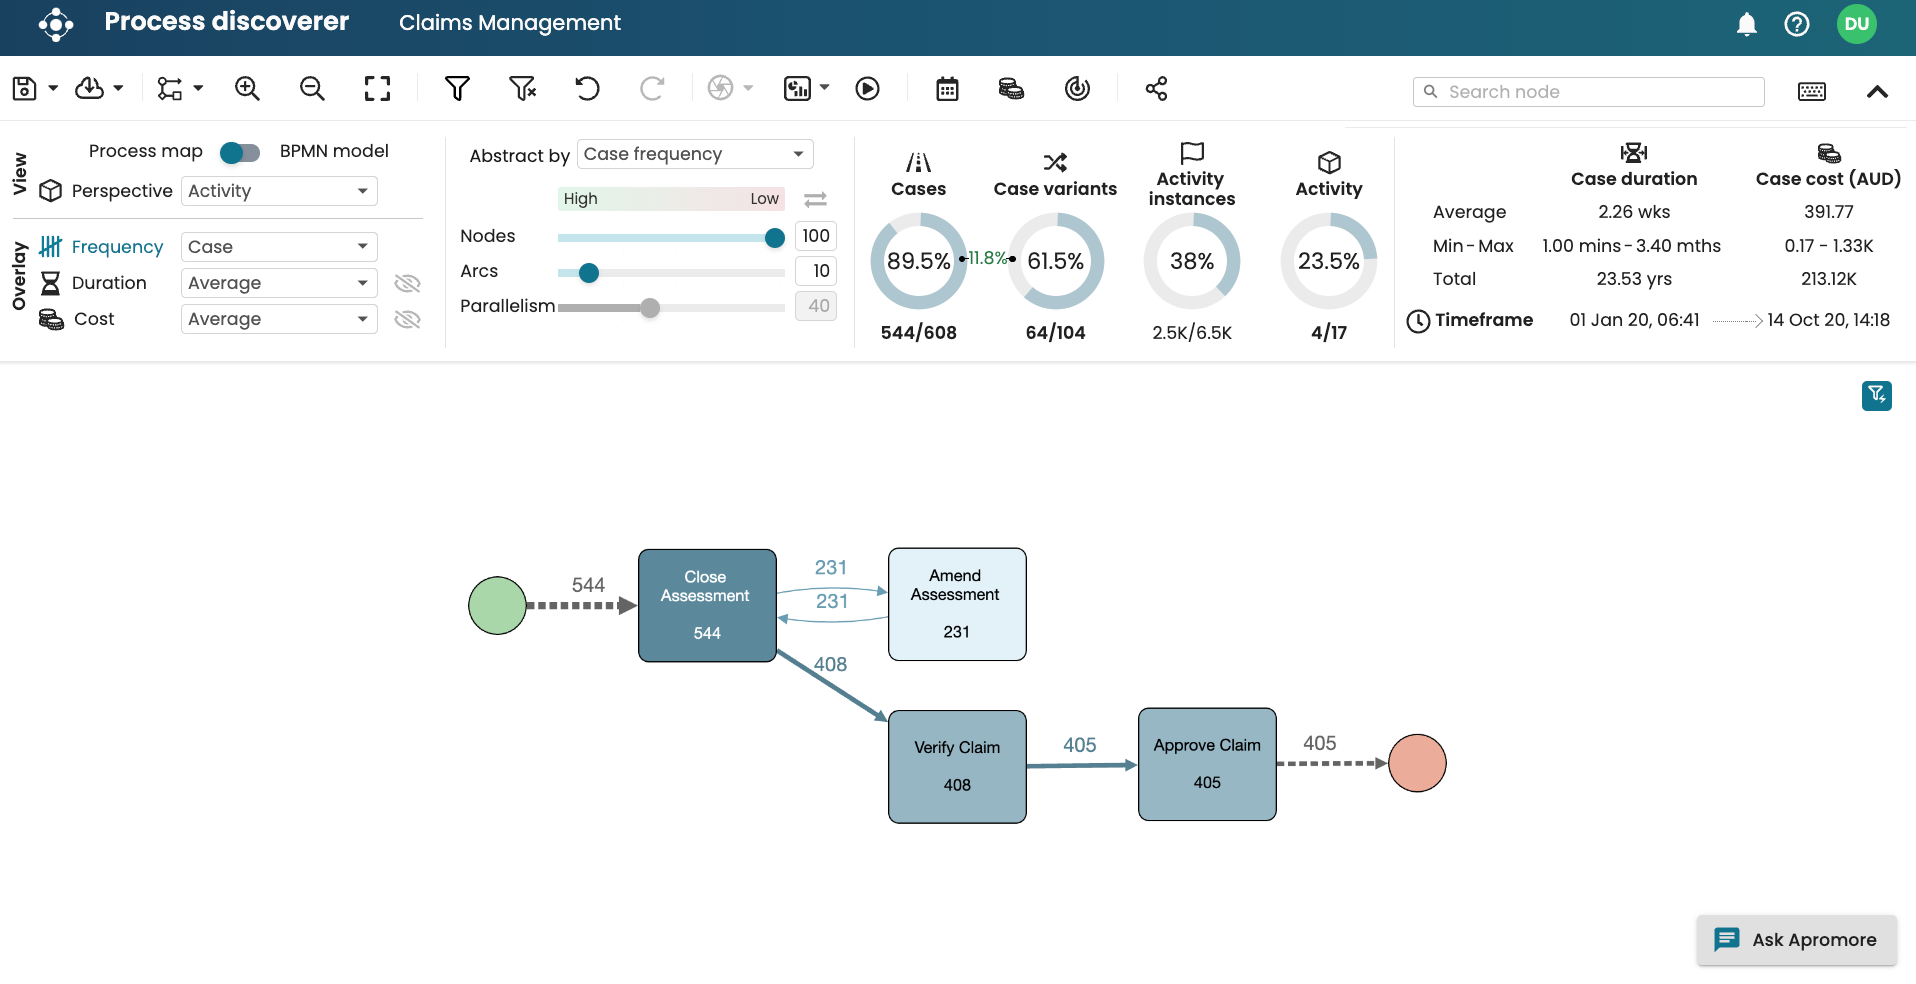
After applying the filter, the Process Discoverer will display the statistics for the filtered log.
From a Dashboard: In the Performance Dashboard, click the “Filter” icon
on the top-right corner and select the log to apply the filter.
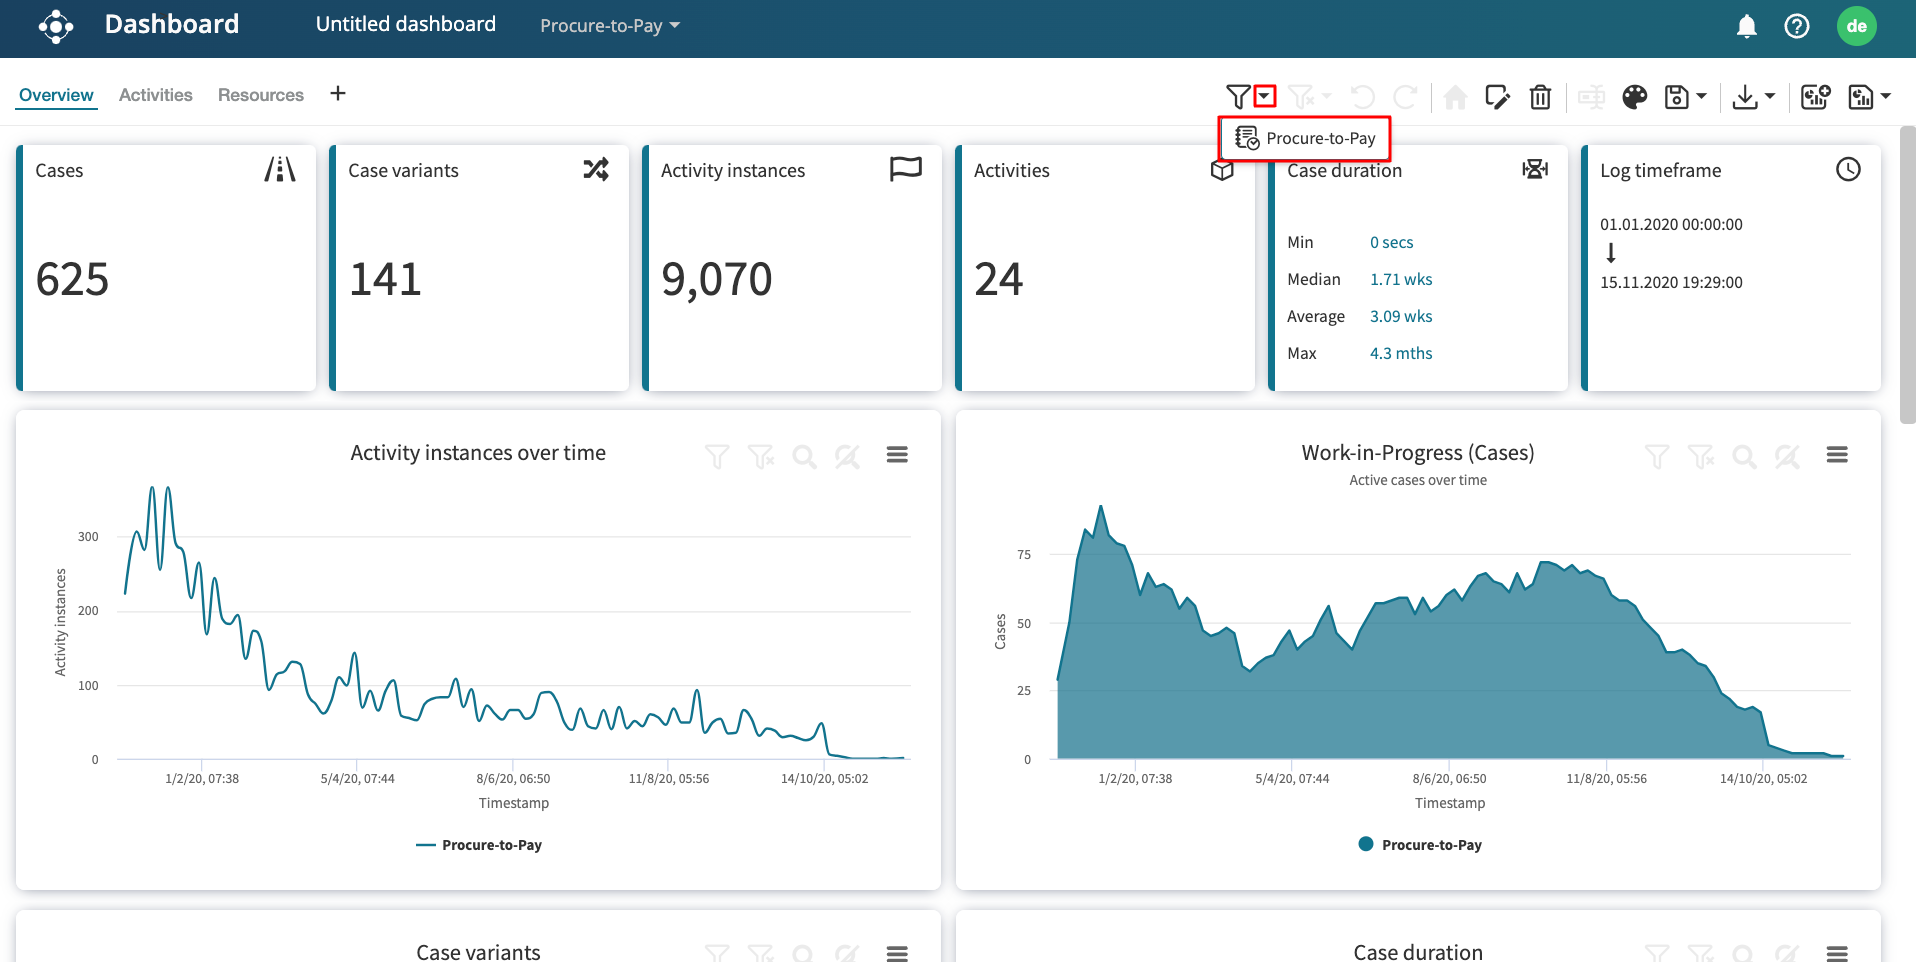
After applying the filter, the Dashboard will display statistics of the filter log.
When creating a chart, table, gauge or tile: In the Custom View of the Performance Dashboard, select Advanced and the “Filter log” icon from the Slicing and filtering section.
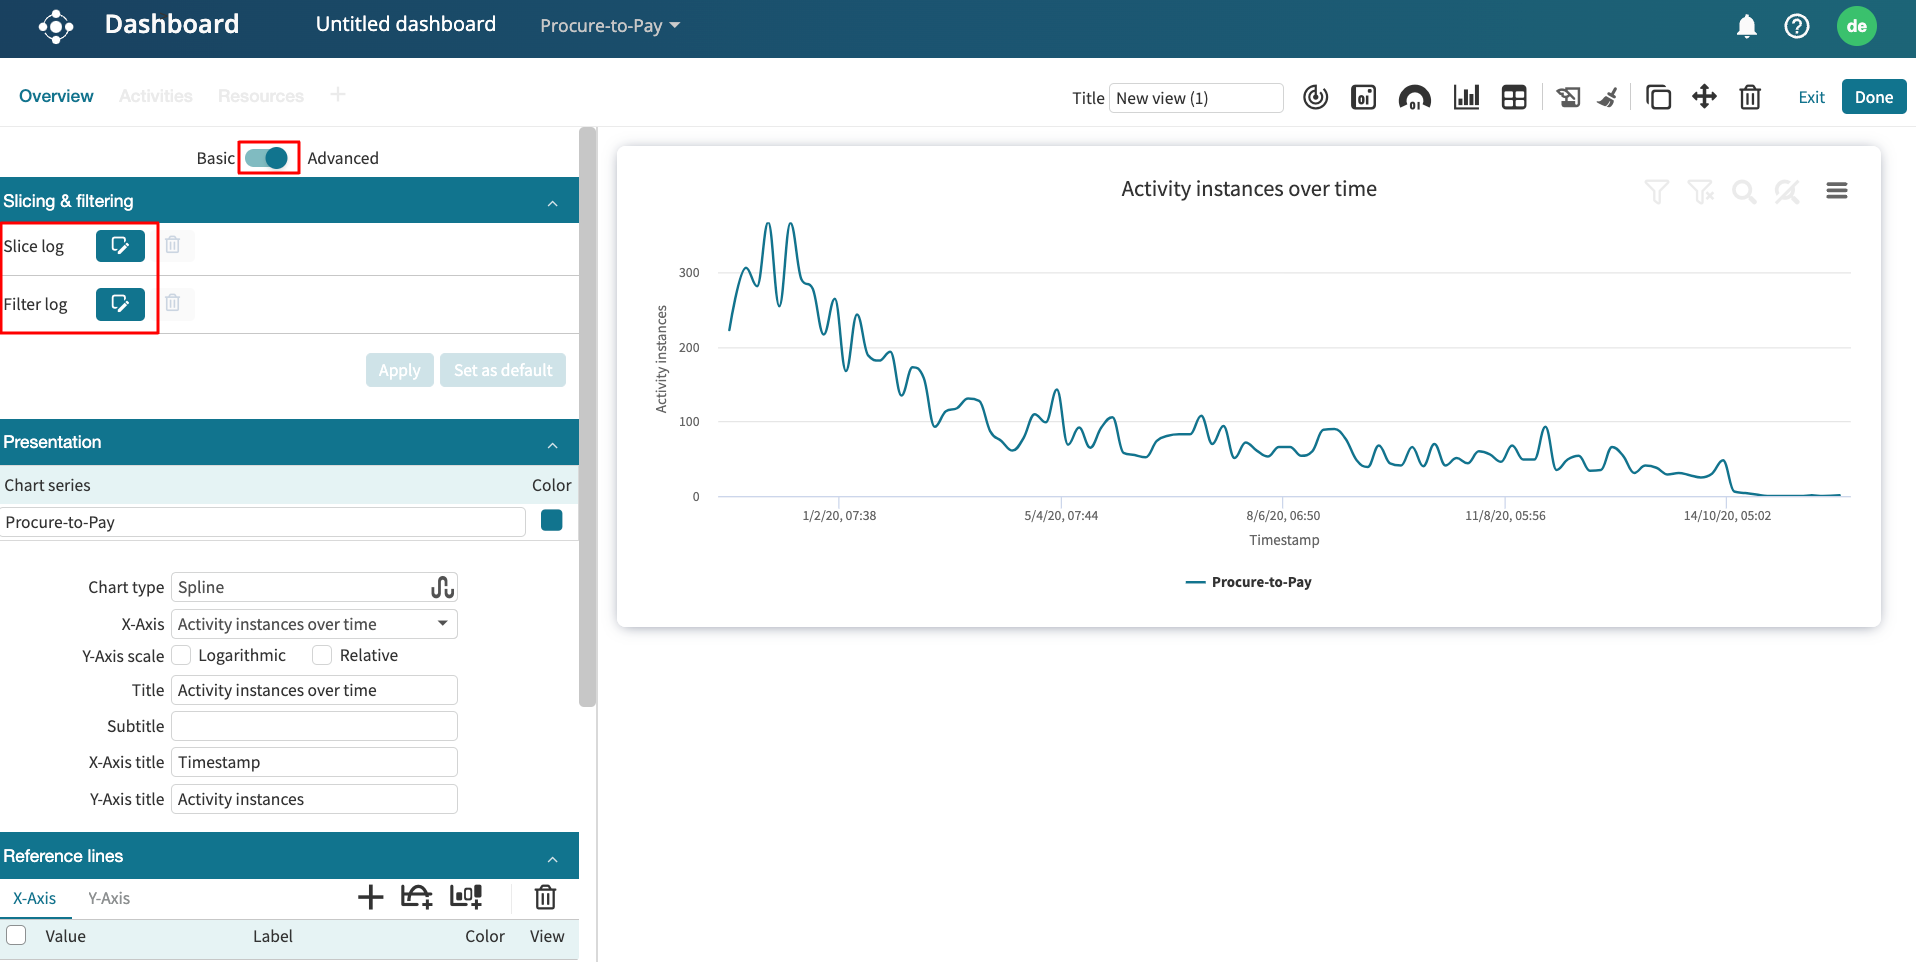
After applying the filter, the chart, table, gauge, or tile being visualized displays the statistics of the filtered log.
Irrespective of where we invoke the filter from, the Filter log window pops up.
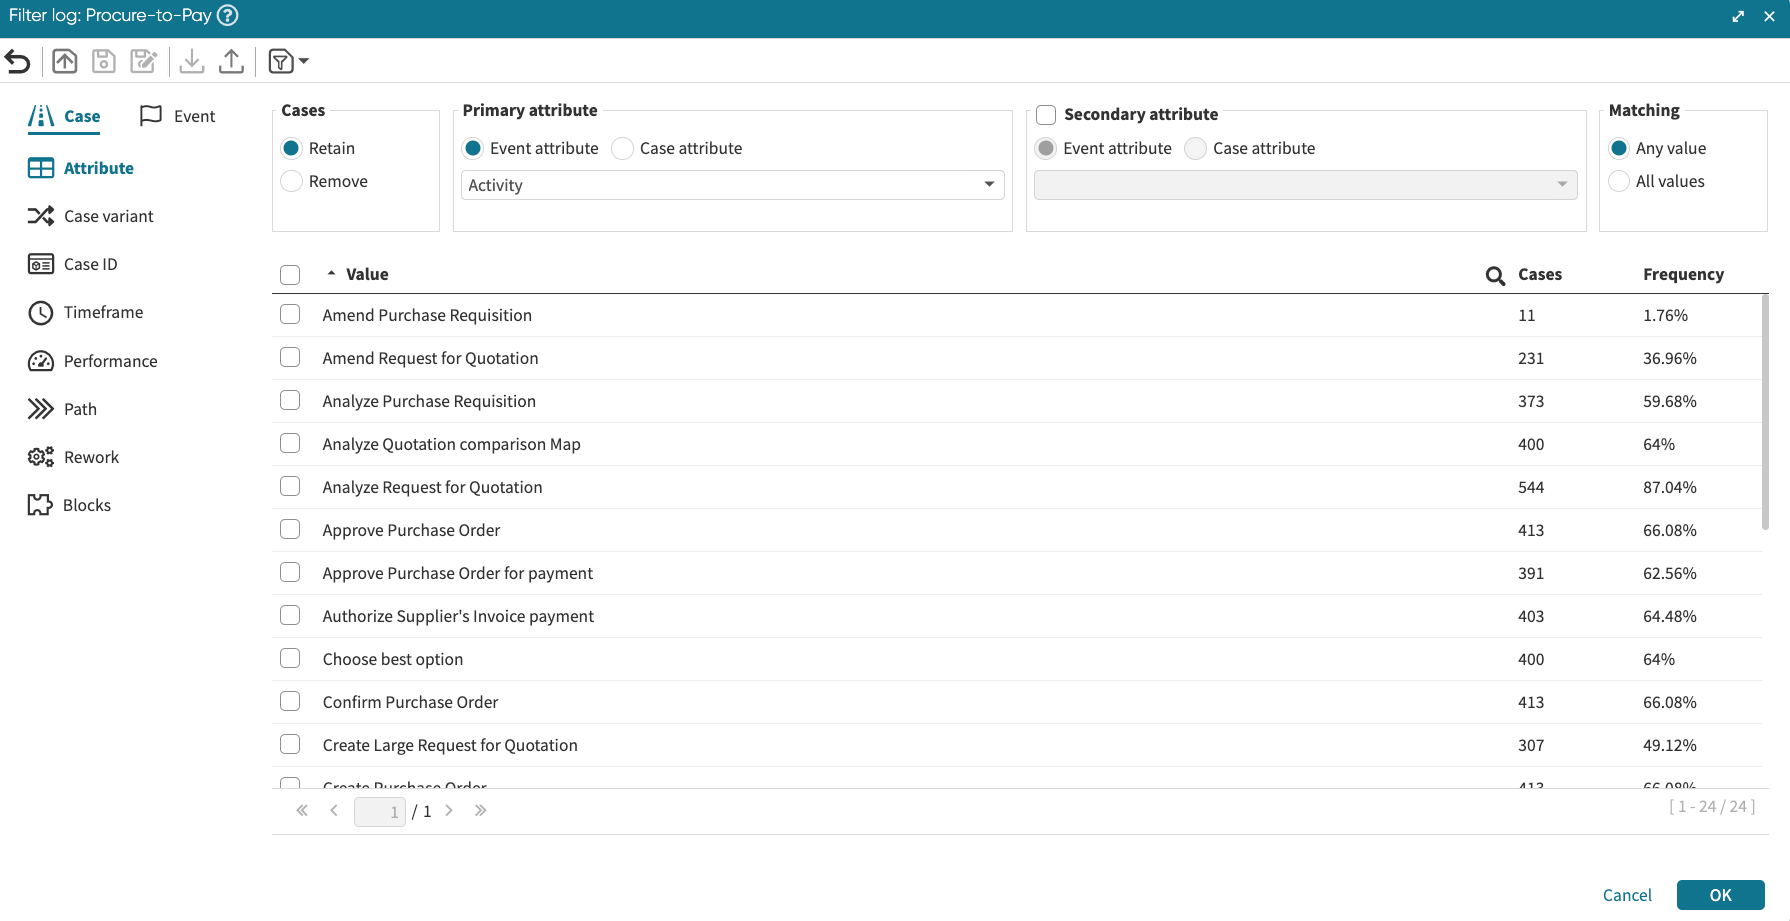
Here, we can define and apply various filter criteria.
Case vs. Event filters
Apromore supports two main filter types: Case filter and event filter. Both filter types allow us to create a filter based on particular conditions in the cases or events.
More specifically:
A case filter allows us to “slice” a log, i.e., to retain a subset of the process cases, e.g., those cases that contain a specific activity;
An event filter allows us to “dice” a log, i.e., to retain a fragment of the process across multiple cases, e.g., an element containing two specific activities.
For the case and event filters, we can set several filter criteria. Let us take a look at the case filters first.
Case > Attribute filter
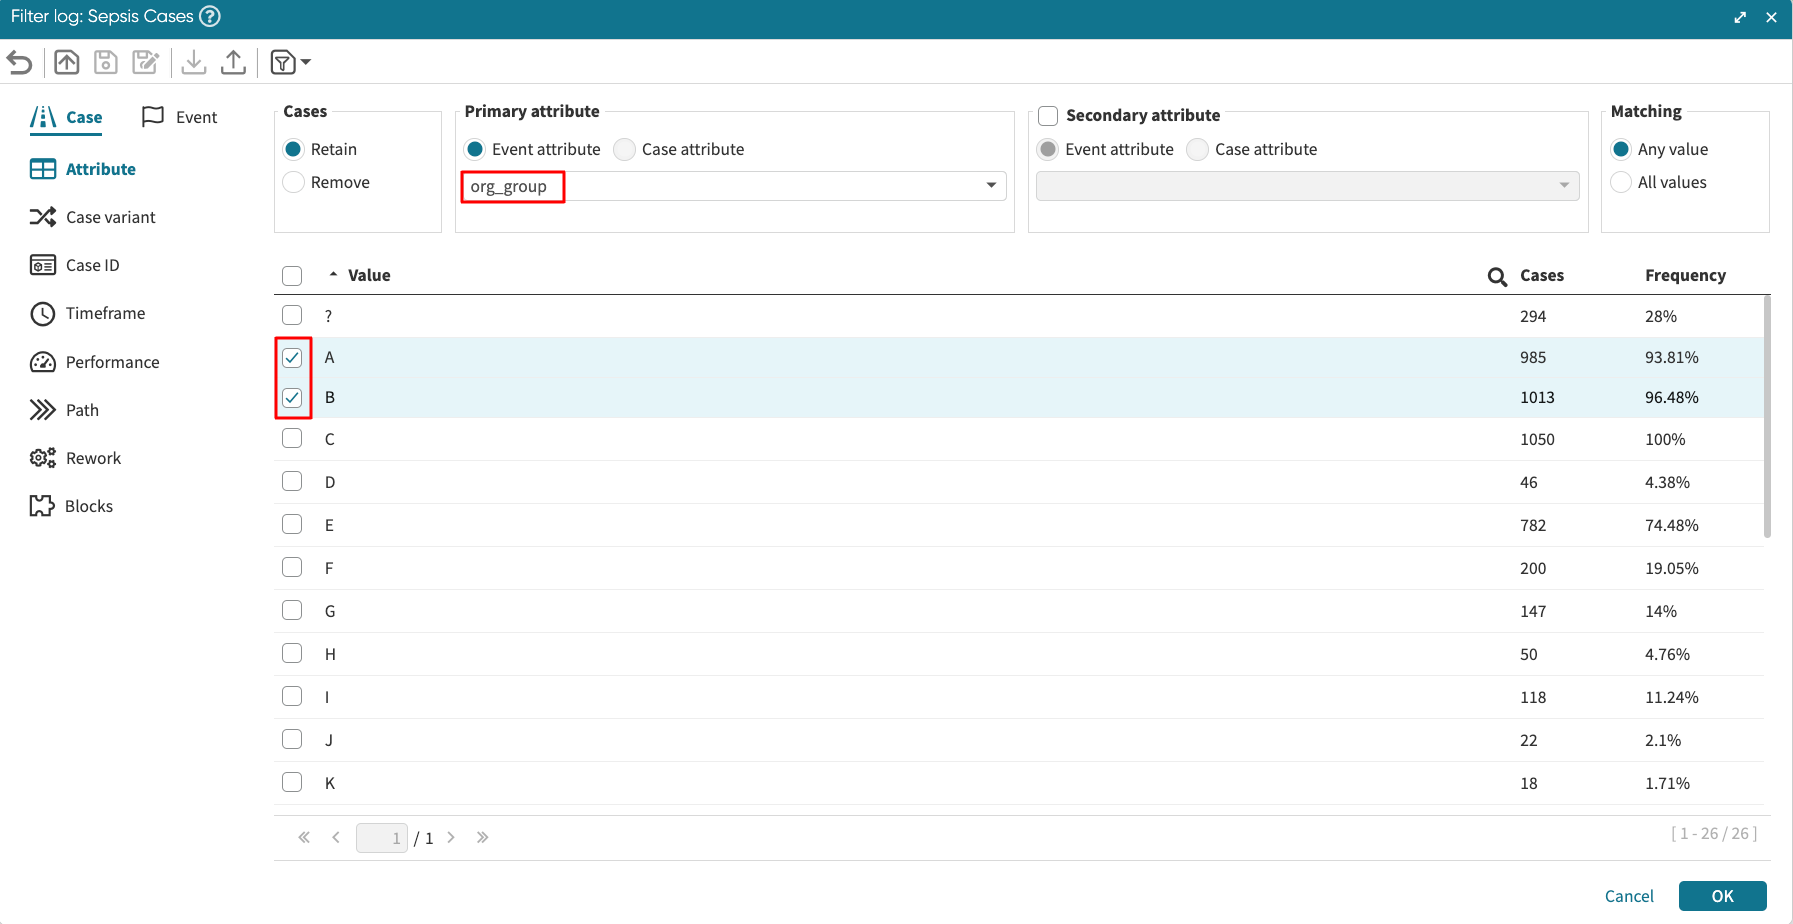
To retain or remove all the cases that include a specific attribute, we can use the Attribute filter. For example, we can retain only cases that have the attribute org:group to be A, or B.
For this, click on the Attribute filter. Select the org:group attribute from the drop-down list and tick the specific values to retain. Click on Apply.
Note
For the numerical attributes only, there is an alternative to retain or remove cases by choosing the range of values using the “From”/”To” slider at the bottom of the filter window. We will see the list of values (categories) for categorical attributes like resources or product types and choose which specific values to retain or remove.
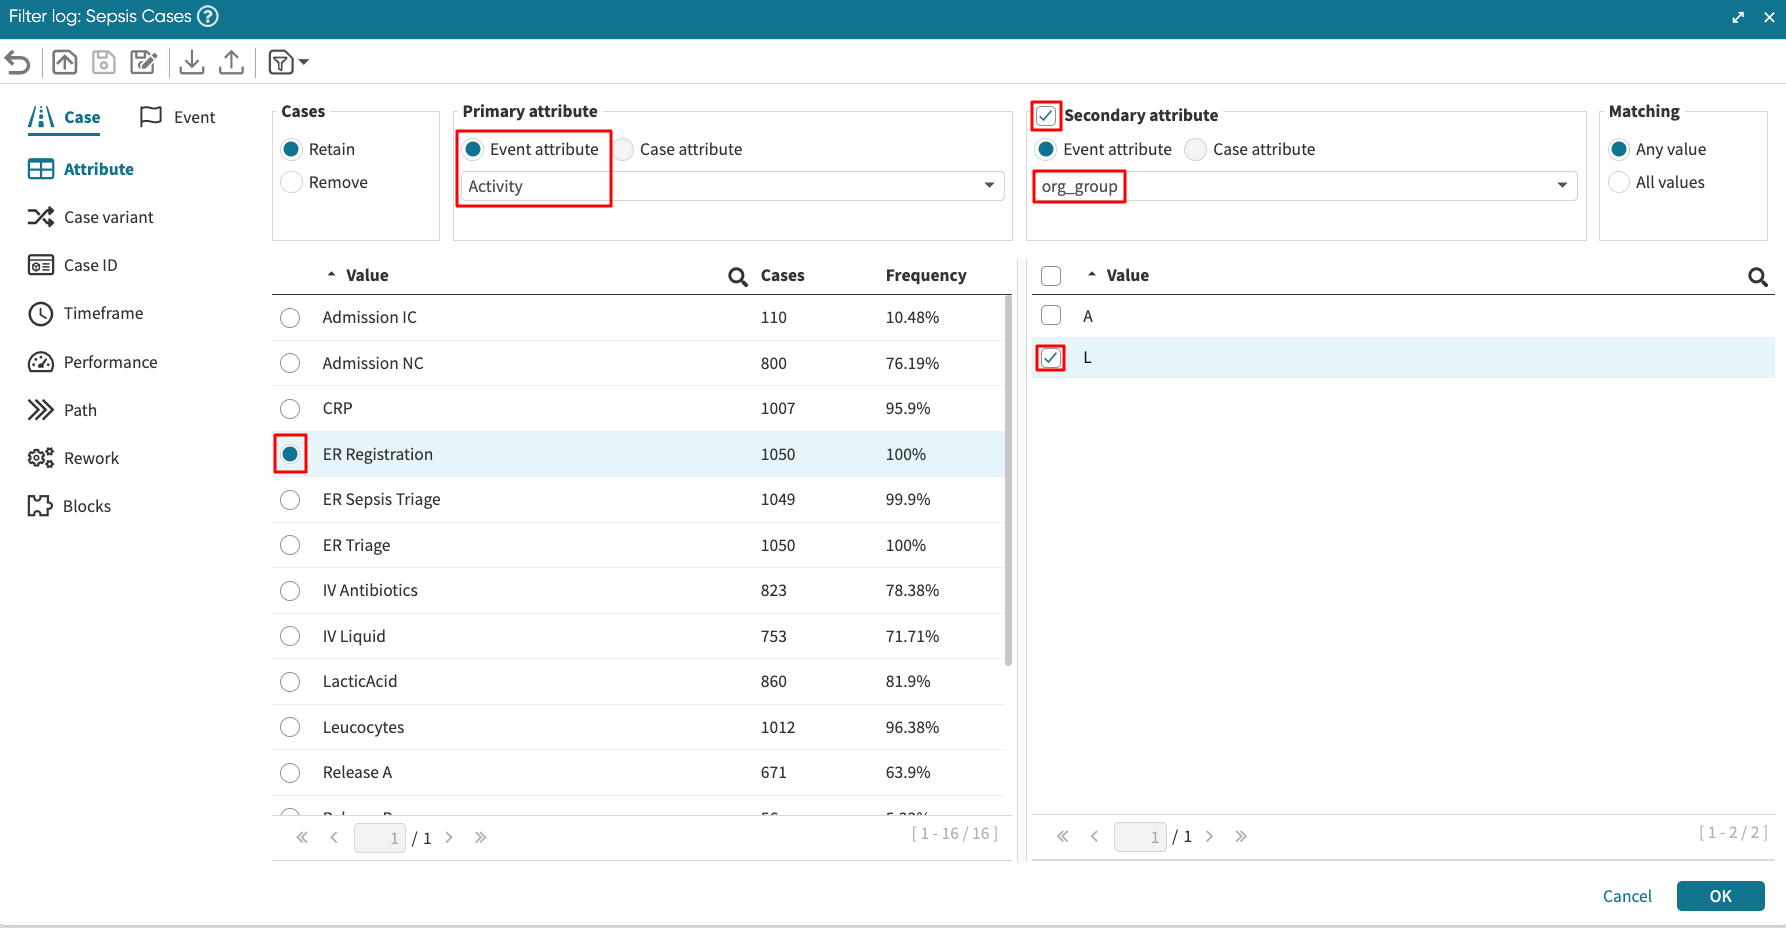
We can also retain/remove cases that include a secondary attribute. For instance, we can retain cases where resource group L (Secondary Attribute) performs an activity ER Registration.
Note
We can also filter cases that include a specific case attribute as a primary/secondary attribute.
In addition, the matching section allows us to set whether cases that satisfy any of the selected values (default selection) should be retained or all the selected values. When “All values” is selected, Apromore counts a case only when all the defined conditions are fulfilled. It can be seen as an AND operator. When “Any values” is selected, Apromore counts a case when at least one of the conditions is fulfilled. We can see it as an OR operator.
Case > Case variant filter
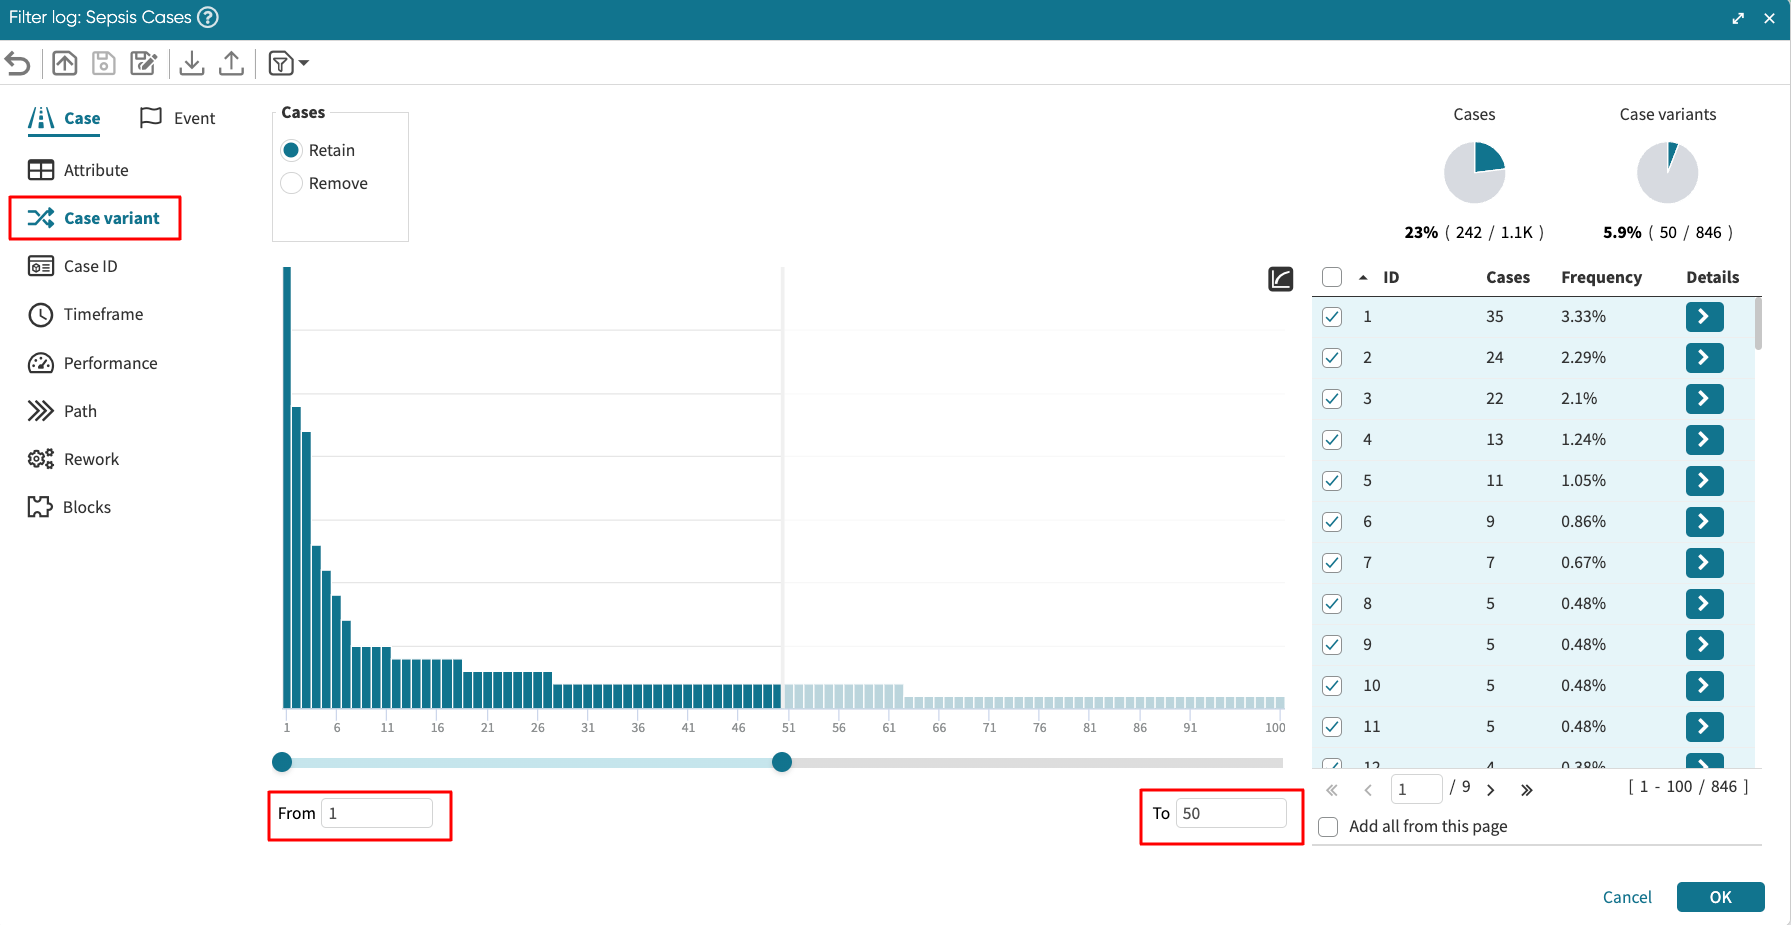
We can use the Case variant filter to retain or remove the case variants based on a particular condition by entering the From variant and To variant values or using the time slider at the bottom of the Filter criteria window. For example, we want to retain up to 50 case variants to analyze the process’s most common behavior.
Let us now take a look at the filter criteria for event filters. We can use the Event filter to dice the log, i.e., isolate a specific fragment of the process across all cases. The Event filter allows us to filter by Attribute, Timeframe, or Between.
Case > Case ID filter
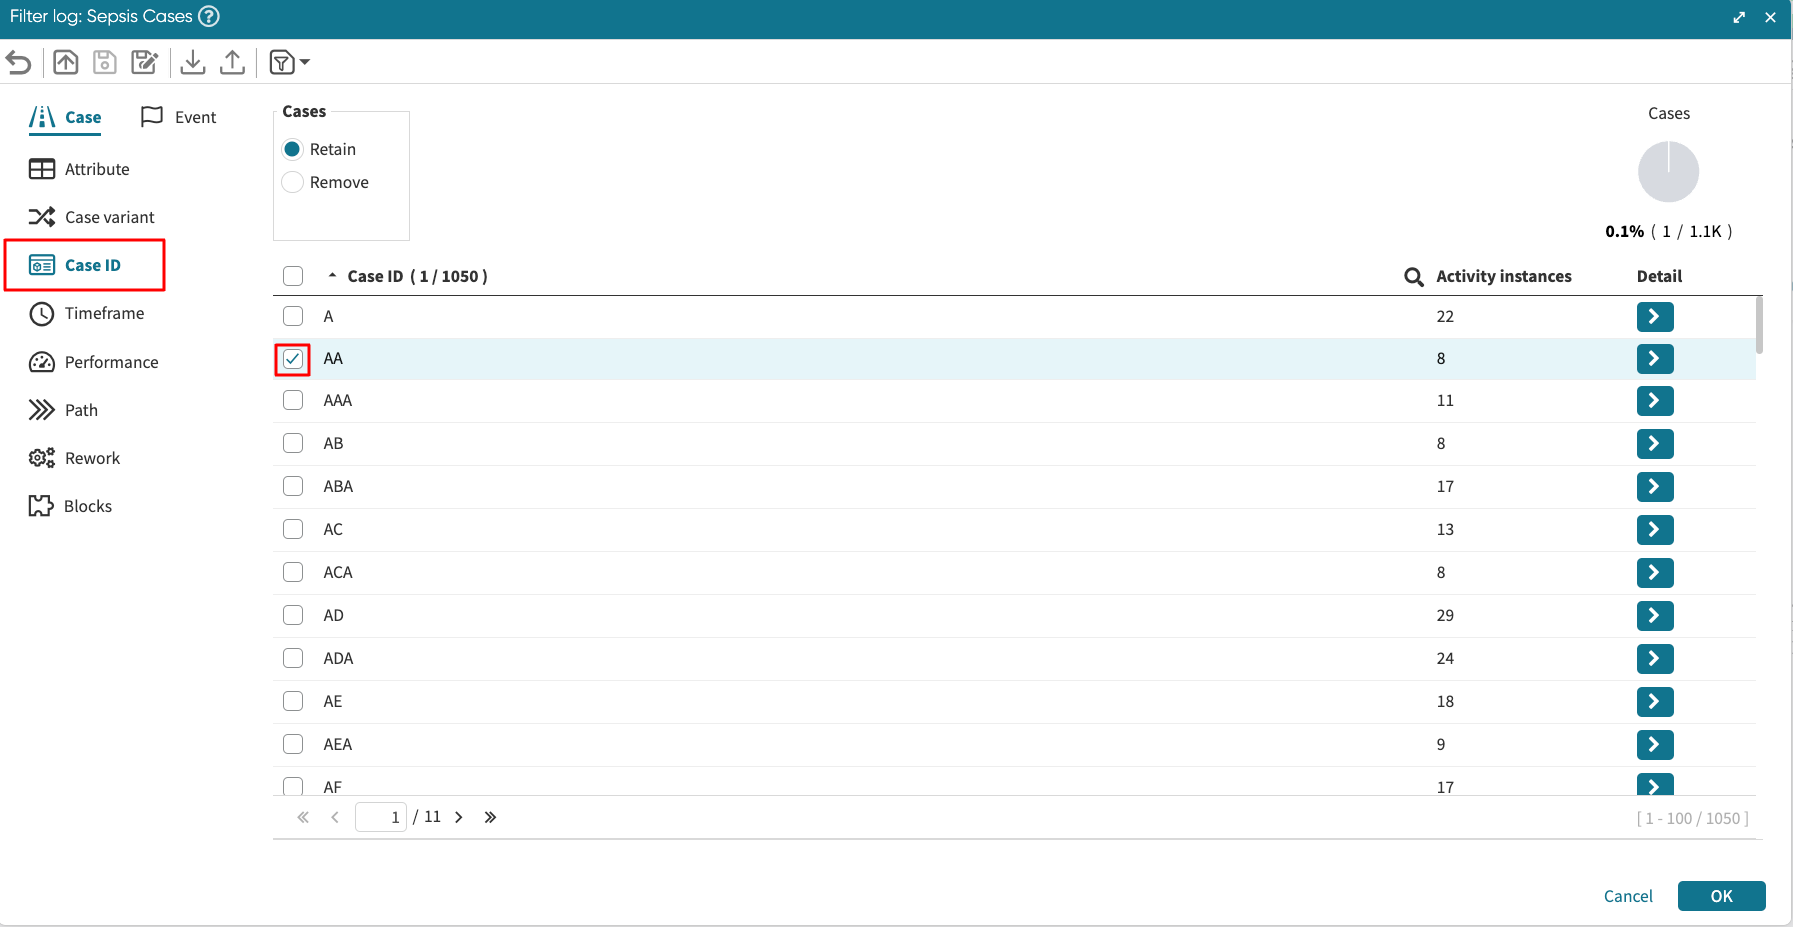
Using the Case ID filter, we can choose to retain or remove cases based on a particular case ID. In the below screenshot, we are retaining those cases with case ID ‘AA.’ The result would include the activities performed by the case ID ‘AJ’.
Note
Case identifiers are treated as strings and sorted alphabetically, even if they consist of numbers.
Case > Timeframe filter
The Timeframe filter allows us to retain or remove those cases that are “active in”, “contained in”, “start in,” or “end in” a particular time period of the log. The containment section is defined as follows:
Are contained in: The start and end events of a case fall within the timeframe.
Are active in: There exists at least one event of the case falling within the timeframe
Start in: The start event of a case falls within the timeframe.
End in: The end event of a case falls within the timeframe.
We can set the desired timeframe by entering the Start and End dates or using the time slider at the bottom of the Filter criteria window.
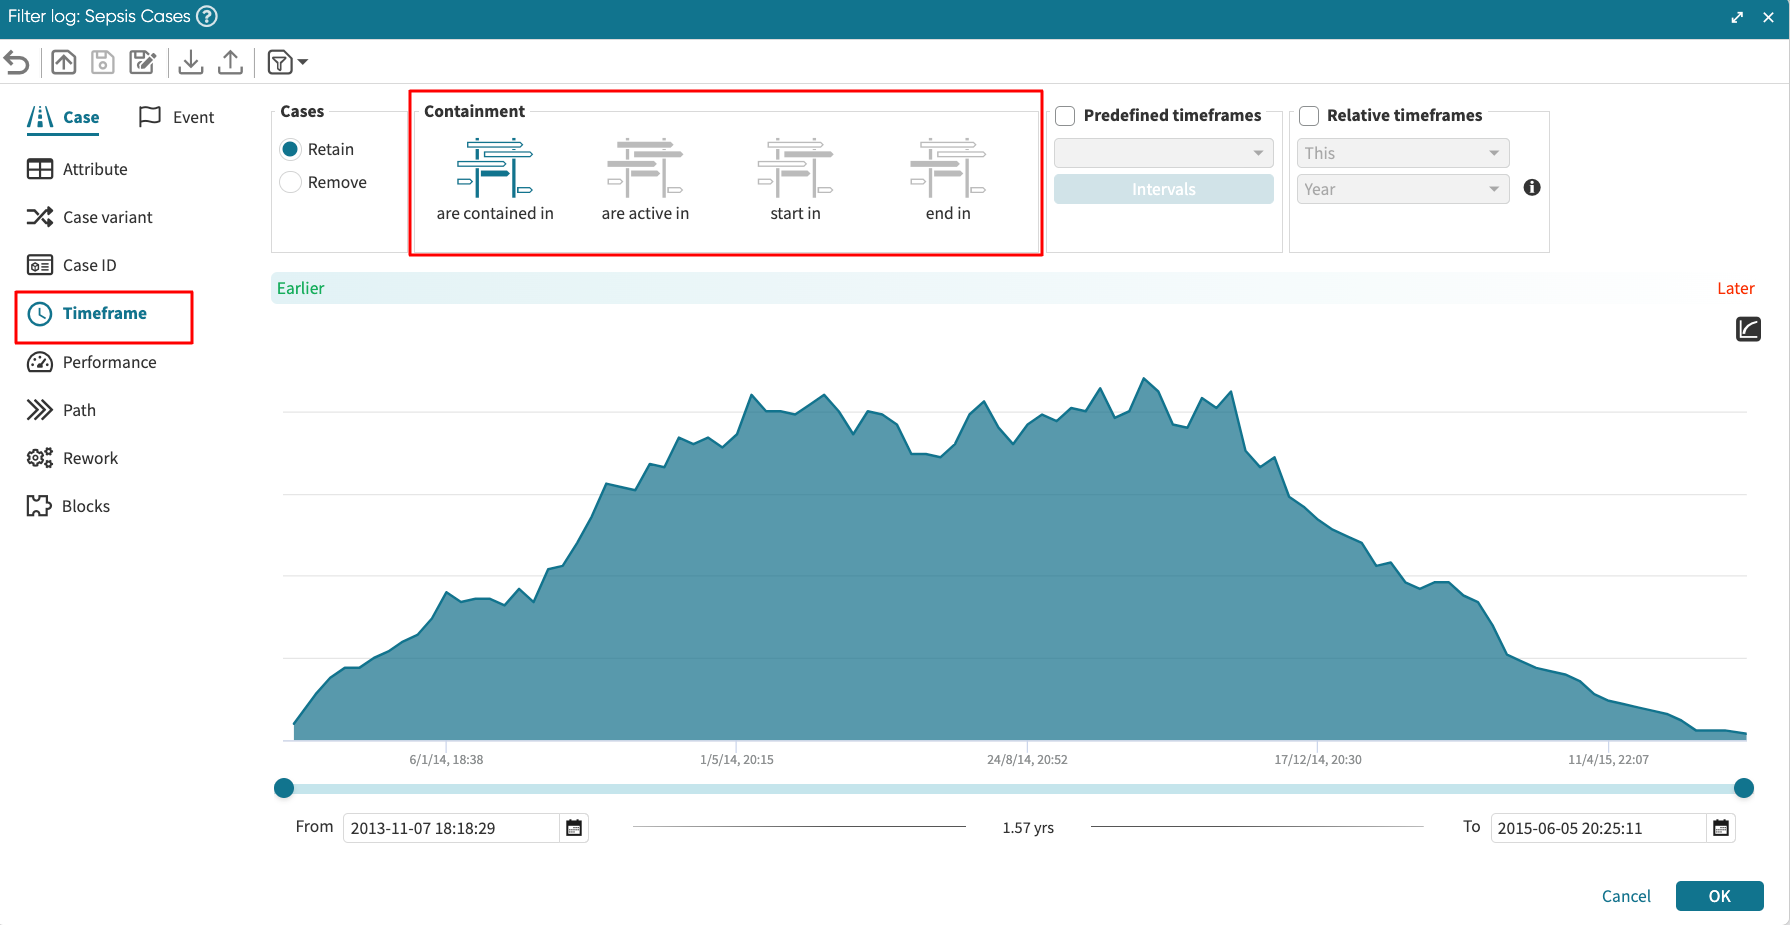
Use the slider to define the time range to filter.
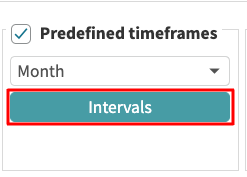
Predefined timeframes
In addition, we can define a time range filter by setting predefined timeframes—for example, cases within a year or a month. To use predefined timeframes, click the Predefined timeframes dropdown and select the time interval we wish to specify. It could be Year, Semester, Quarter, Month, or Week.

Click Intervals.
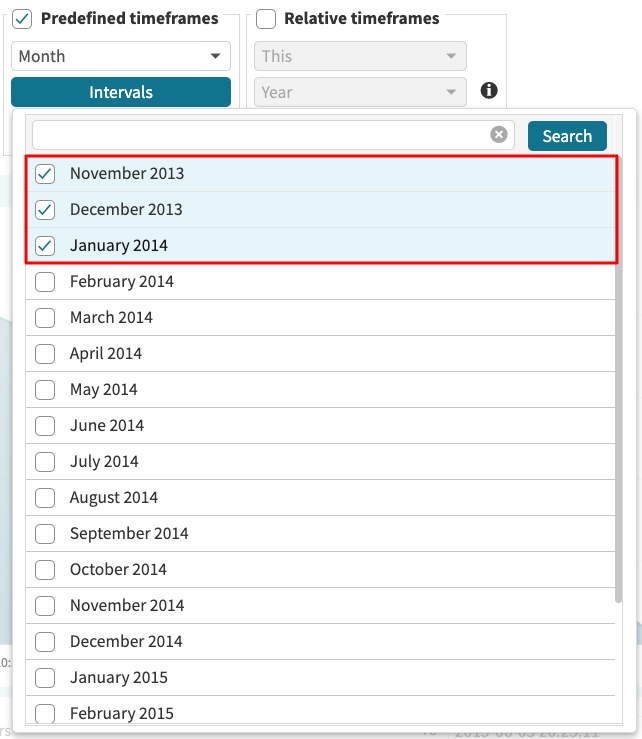
If we had selected Month, this lists all the months in the event log time frame. We select the months we wish to filter and click OK.
Relative Timeframes
We can specify relative timeframe filters. Relative timeframes are time intervals with respect to the present time. For instance, we can filter cases within the last three months or this year. In other words, as time progresses, the filter is updated.
To use relative timeframes, click the Relative timeframes checkbox. Use the dropdown to select the timeframe to filter by. To select the last three months, we can select Third last and Month from both dropdowns, respectively.
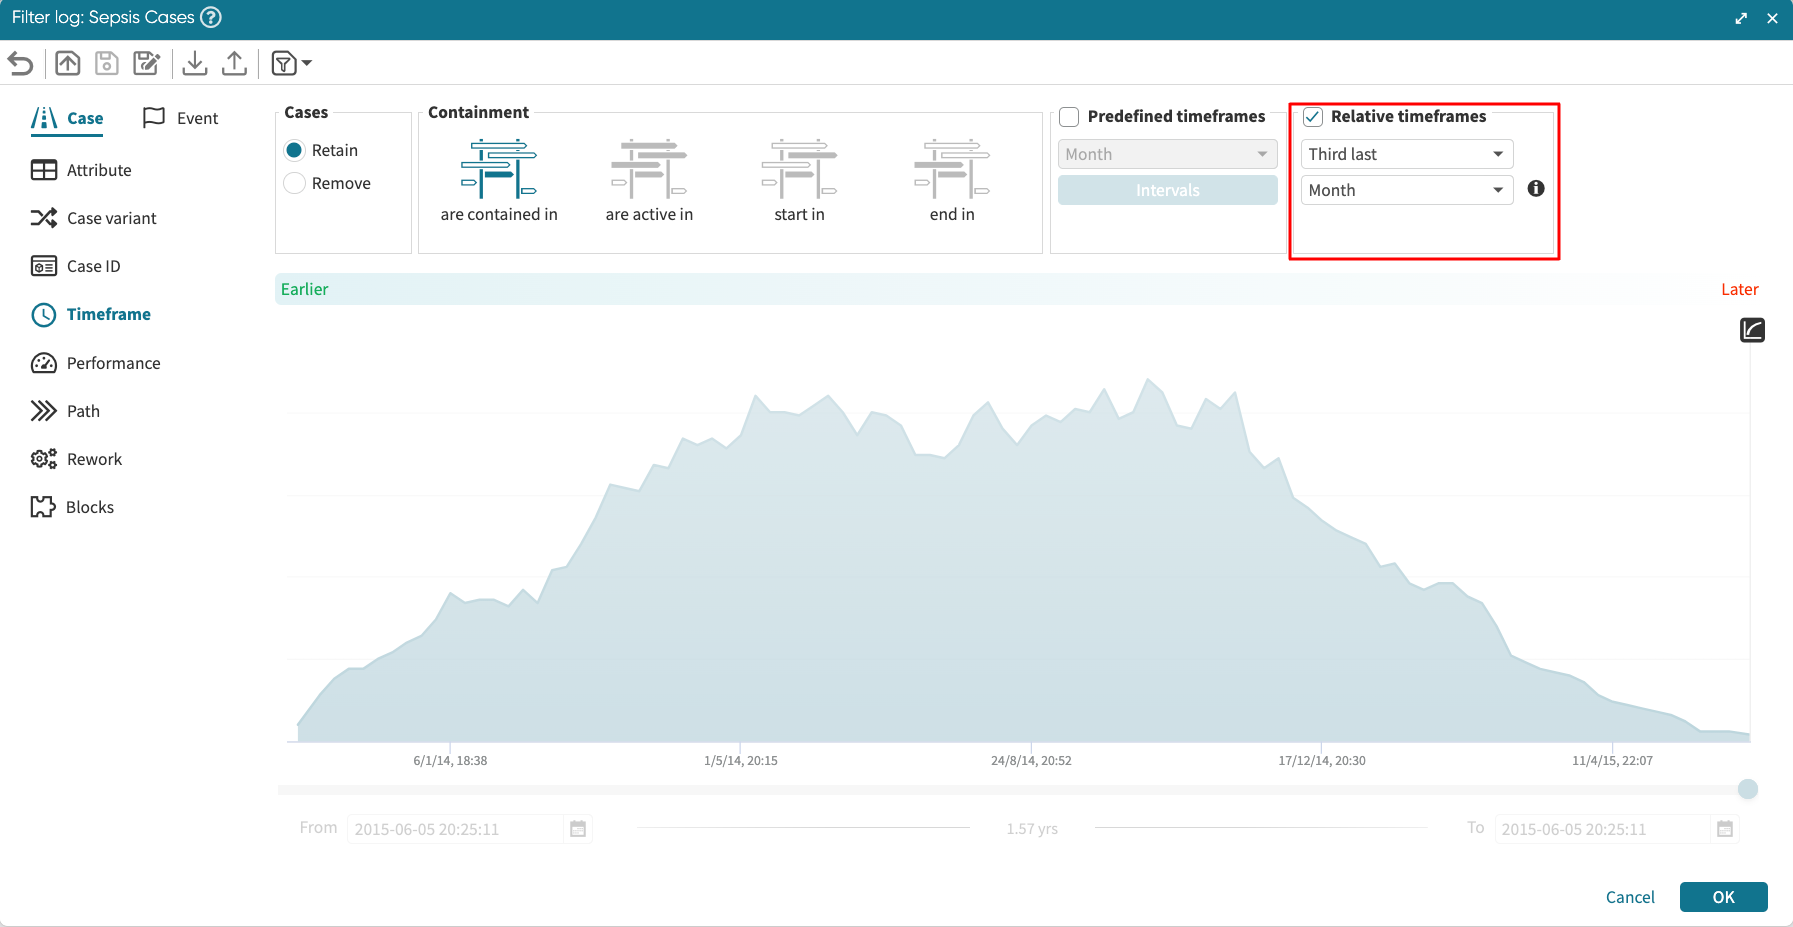
Click OK to apply the filter.
Case > Performance filter
To understand a process, we might want to retain or remove cases that fulfill specific performance requirements, e.g., retain all cases within one month. We can use the “Performance” filter for this purpose. The performance filter can be used to filter the event log based on the following metric:
Case duration
Case length
Processing time (average, maximum, total)
Waiting time (average, maximum, total)
Case utilization
Node duration
Arc duration
Case duration
The case duration shows the time to complete each case. We can filter cases based on this duration. For example, we may wish to retain only those cases that last no more than one month. Go to the Performance tab. Click Retain. Click Case duration from the Performance measure dropdown and adjust the filter to less than or equal to 1 month.
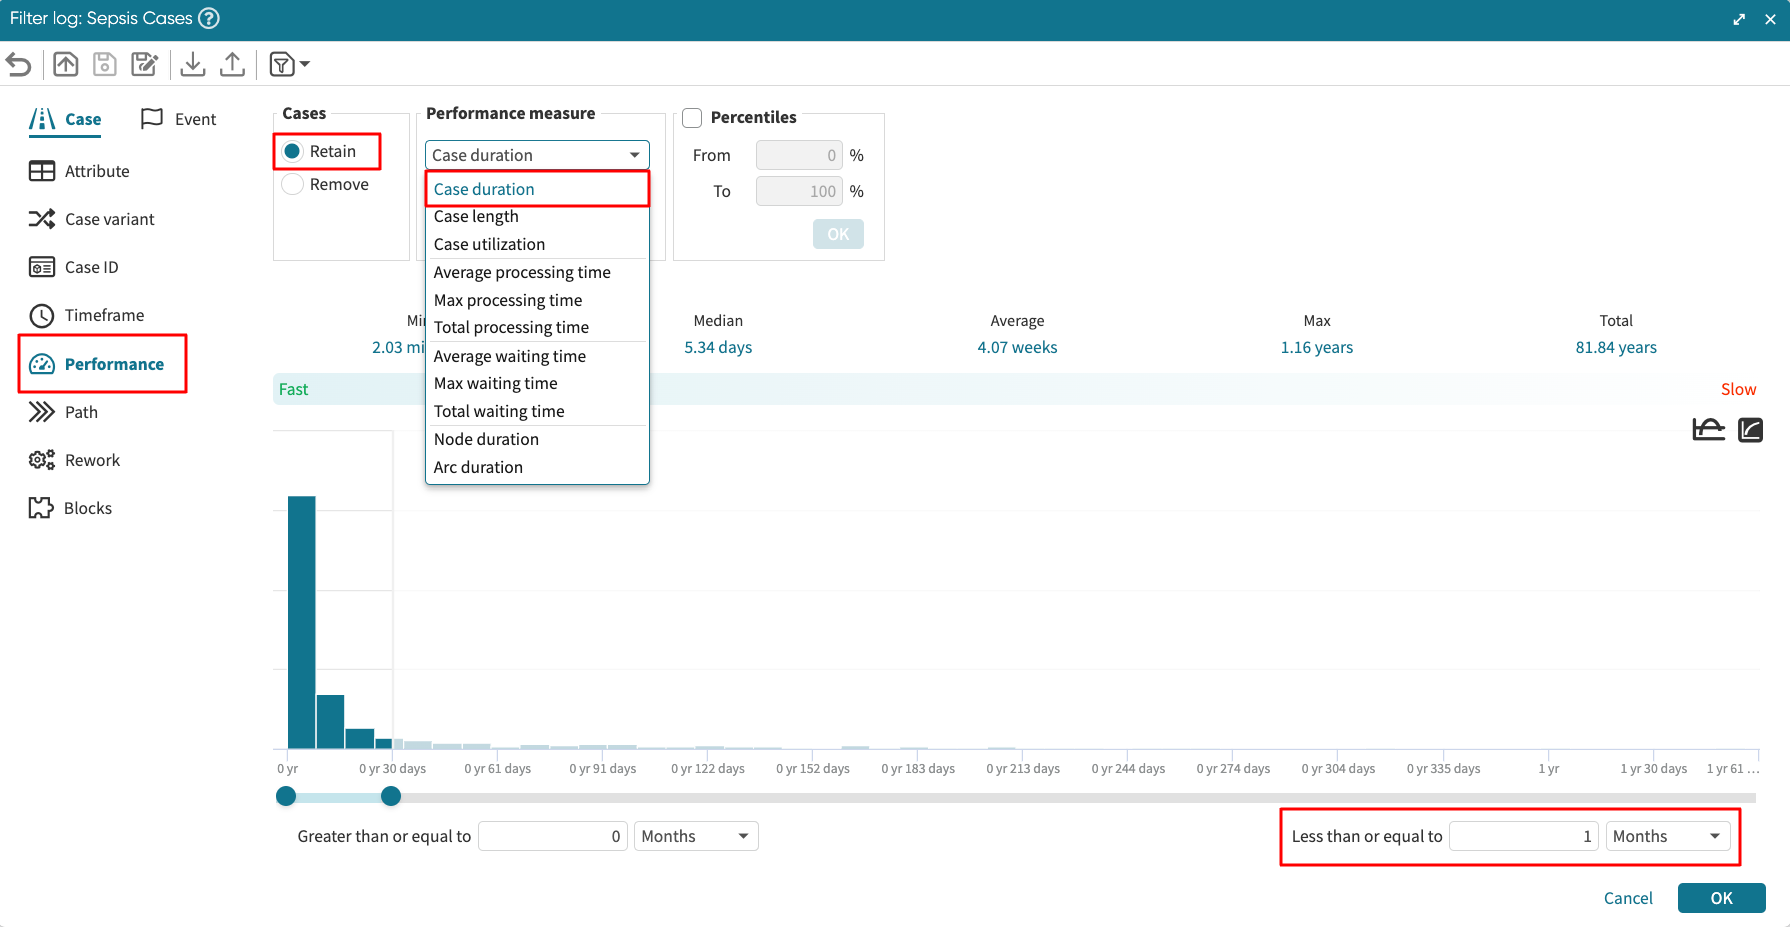
Click OK. An overview of the log statistics appears after applying the filter.
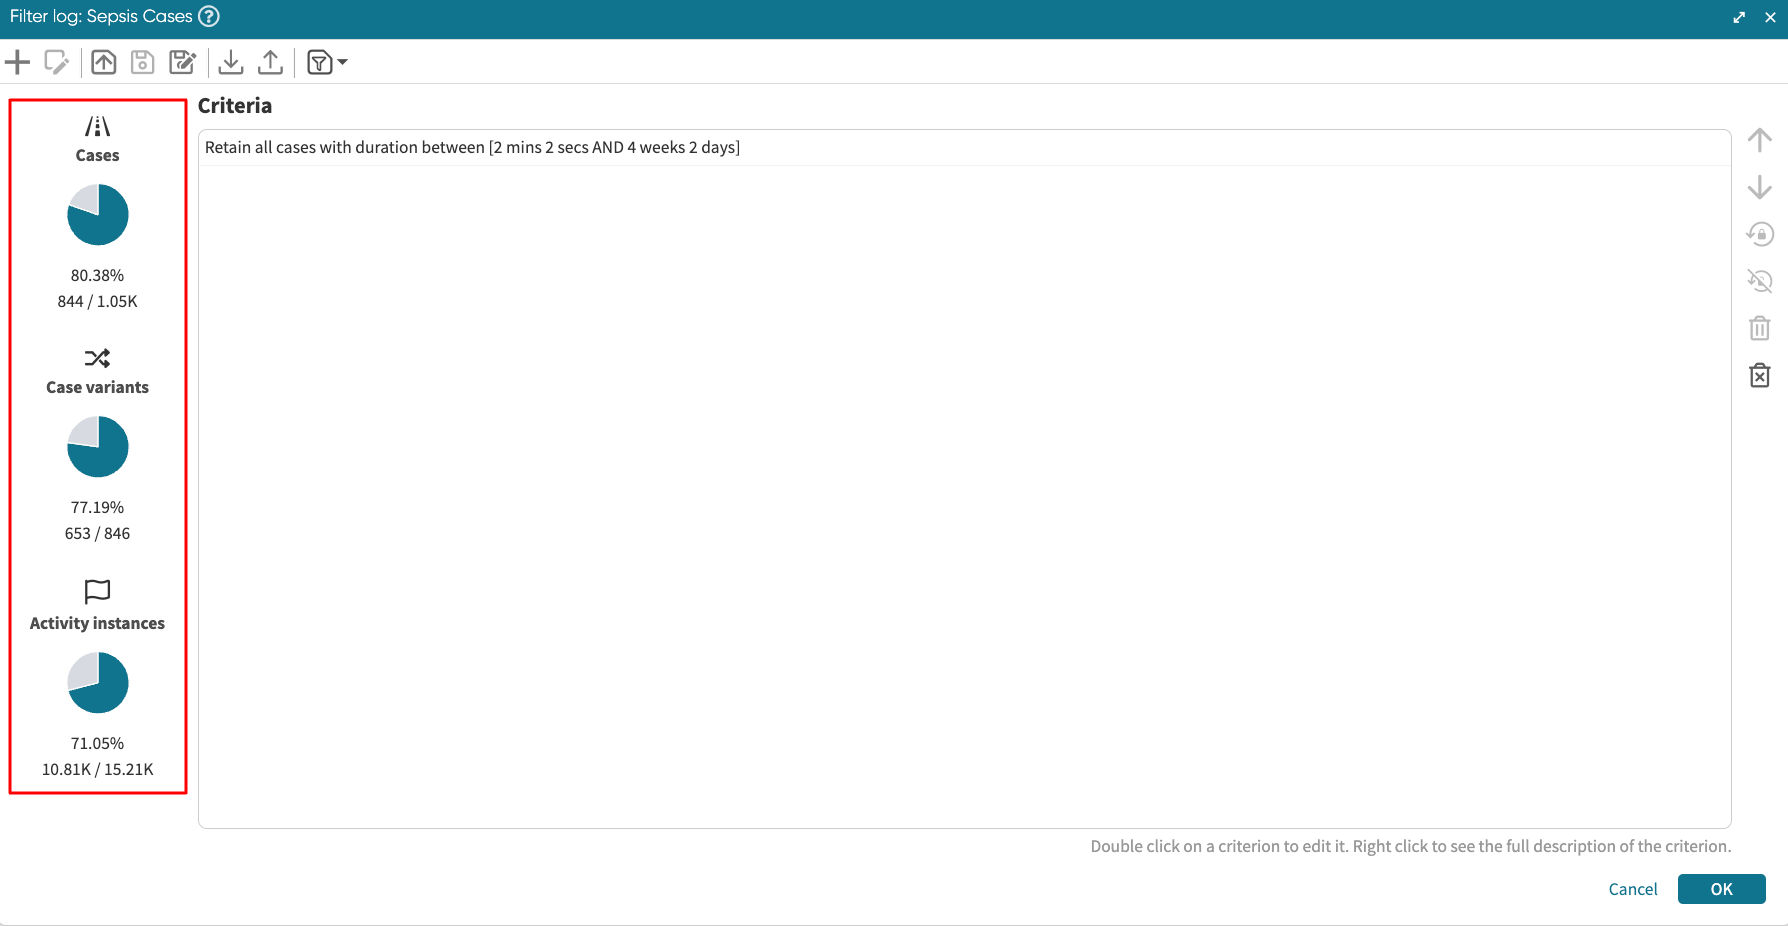
Click OK to apply it.
Note
Similar to retaining cases that fulfill a filter condition, we may also remove the cases that satisfy a filter condition. When applying the filter in the performance tab, click Remove.
Case length
We can filter out cases based on case length (number of activity instances in the case). To filter by case length, select Case length in the Performance measure dropdown. For example, we may wish to retain all cases with a length of 3 to 30 activity instances.

Click OK to apply the filter.
Processing time (average, maximum, and total)
The processing time is the time it takes to complete an activity. We can filter by processing time (average, maximum, and total) in Apromore. For instance, we may wish to filter cases where the average processing time is less than 5 minutes. To do this, click Average processing time from the Performance measure drop down. Set the filter condition to less than 5 minutes.
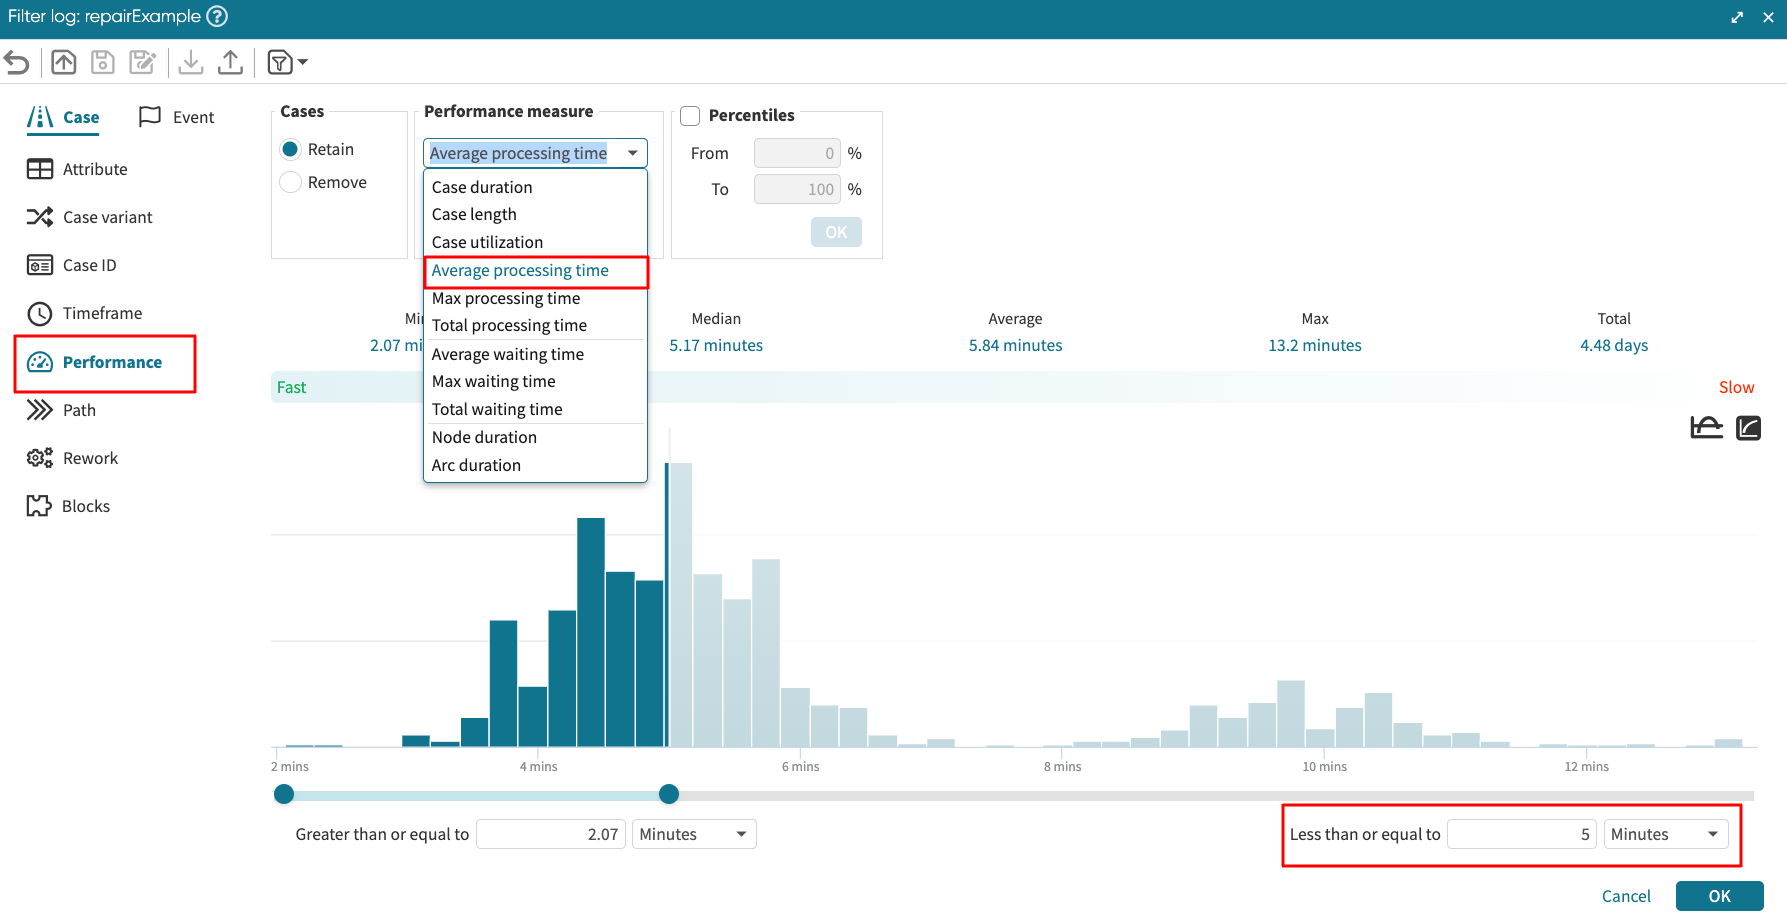
We can similarly create filters that retain or remove cases by maximum processing time and total processing time. The maximum processing time is the highest processing time in all the cases. The total processing time is the sum of the processing time for each case.
Waiting time (average, maximum, and total)
Waiting time is the time between two activities. We can filter cases where the average waiting time is within a specified range. For instance, if we want to filter cases where the average time is less than 5 minutes, click Average waiting time from the Performance measure dropdown. Specify the duration condition.
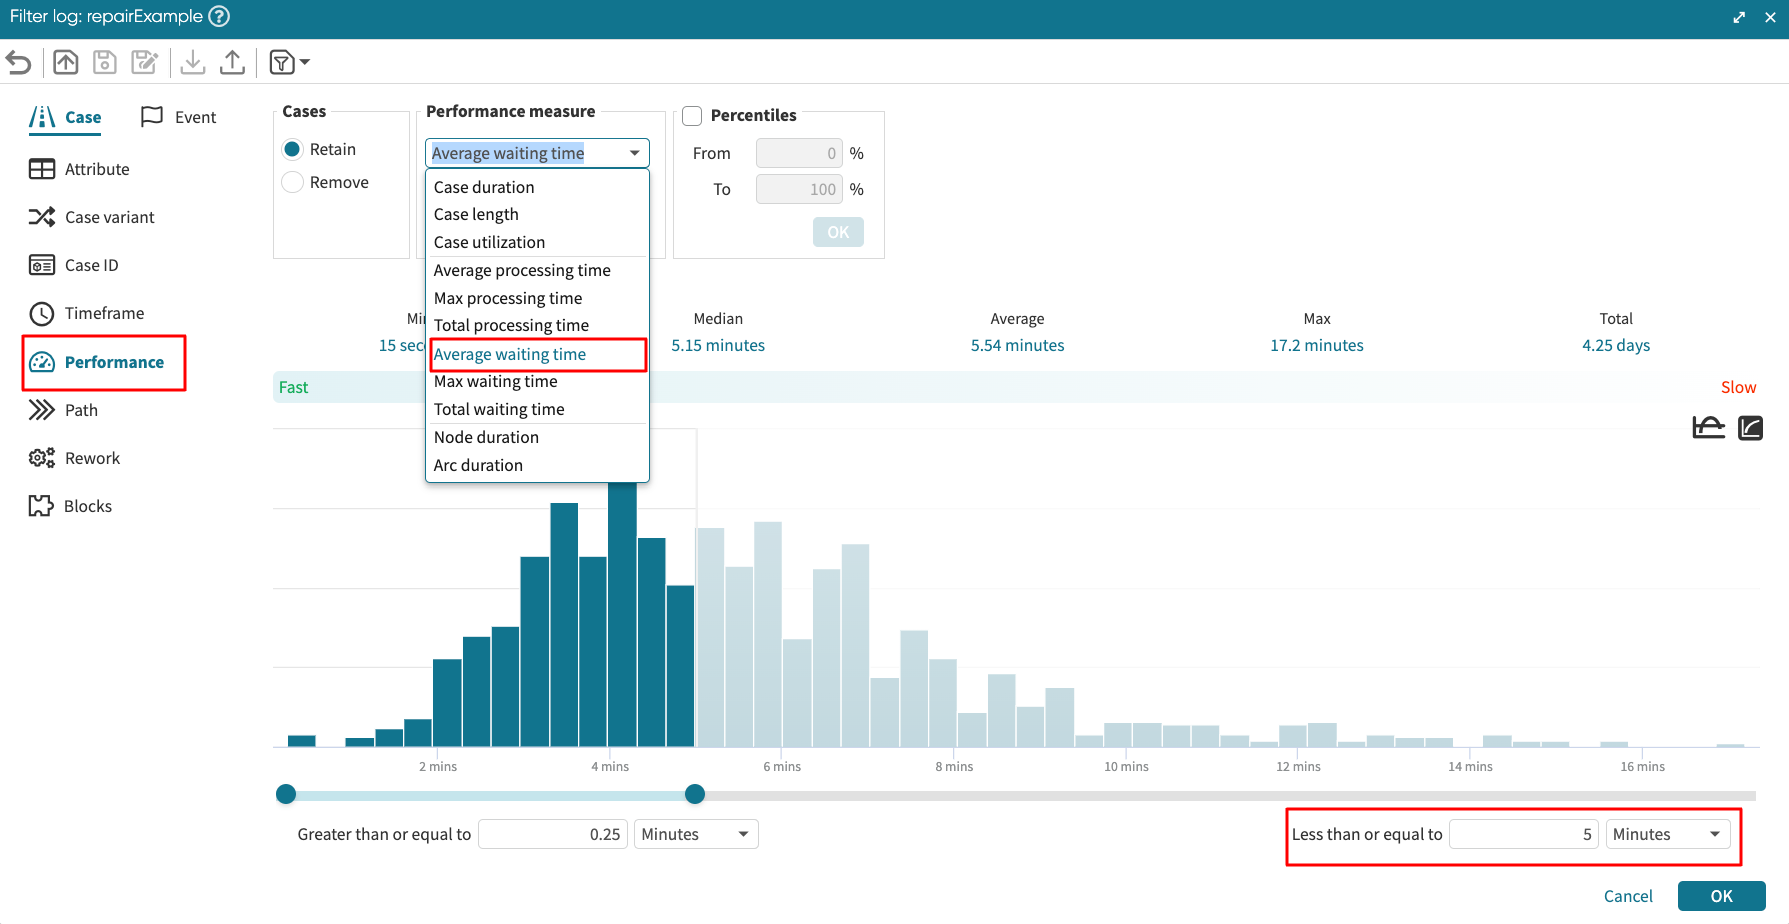
Similarly, we can filter by maximum and total waiting time by clicking the corresponding option from the Performance measure dropdown. The maximum waiting time is the longest waiting time between two adjacent nodes in a case. The total waiting time is the sum of all waiting times in a case.
Case utilization
The case utilization is equal to the ratio of the processing time to the sum of the processing time and waiting time. Mathematically, it is represented as
ProcessingTime / (ProcessingTime + WaitingTime)
Where:
ProcessingTime = the sum of the activities duration in the case.
WaitingTime = the sum of the waiting time in the case.
For example, consider the following event log, which contains one case:
Case ID |
Activity |
Start Time |
End Time |
1 |
Create Purchase Order |
2022-09-03 09:00:00 |
2022-09-03 09:10:00 |
1 |
Check Availability of Products |
2022-09-03 09:30:00 |
2022-09-03 09:50:00 |
1 |
Approve Purchase Order |
2022-09-03 10:00:00 |
2022-09-03 10:30:00 |
There are three activities in this case.
The Processing Time of this case = 10 minutes + 20 minutes + 30 minutes = 60 minutes
The Waiting Time of this case = 20 minutes + 10 minutes = 30 minutes (there are 20 minutes of waiting time between the first and the second activity and 10 minutes of waiting time between the second and third activity).
Case Utilization = 60 minutes / (60 minutes + 30 minutes) = 60/90 = 0.67.
In Apromore, case utilization is represented as a percentage. Thus 0.67 is 67%.
If an event log has multiple cases, we calculate the case utilization of each case, and then we compute the average of all the case utilizations.
The case utilization is a number between zero and 100%:
A case utilization of 100% means that the workers are working on the case continuously the whole time.
A case utilization close to zero means that there is a lot of waiting time in the case. So, the case was handled very inefficiently.
If we wish to filter cases where the case utilization is less than 67%, click Case utilization from the Performance measure dropdown. Specify the case utilization range; in our case, 67%.
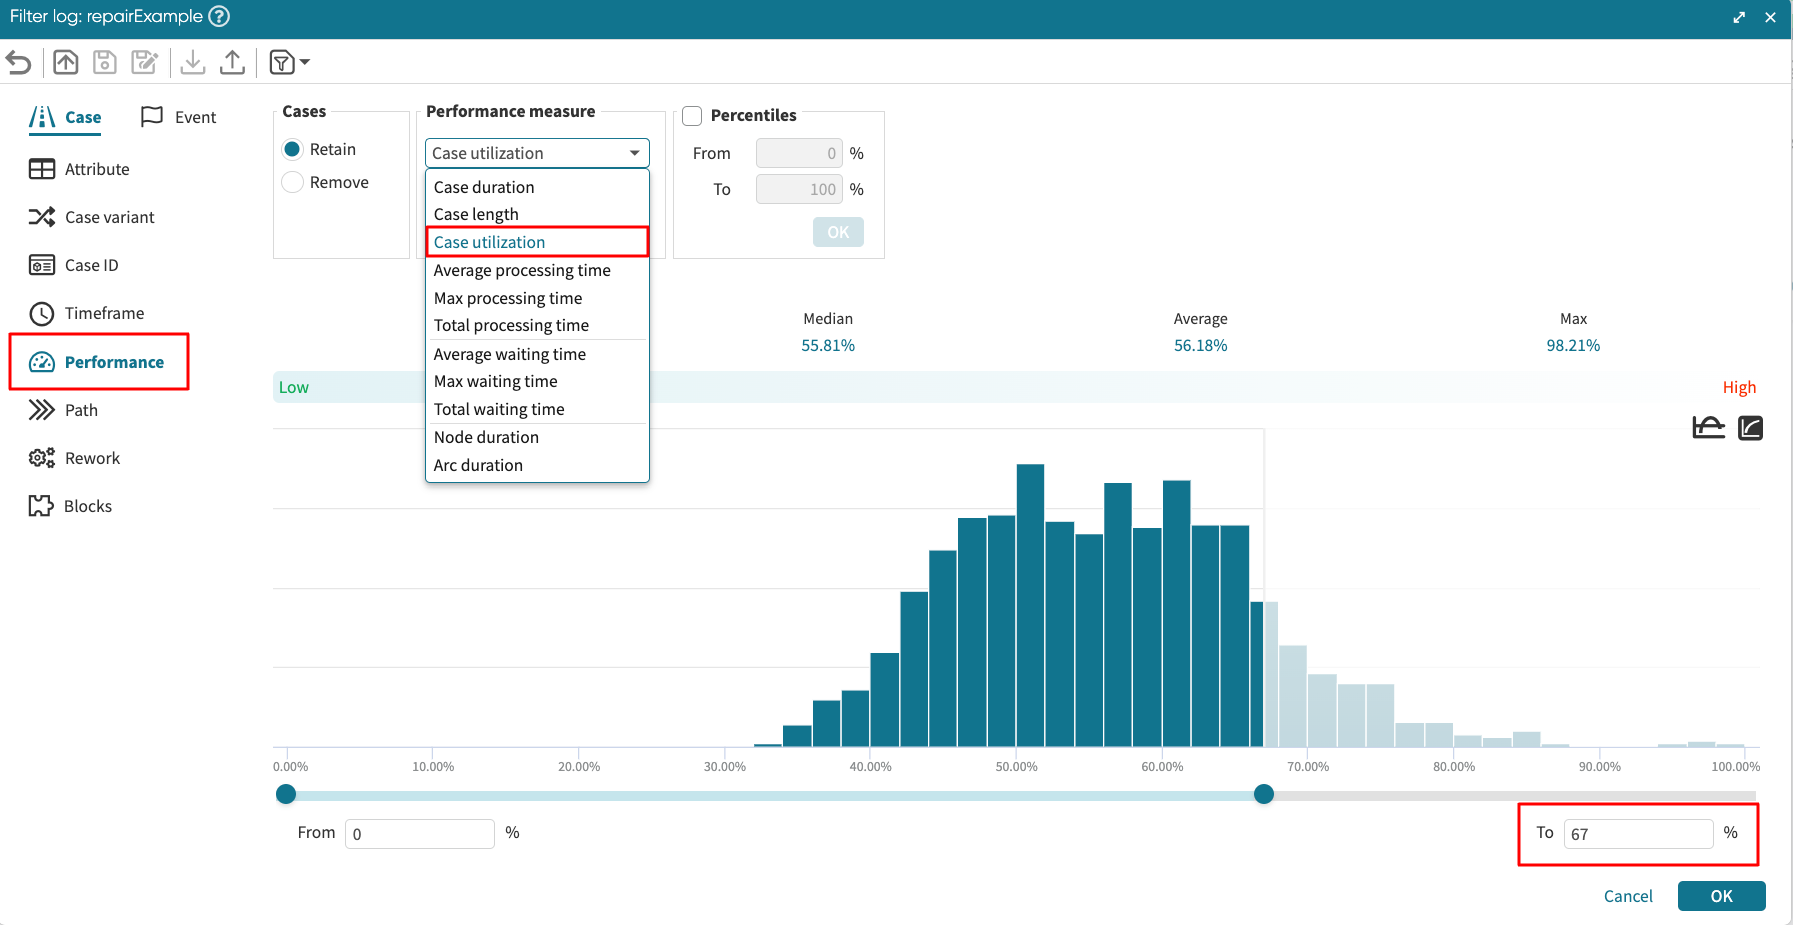
Click OK to apply the filter.
Node duration
We can select a node duration performance metric to analyze performance by retaining or removing different nodes of type activity, resource, or event attributes.
To apply the node duration filter, click Node duration from the Performance measure drop-down. If we wish to retain cases where the “Analyze Defect” activity took less than 7 minutes, select Activity from the Node type drop-down. In the matching tab, select All node instances in a case.
Note
Since an activity can be performed more than once in a case (e.g., during a ping-pong effect), we may select At least one node instance in a case when we want the filter to match cases where at least only one instance of the node satisfies the filter condition.
Lastly, edit the filter duration to less than 7 minutes.
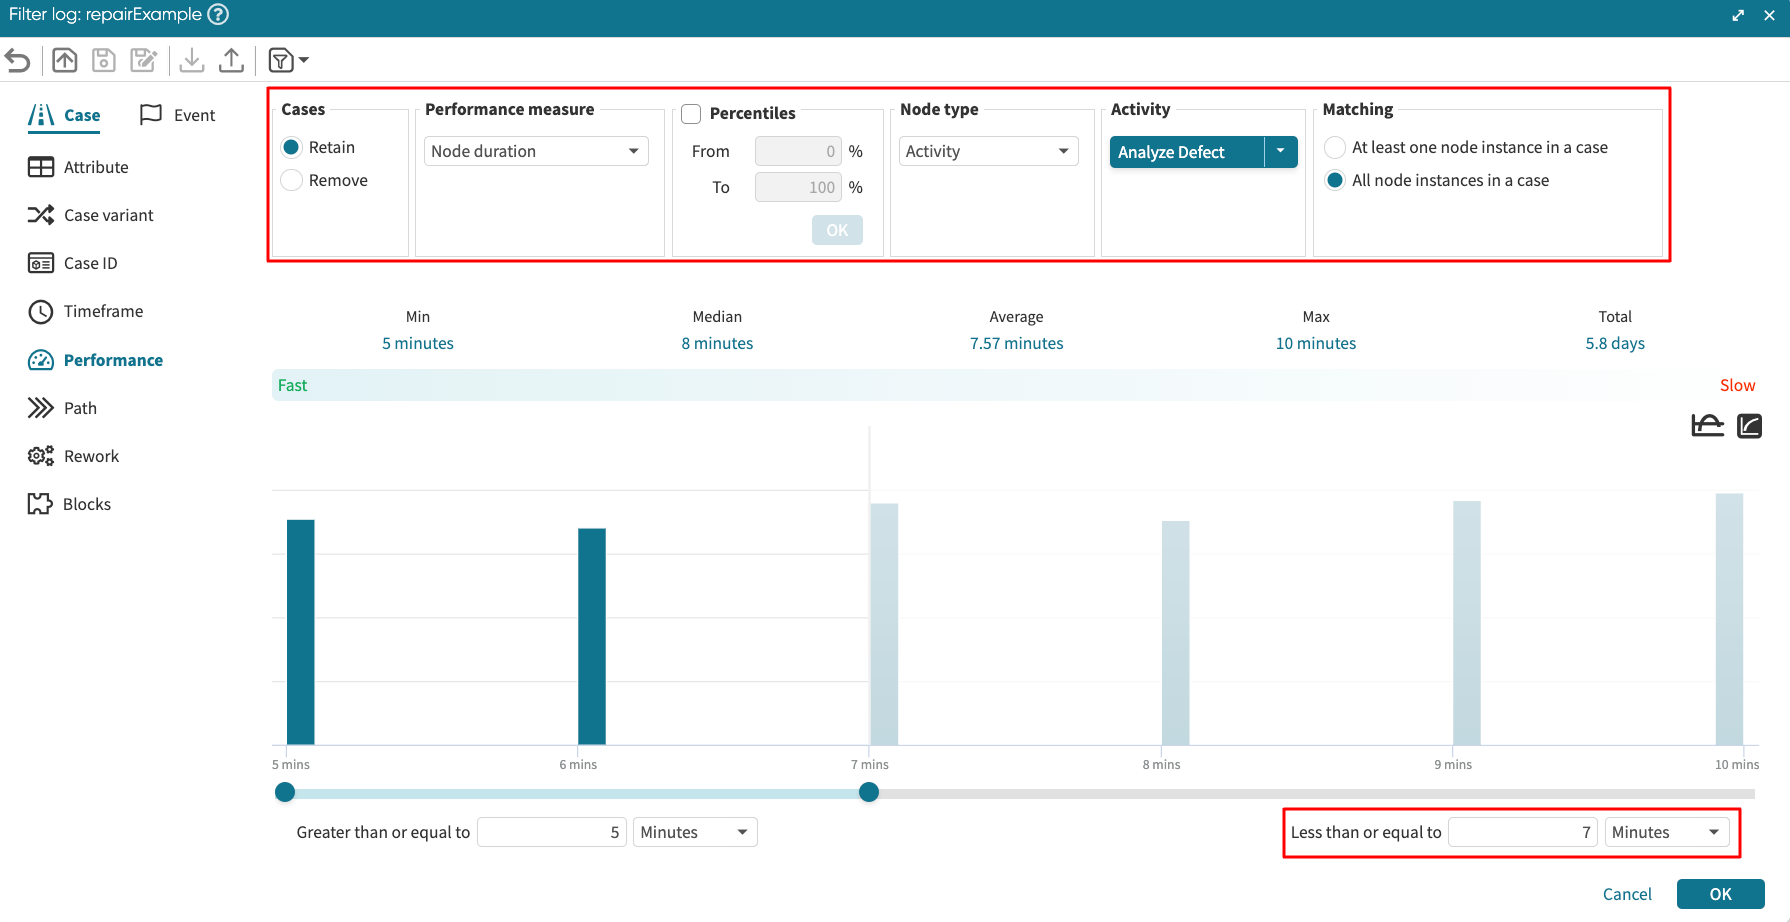
Click OK to apply the filter.
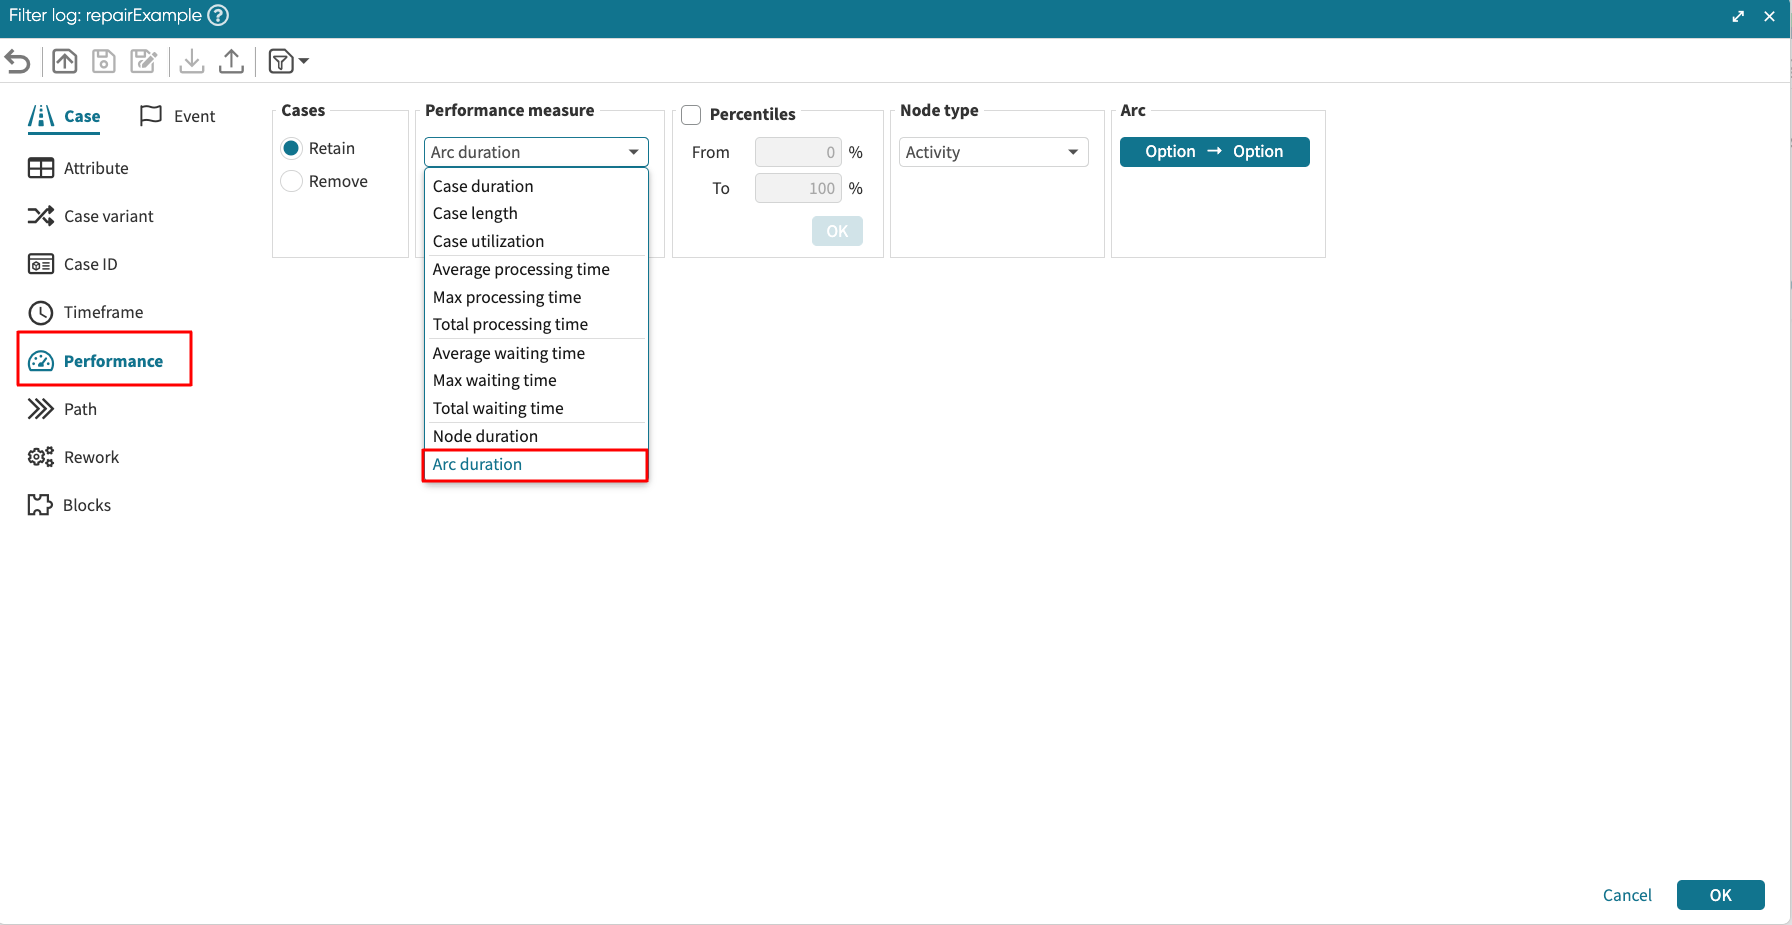
Arc duration
An arc is the path between two nodes. The arc duration measures the duration of the path between different nodes of type activity, resource, or other event attributes. For instance, we may retain cases where the duration between Analyze defect and Repair (Complex) is less than 20 minutes.
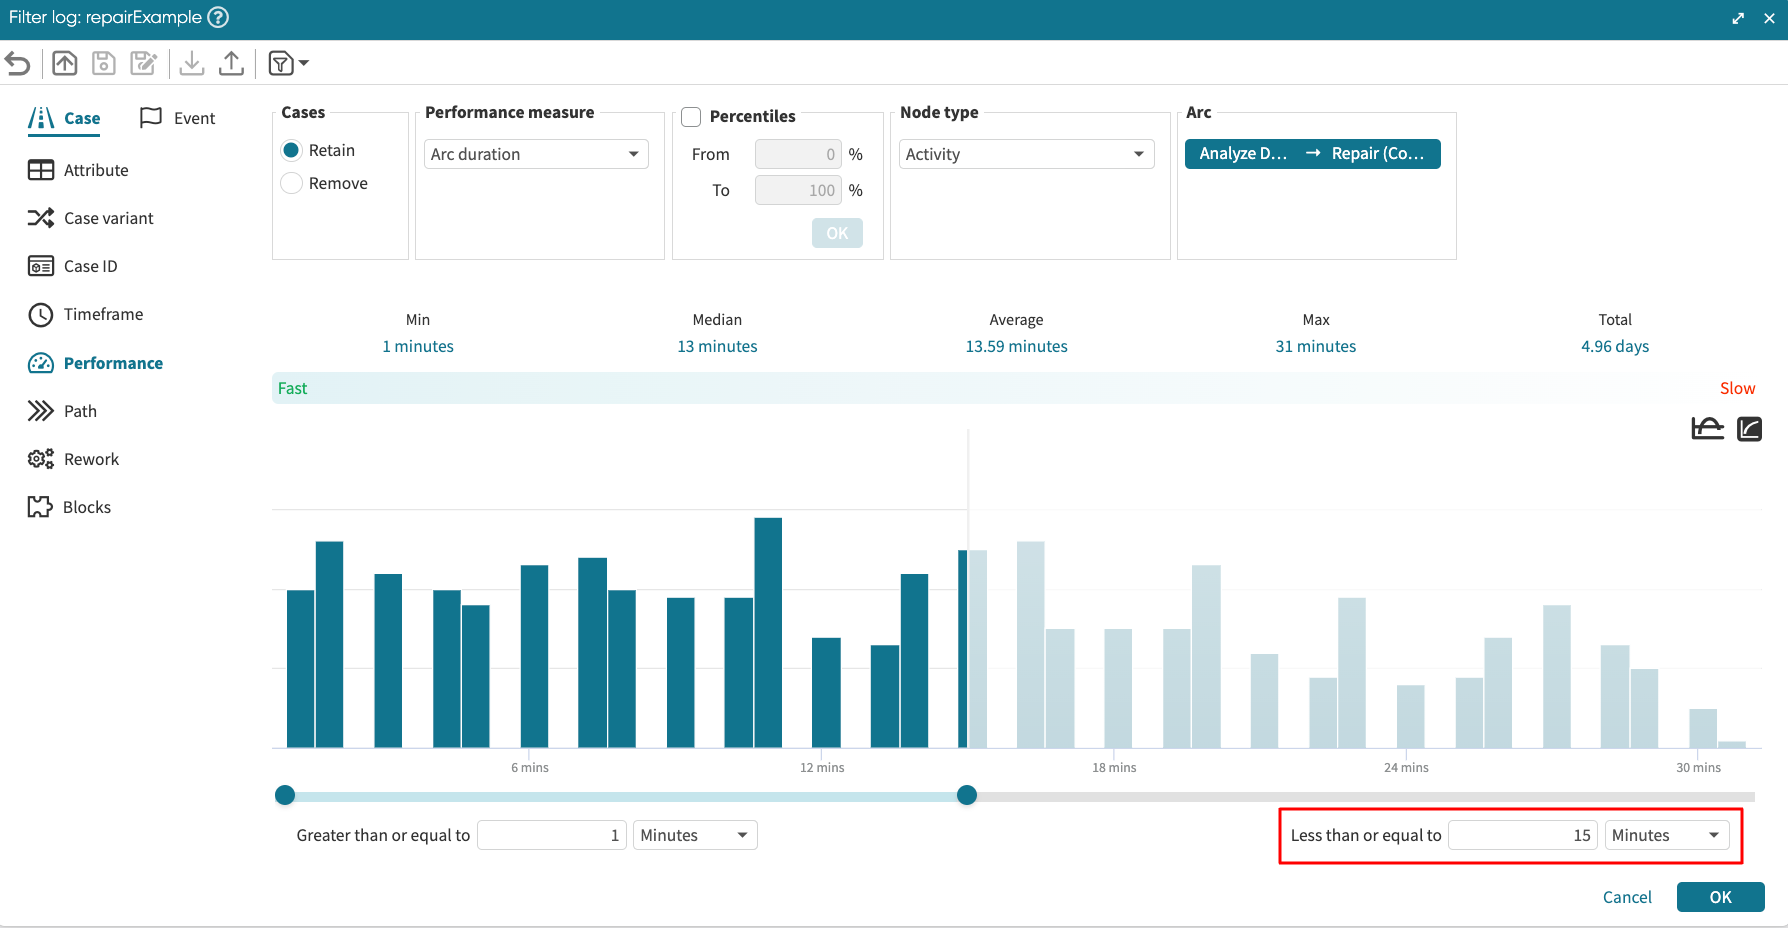
In the performance measure dropdown, click Arc duration.
Select a Node type from the dropdown. In our case, we select Activity.
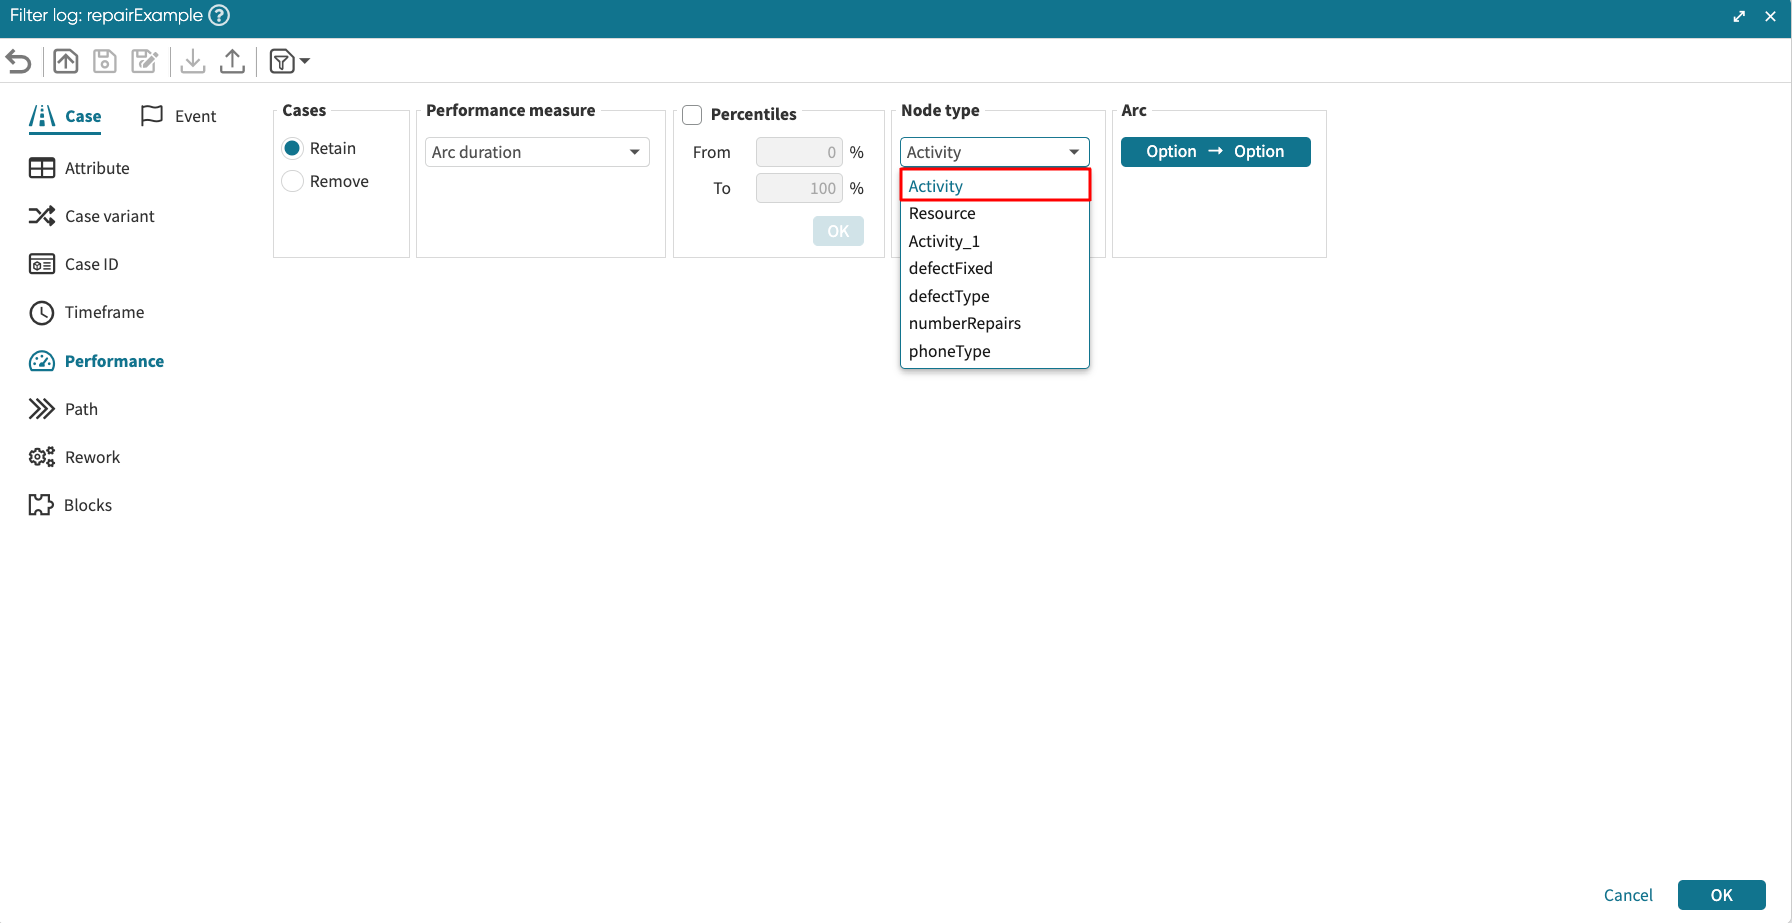
Finally, we define the arc in the Arc tab. Click Option -> Option. In our example, our arc is between Analyze Defect and Repair (Complex).
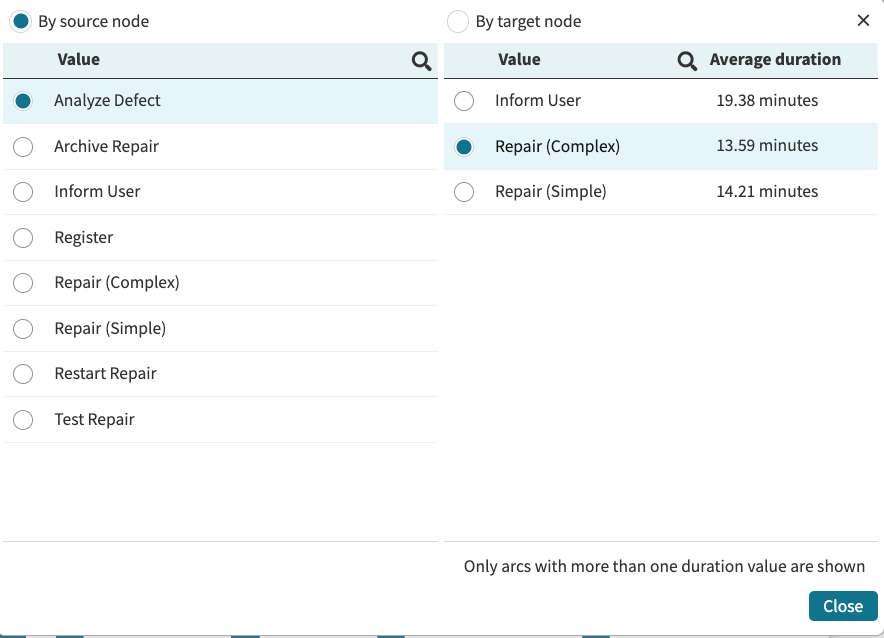
Click Close to apply the arc. Set the filter condition to less than or equal to 15 minutes.
Click OK to apply the filter.
Percentile performance filter
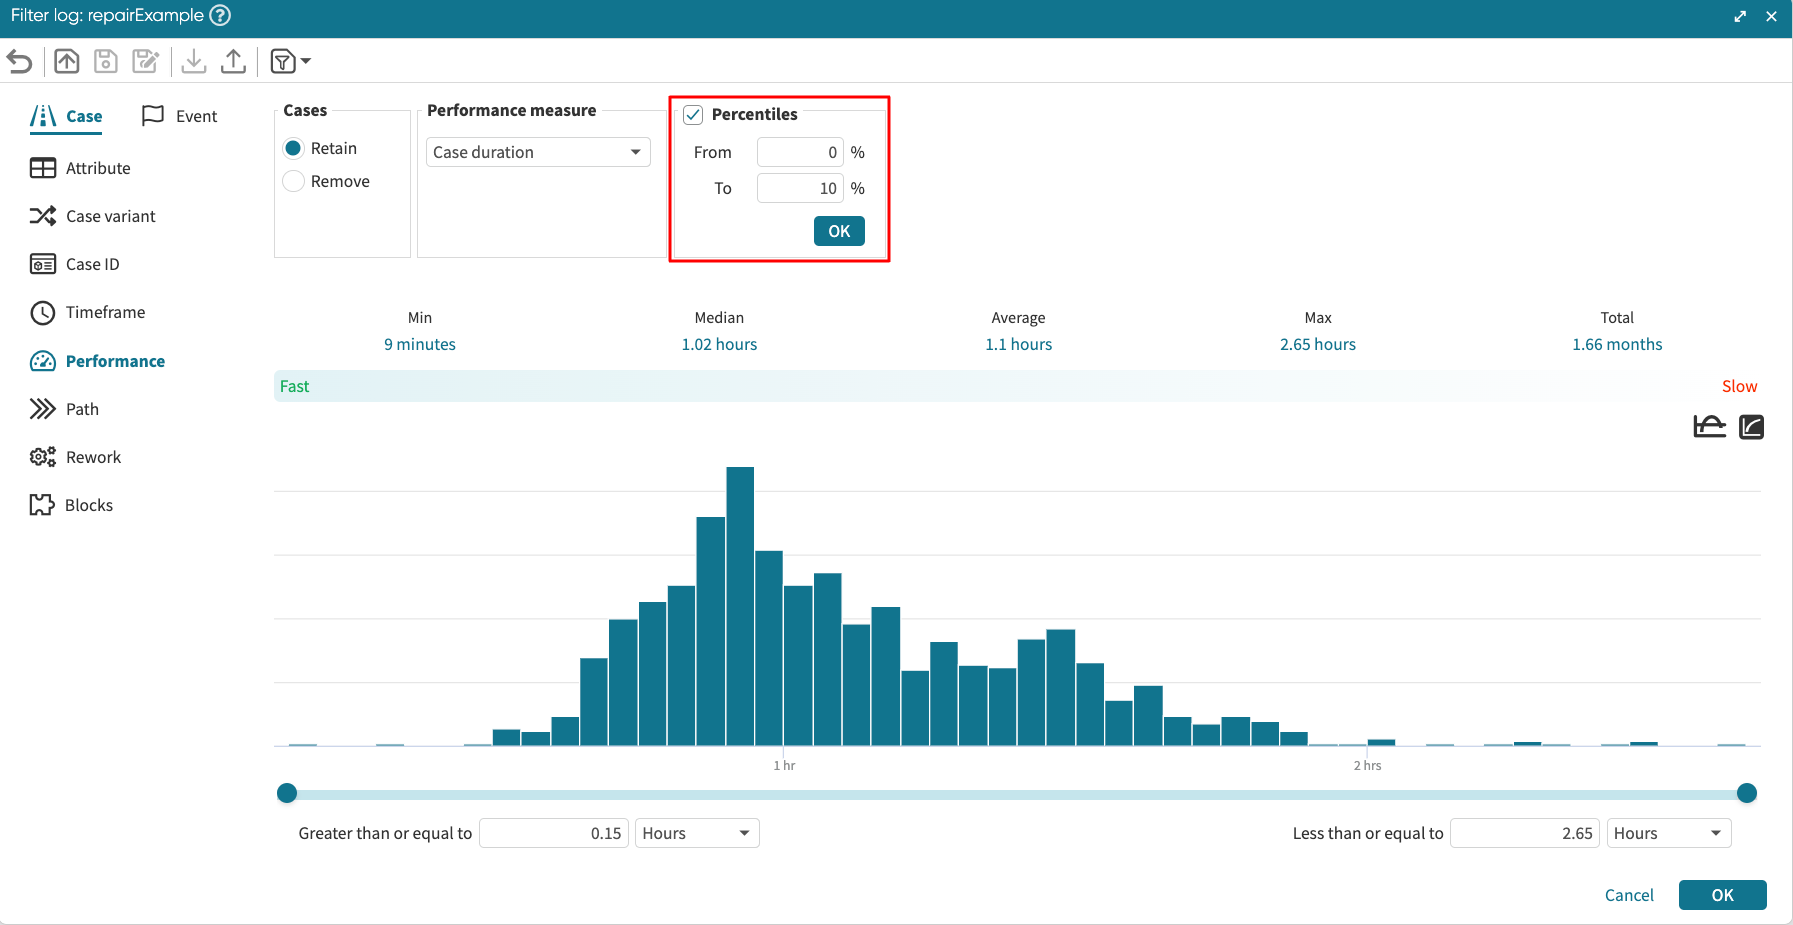
We can filter based on a percentile over a performance metric in the performance filter. For example, retrieve all cases in the top-10th percentile of case duration. In other words, the top 10% fastest cases.
To use the percentile performance filter, tick on the Percentiles box and enter the desired percentiles. For example, to retain the cases in the lower decile of case duration, enter 0 in the From and 10 in the To percentile.
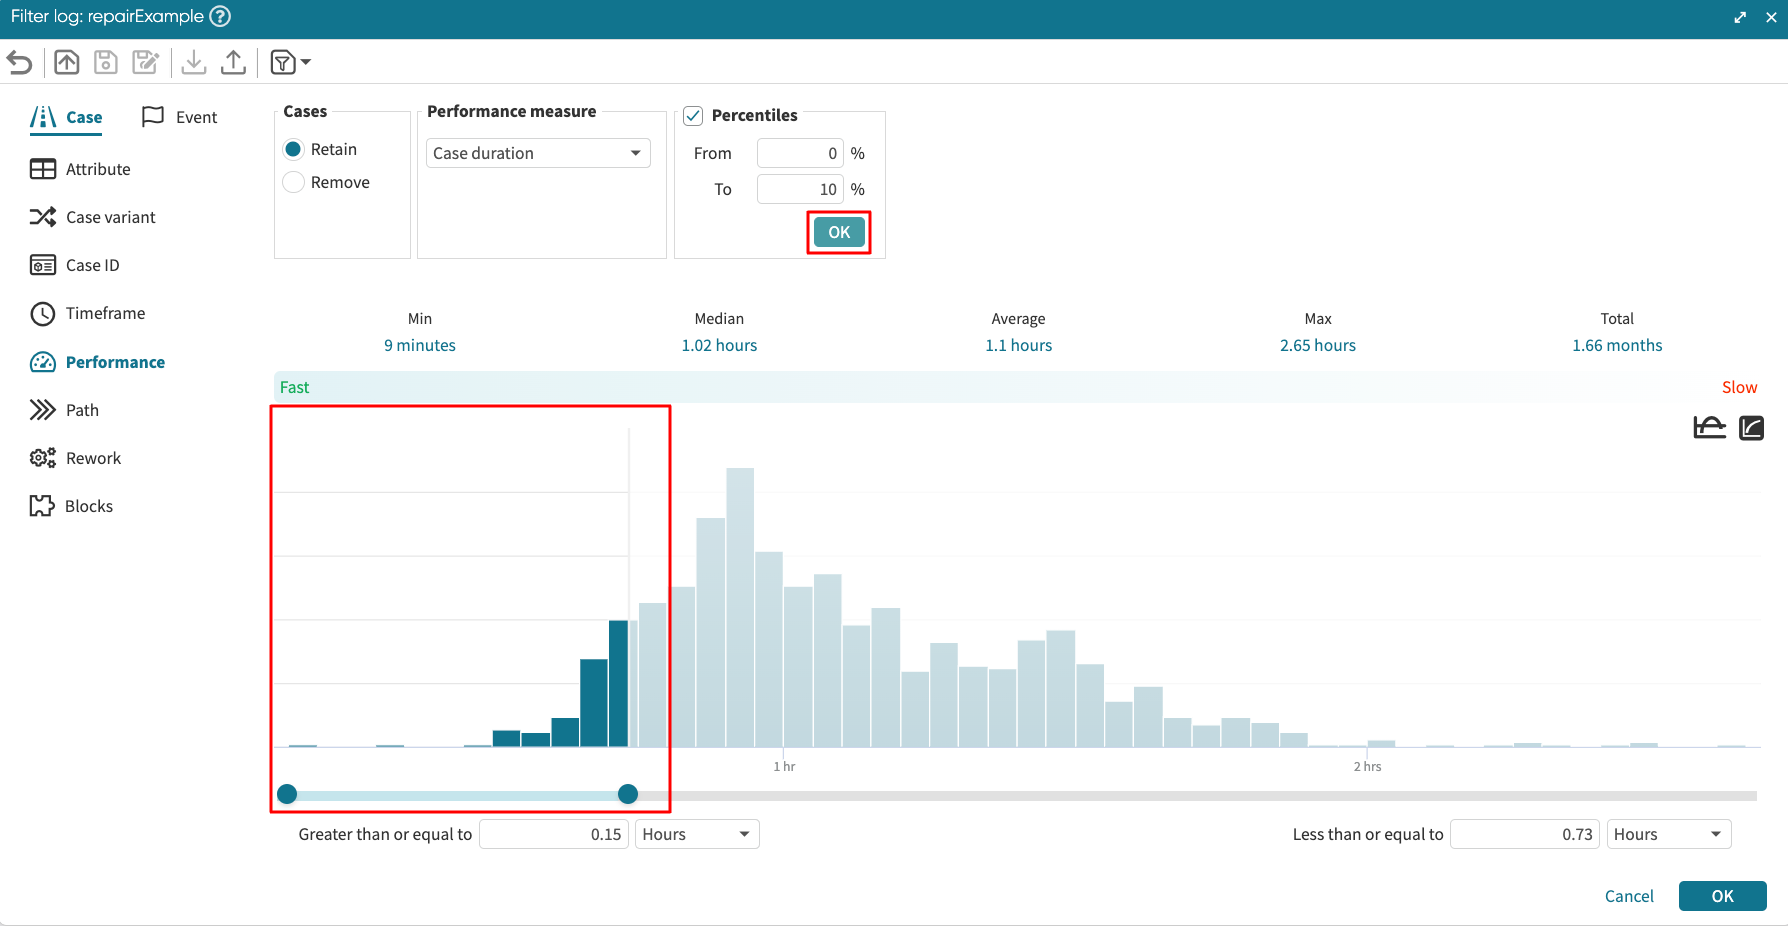
Click OK. The slider is updated to reflect that only the bottom-10th percentile is retained.
Case > Path filter
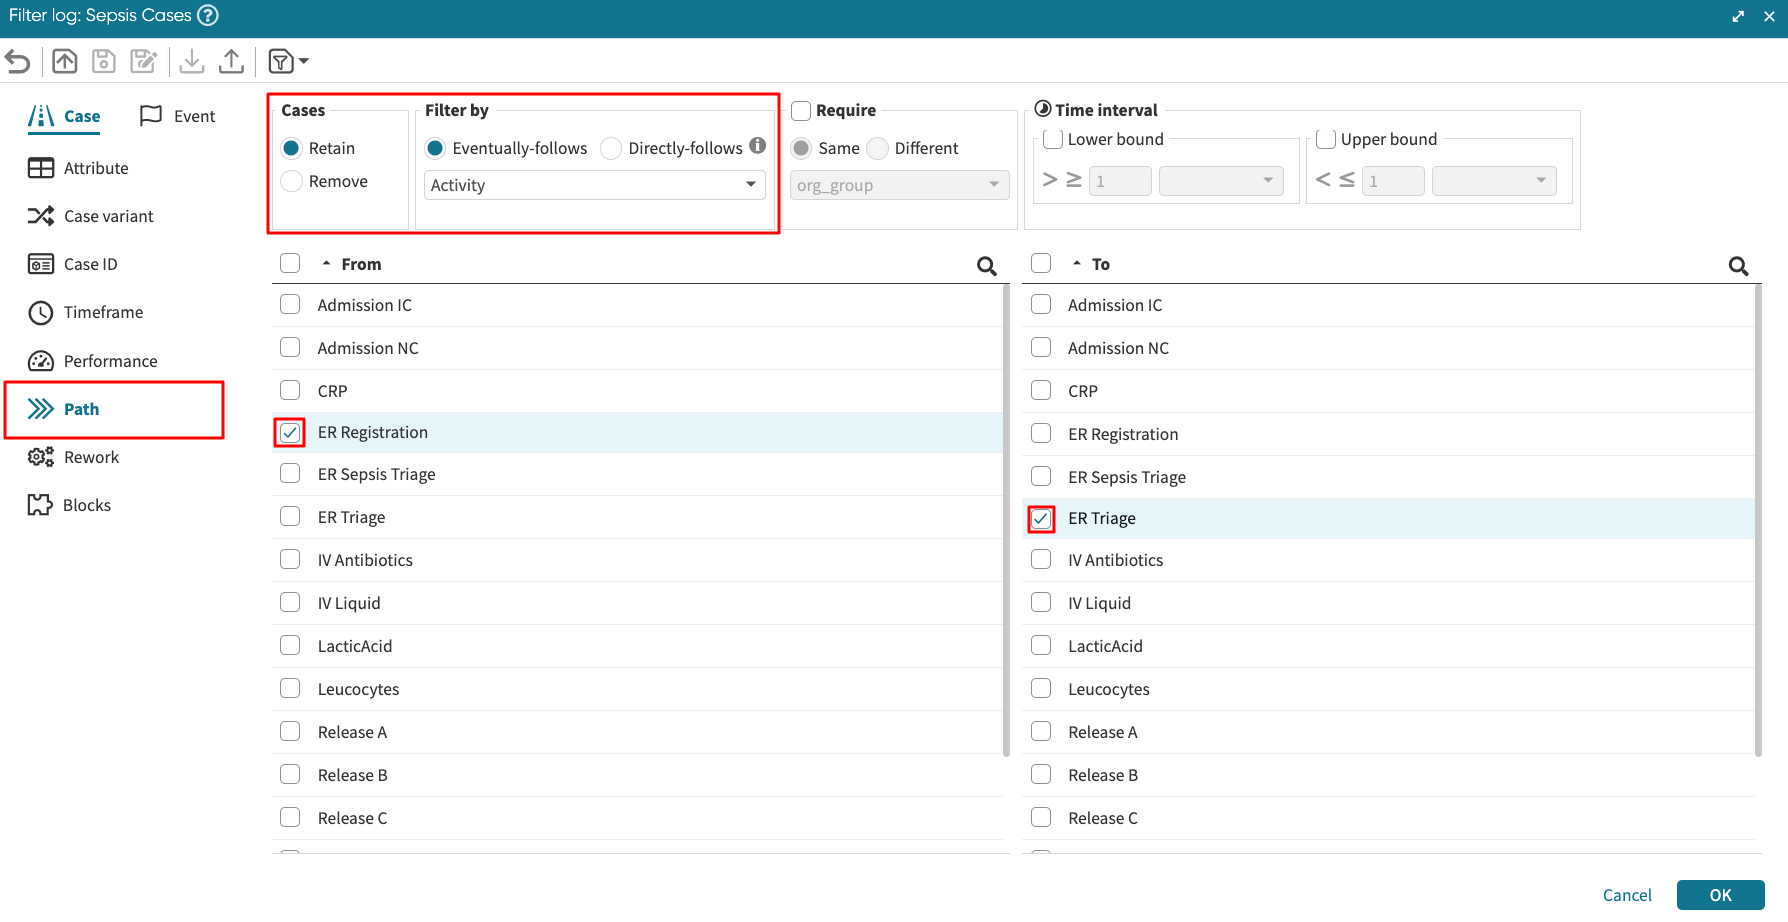
We can use the Path filter to analyze the transitions between the activities performed. This is typically used for conformance checking. For example, it is required that the “ER Registration” activity is done before “ER Triage”. We can check whether this happened in all cases using the Rework filter.
Click on the Path filter. Click Remove. Click Eventually follows. Select “ER Registration” as From and “ER Triage” as To. This simply removes cases where ER Triage eventually follows ER Registration, leaving behind cases that it does not.
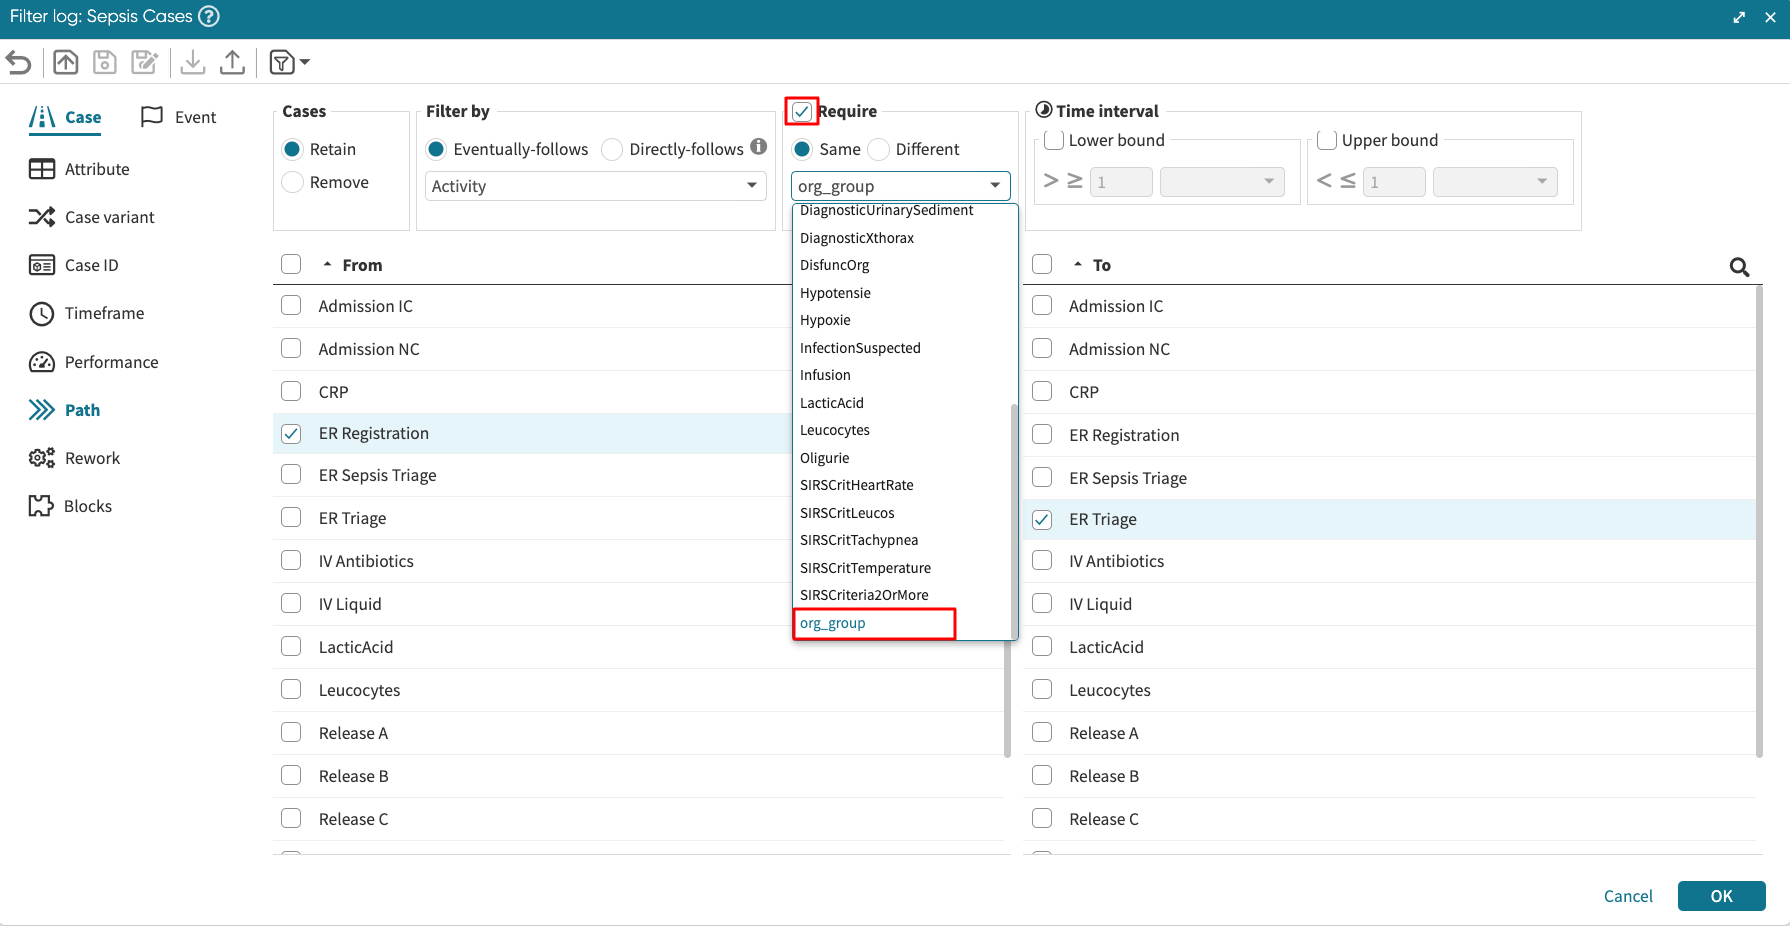
We can also ensure the cases filtered have the same or different values of an attribute. This can be done by checking the Require checkbox.
For instance, we can ensure that in cases where ER Triage does not eventually follow ER Registration, the resources performing both activities are from the same group. Select “Same” and select org:group from the drop-down list of the Path filter.
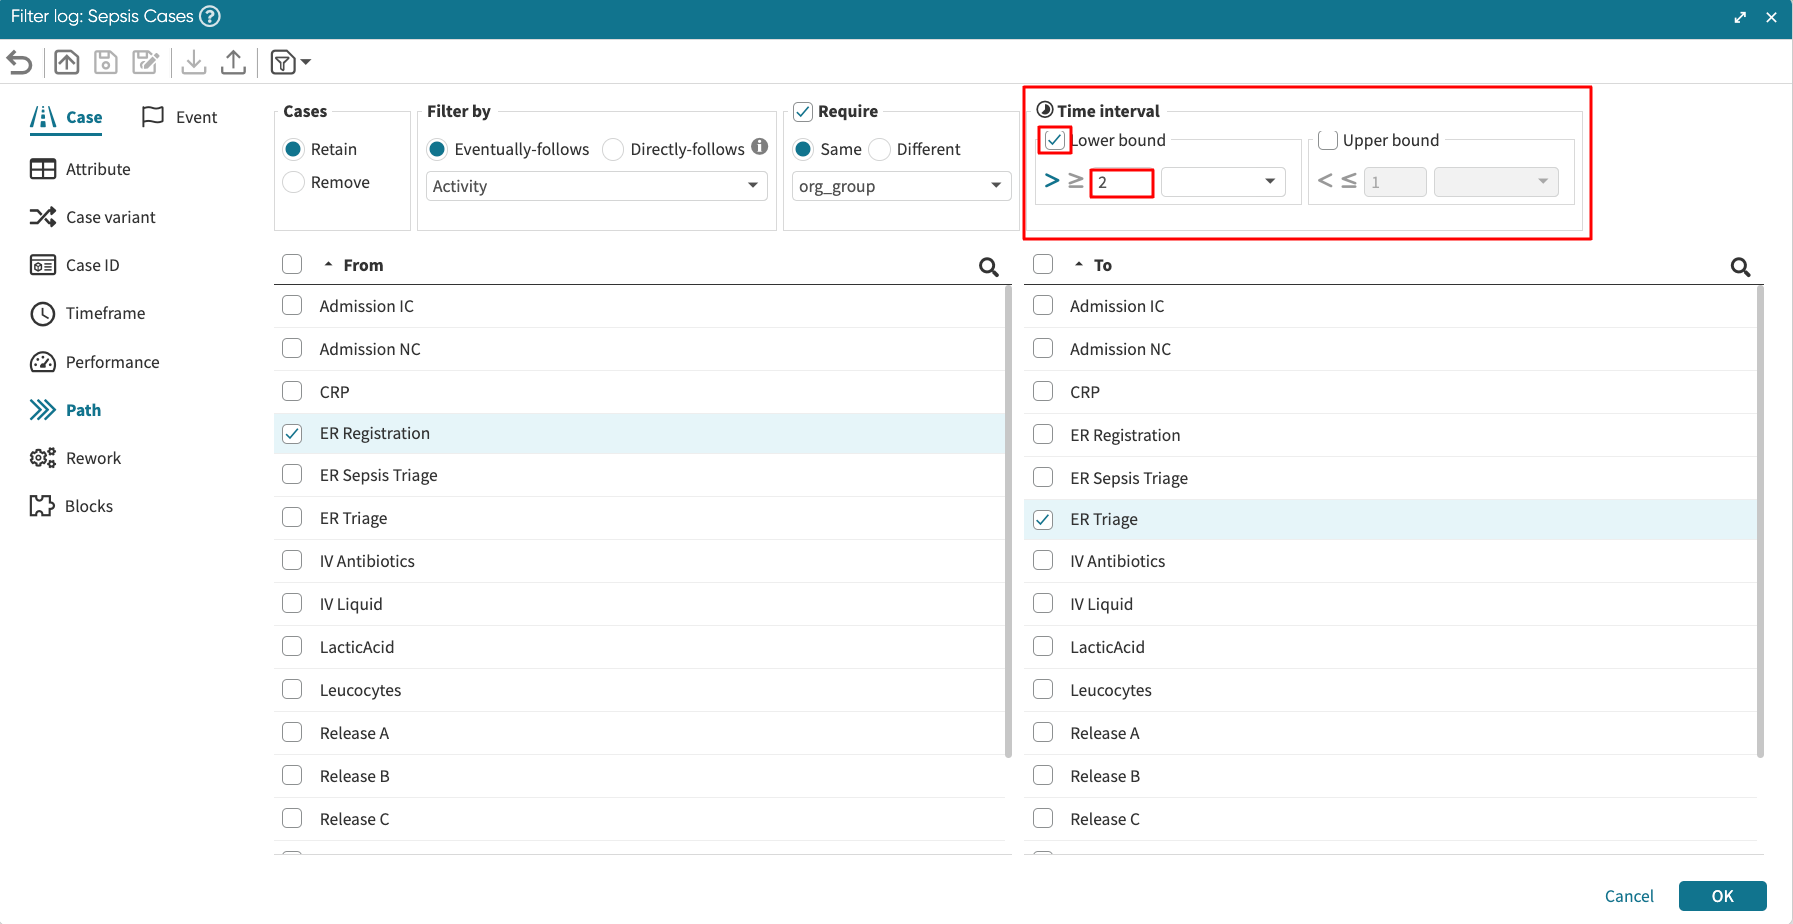
The time between the occurrence of activities can also be captured by using the Lower and Upper bound fields of the Path filter. For example, retain those cases where the time interval between ER Registration and Release A is greater than 2 hours.
Case > Rework filter
In some processes, certain activities are repeated. This is called a rework. Rework in a case could be in three forms:
Self-loop: When an activity occurs more than once consecutively.
Short loop: When there is a back-and-forth between two activities. This is also called a ping-pong effect.
Indirect repetition loop: When several activities are repeated in a sequence.
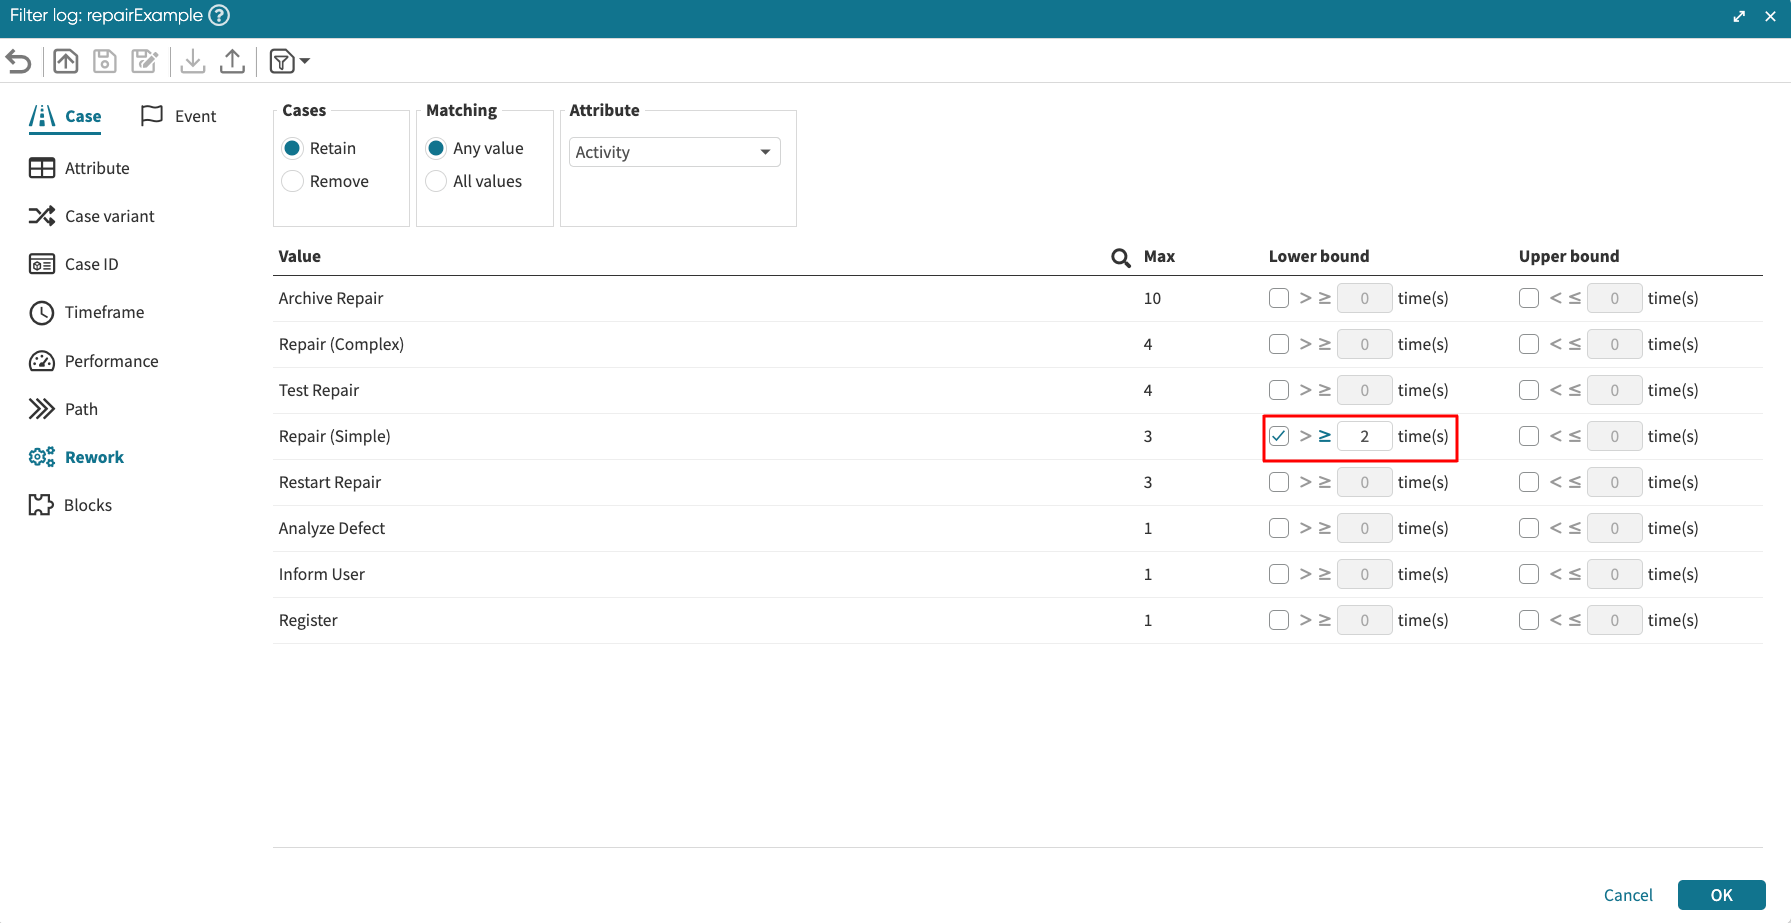
A Rework filter can isolate repetitions so that only those process sequences that contain specific repetitions are retained or removed. We can also set the Lower and Upper bounds for the reworked activities. The lower bound defines the minimum number of times the activity is repeated, while the upper bound sets the maximum number of times the activity is repeated.
For instance, if we want to determine the number of times the activity “Repair (Simple)” was repeated, we can set the lower bound to 2.
We can also use the Rework filter to determine cases with a rework loop. For instance, we can determine whether there is a rework between “Test Repair” and “Restart Repair” activities. To ascertain there is rework between two activities, the first activity in the process (Test Repair) must occur at least twice. In contrast, the second activity (Restart Repair) occurs at least once.
To do this, set the lower bound of “Test Repair” to 2 and the lower bound of “Restart Repair” to 1. Select “Retain” cases and select “All values” for Matching.
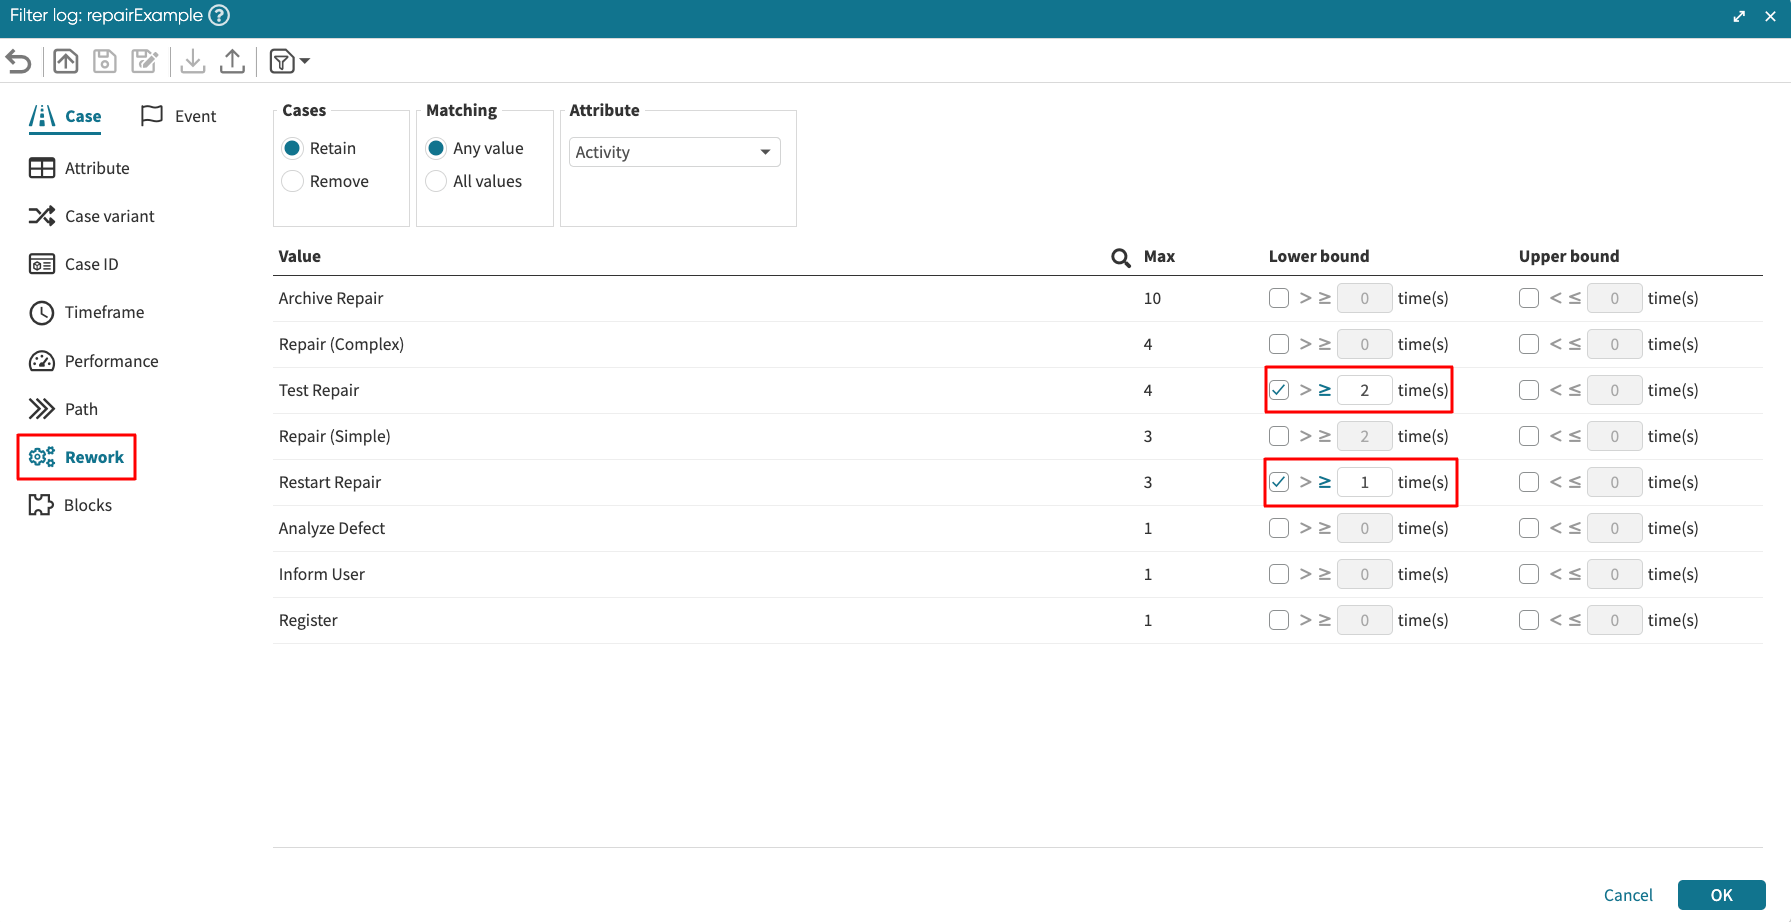
Click OK to apply the filter.

The result shows that in 293 cases, there was a rework loop between “Test Repair” and “Restart Repair”.
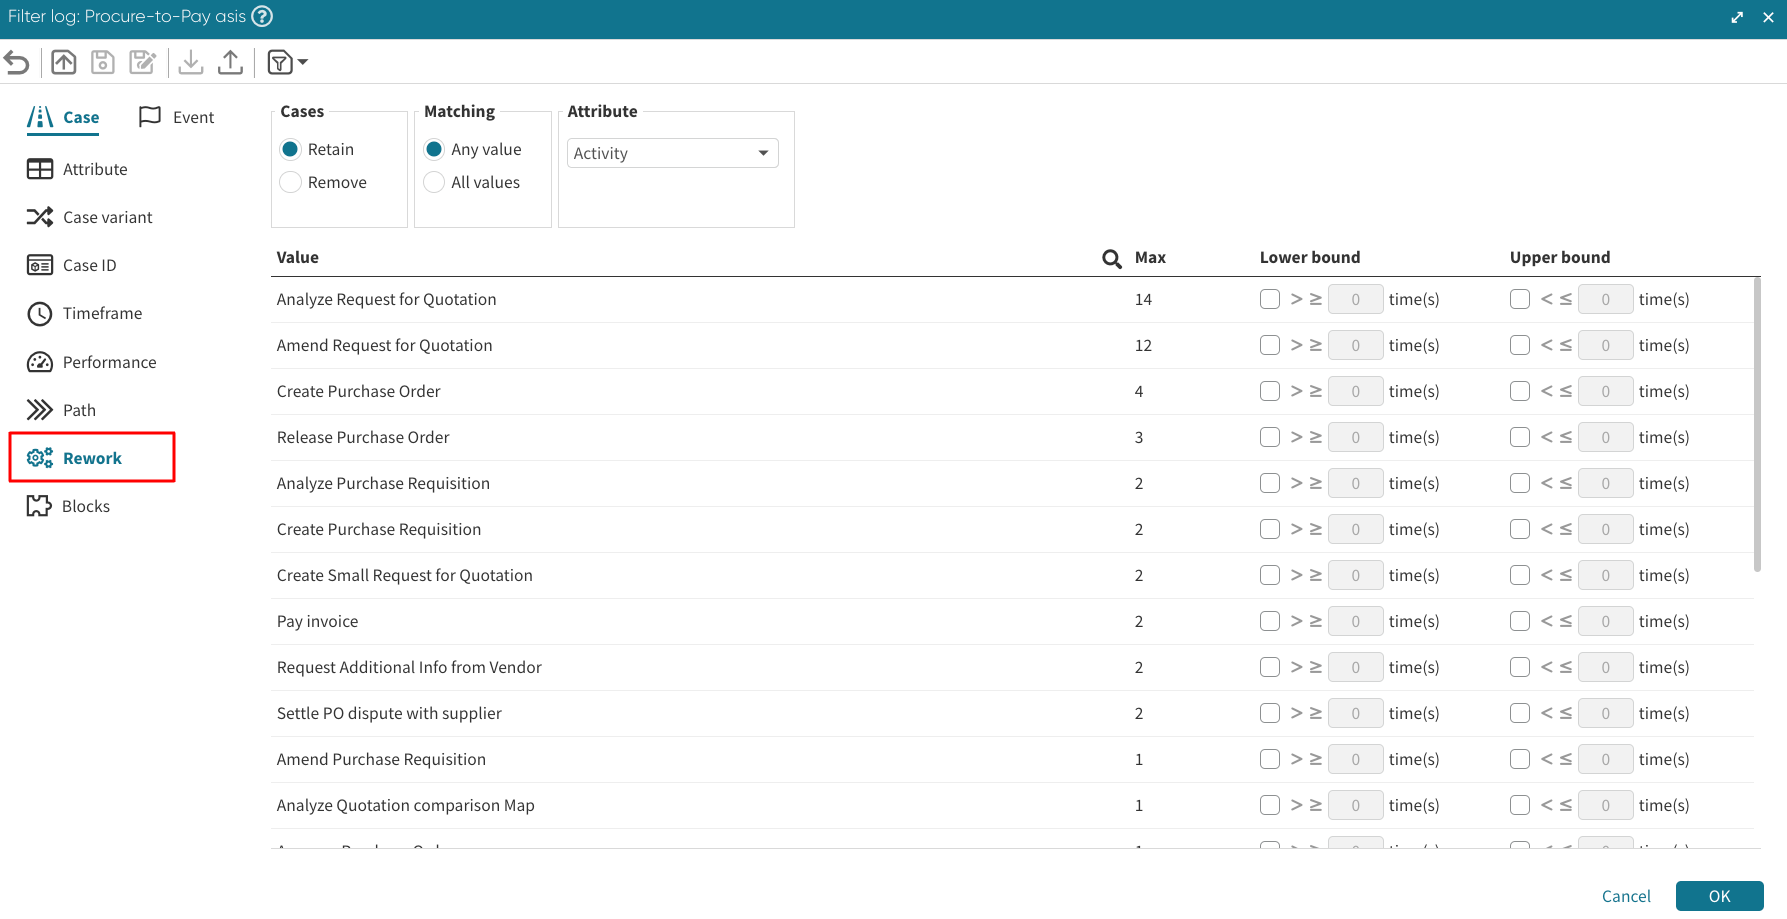
We can also create a rework filter on other event attributes such as roles, resources, etc. This way, we can use the rework filter to discover cases where a role, resource or any other event attribute is involved in multiple activities in a case.
For instance, in a Procure to Pay log, we may wish to filter cases where the “Purchasing Agent” is involved in more than 10 activity instances. If, by design, the Purchasing agent is not meant to be involved in a case more than 10 times, this filter returns cases where the purchasing agent was involved in a rework.
To create this filter, open the Filter log window and go to Rework.
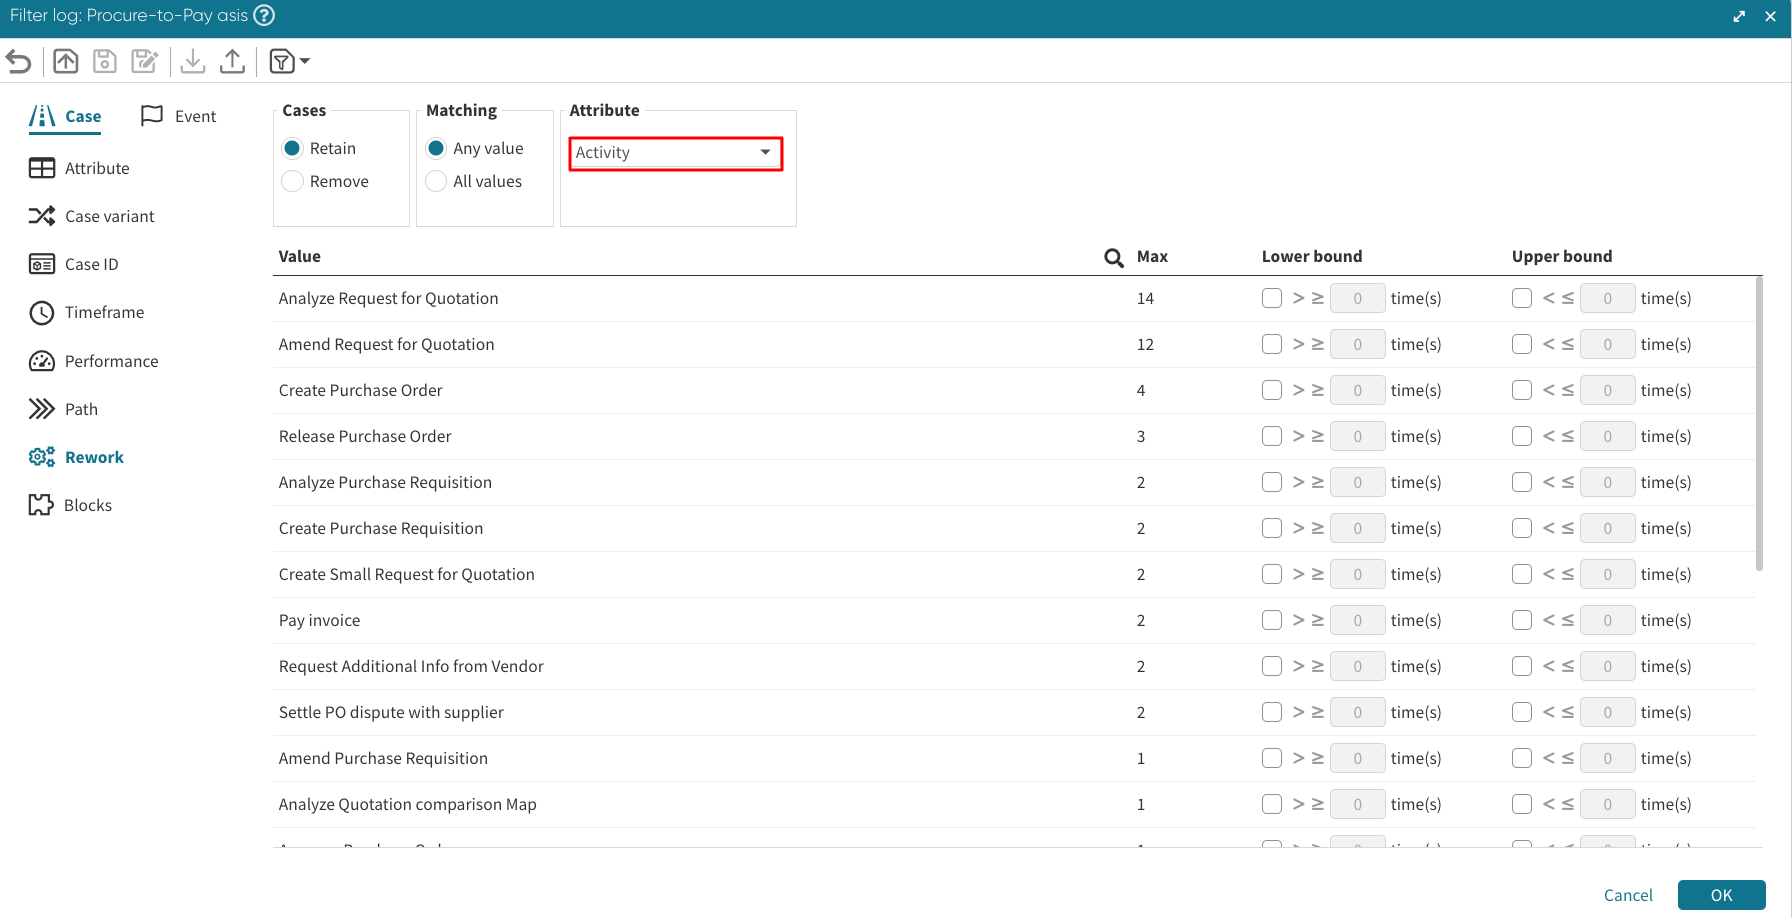
Click the Attribute dropdown.
Select the attribute we wish to use to define the rework filter. In our case, we select Role.
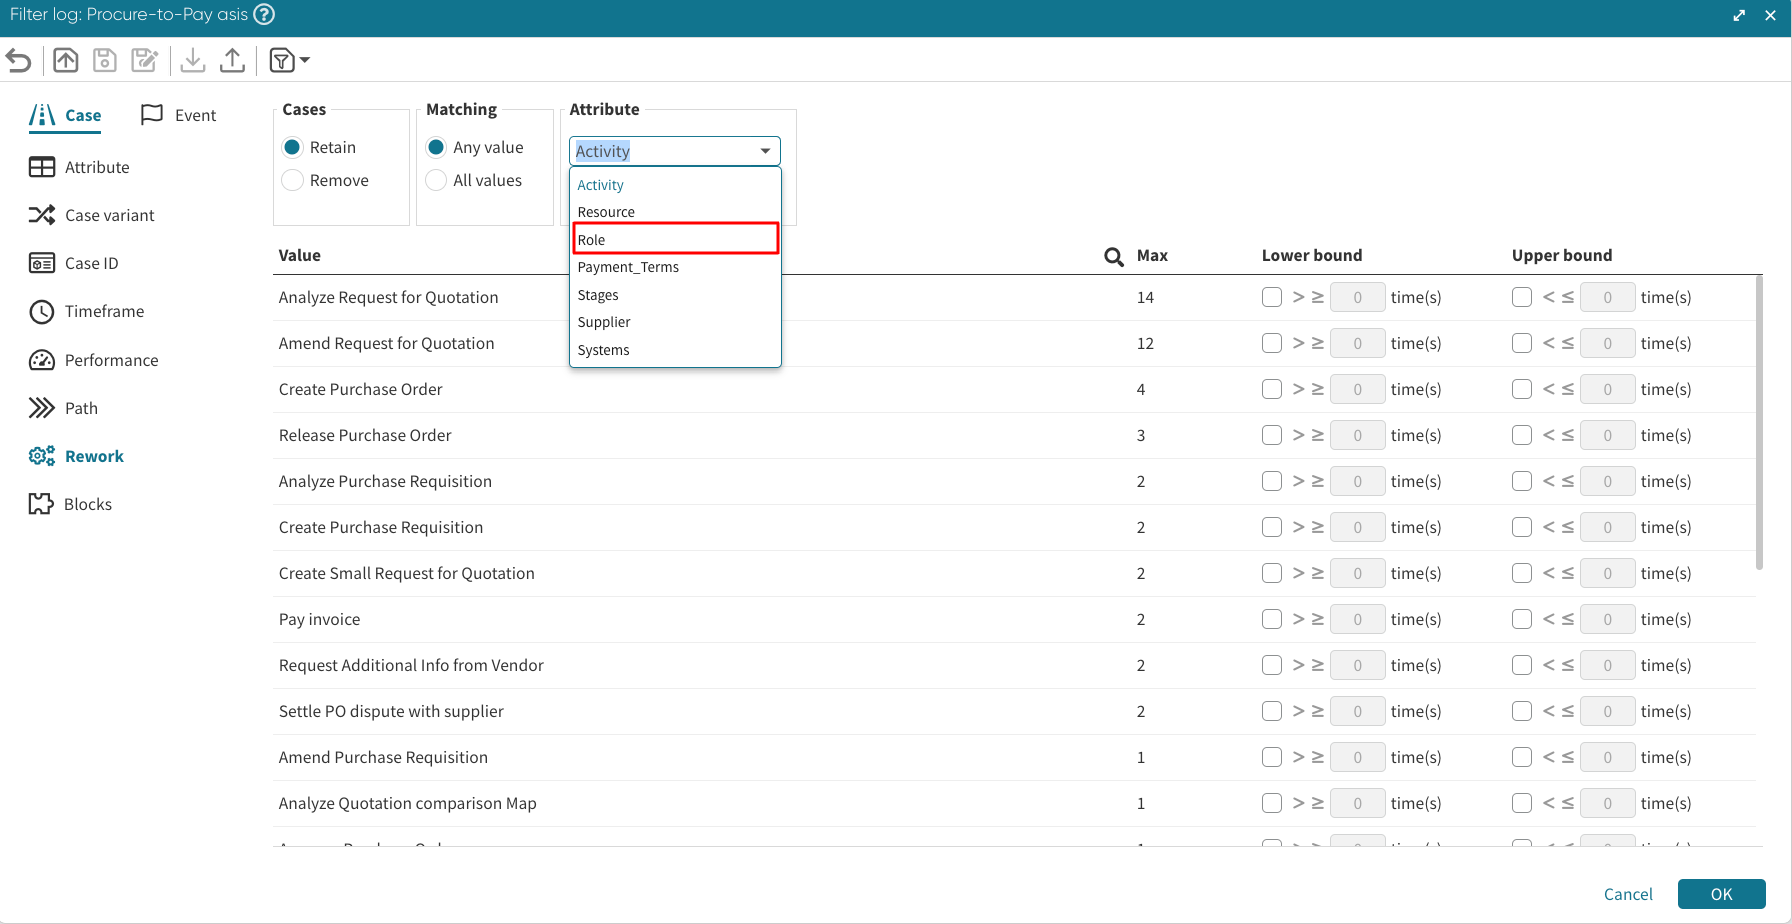
We can now create the filter criterion.
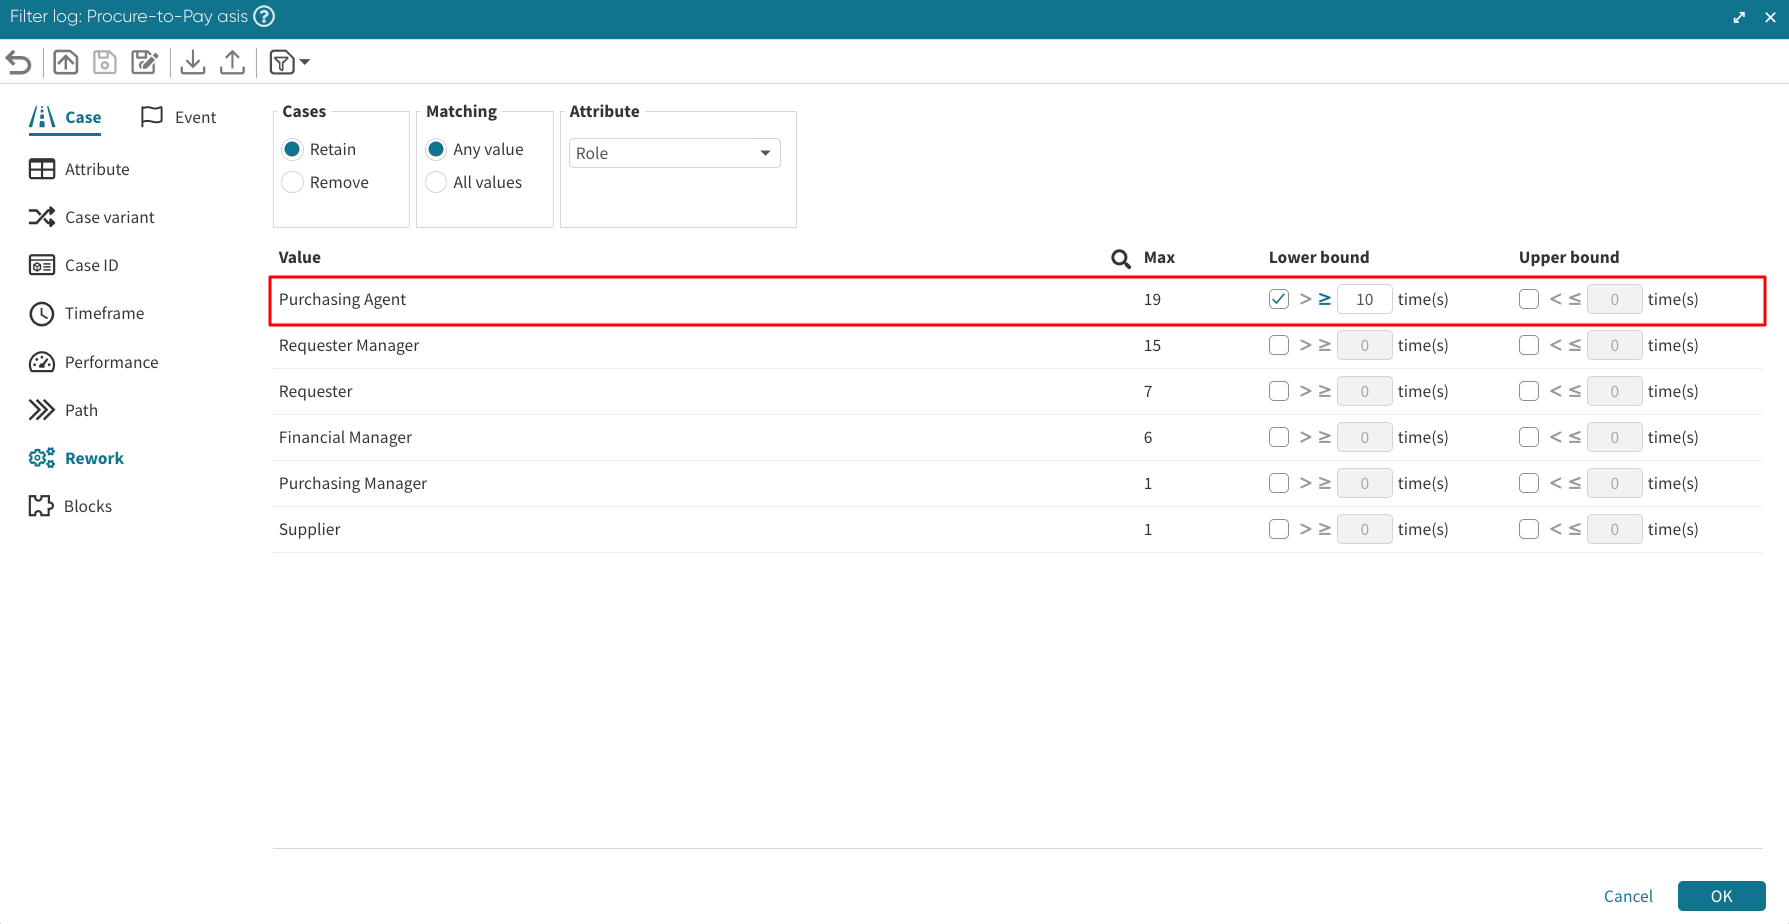
Click OK.
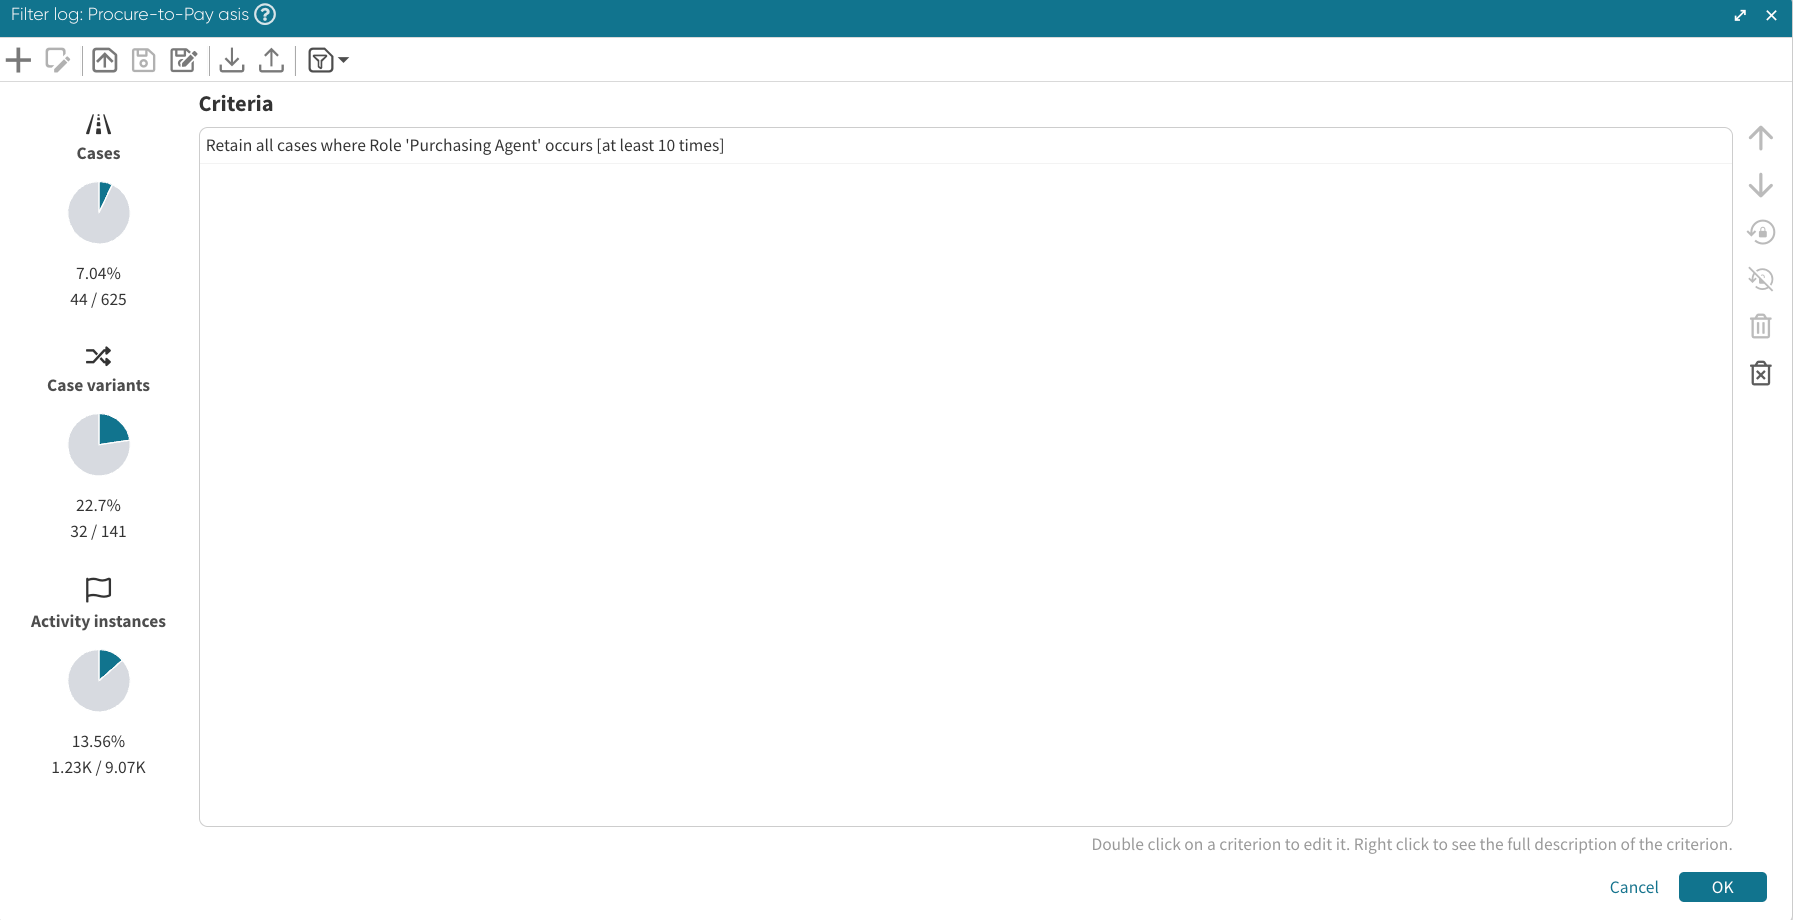
We see that the “Purchasing Agent” was involved in a case in 44 cases.
Case > Blocks filter
The Blocks filter is a new type of filter that allows us to create filters consisting of multiple conditions in an intuitive manner. We can create multiple filter conditions in one go by dragging and dropping filter blocks.
A Blocks filter consists of one or more block rows. This is the filter criterion that would be applied to the log. The simplest block row consists of the following:
A left-hand side consisting of a single attribute or a metric (e.g., case duration)
A logical operator (e.g., equal, greater than, etc.)
A right-hand side, which may be an attribute, a metric, or a constant value (e.g., 100 or “Japan”)
Multiple block rows are concatenated by either an “AND” logical operator or an “OR” logical operator. If the “AND” logical operator is selected, then the Blocks filter criterion is fulfilled if every one of its conditions (i.e., block row) is true. If the “OR” operator is selected, the Blocks filter criterion is fulfilled if at least one of its conditions is true.
To create a block filter, click the filter icon to open the Filter log window, then click Blocks.
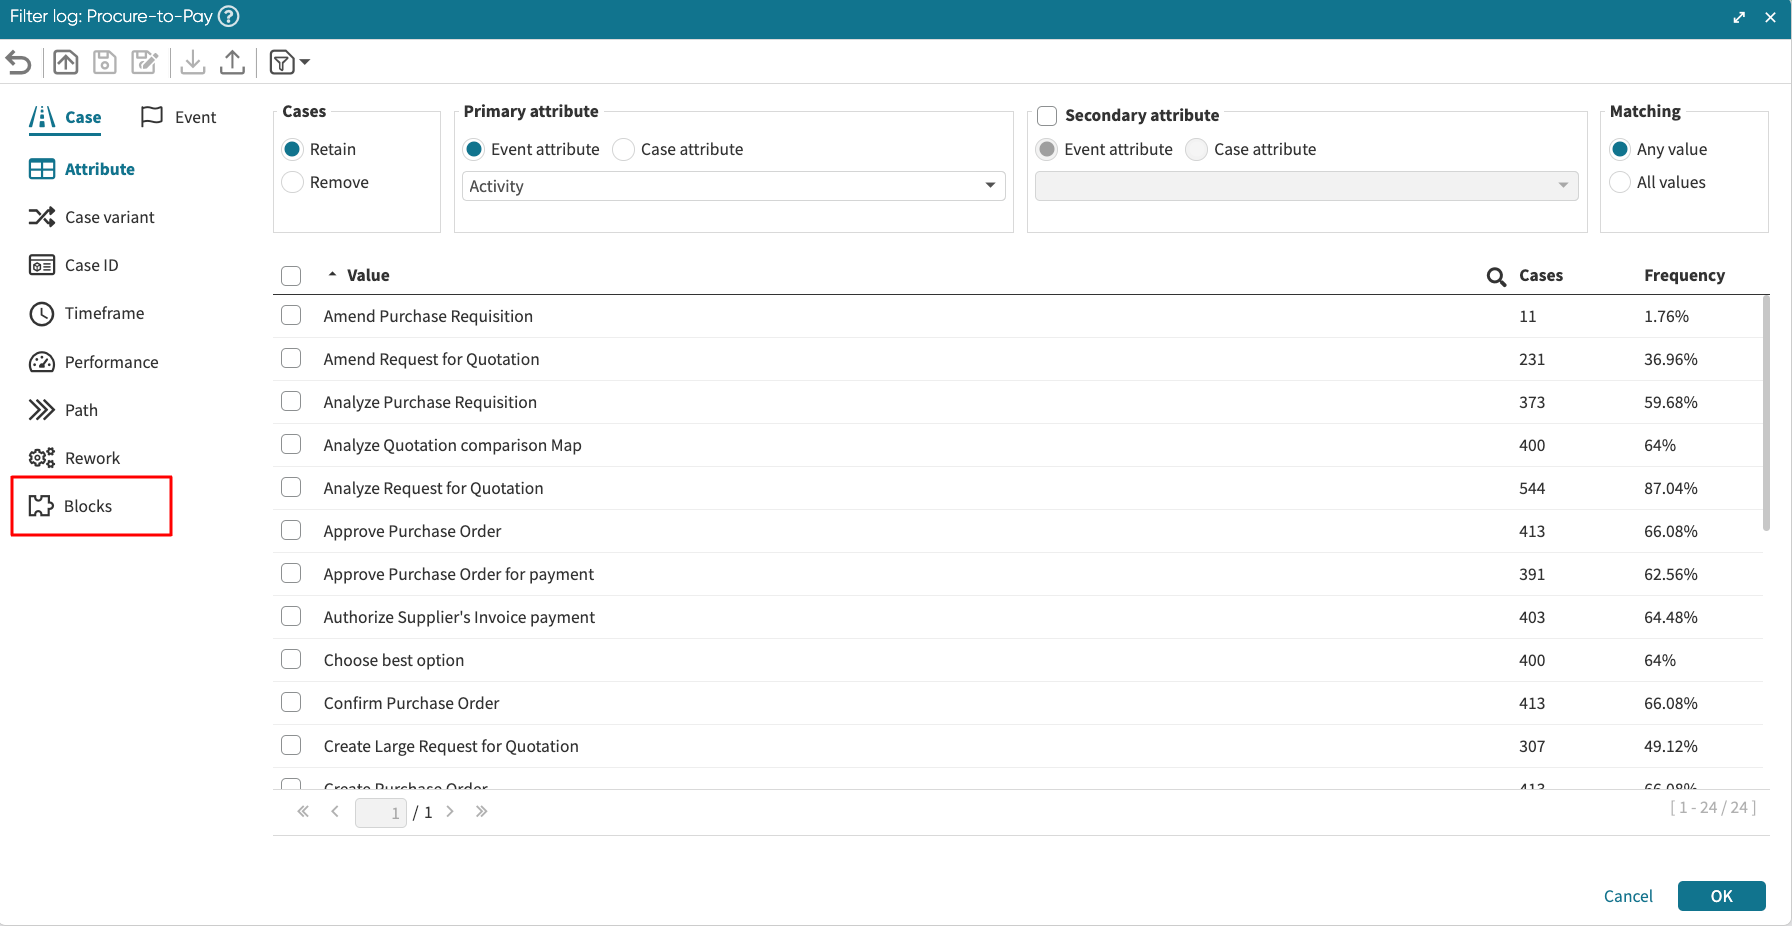
The blocks filter environment is displayed.
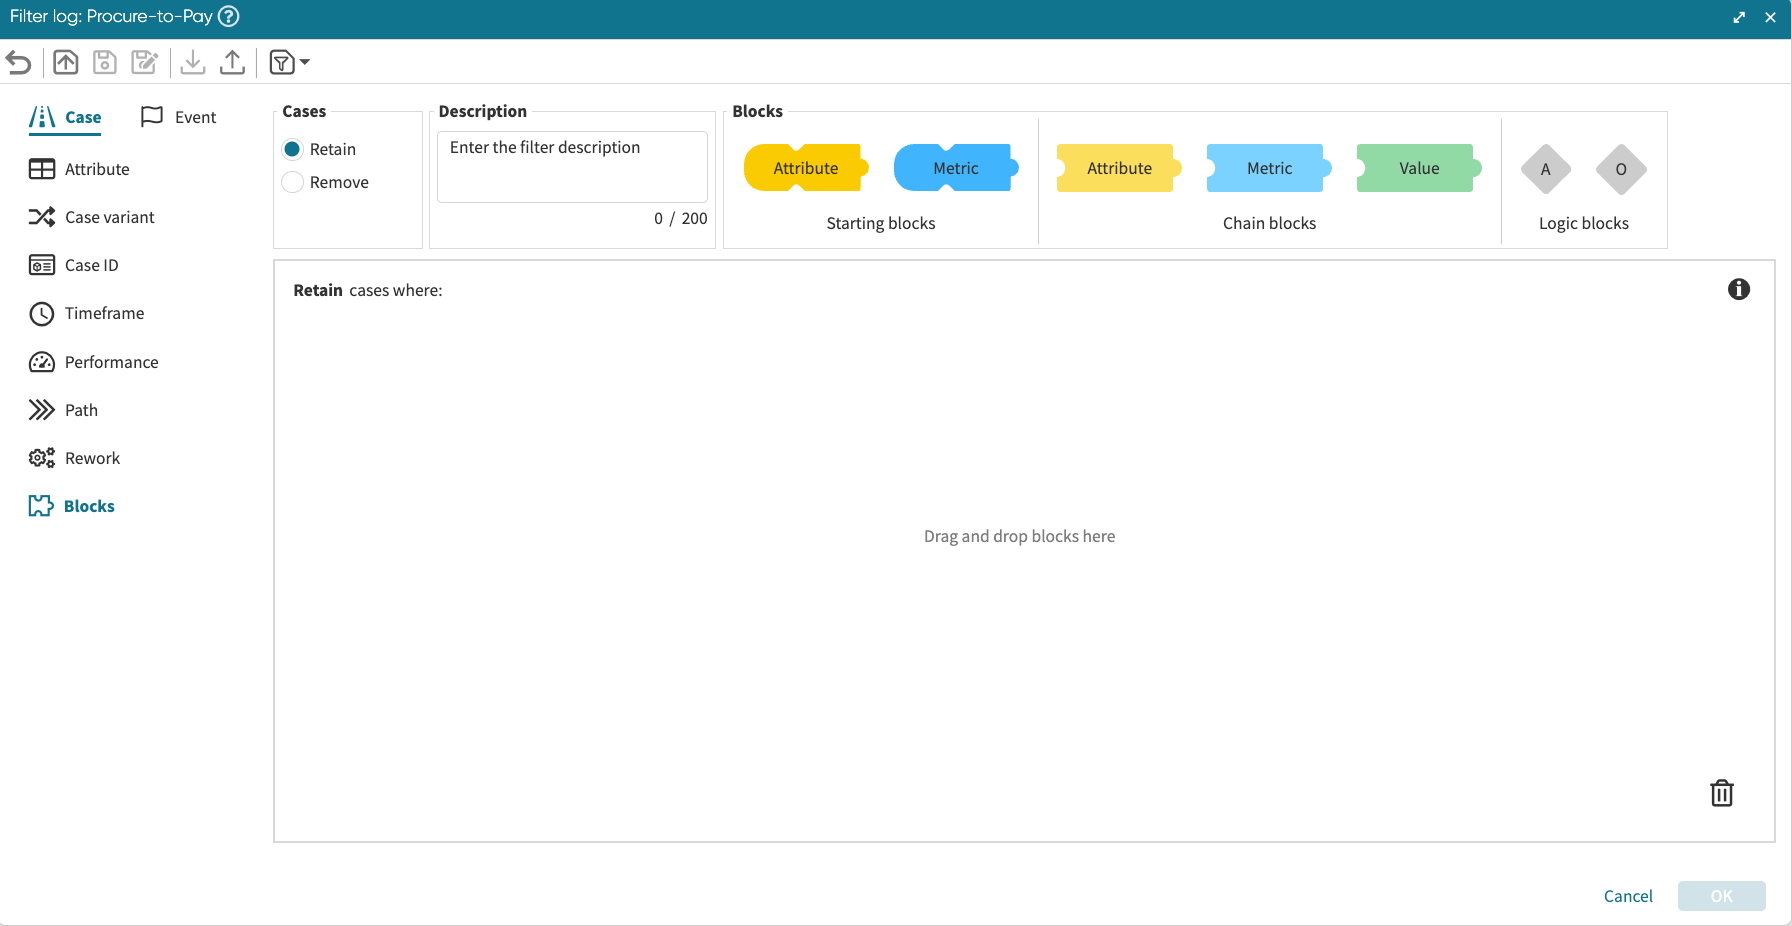
The Blocks filter environment contains different sections.
Cases (retain or remove): This option determines whether a case that fulfills the Block filter criterion should be retained or removed.
Description: This allows us to enter the description of the filter to be created. If no description is added, Apromore uses “User-defined blocks filter” as the default description.
Starting blocks: This is the attribute or metric we wish to begin our filter with (the left-hand side of a condition). There are two types of starting blocks.
Attributes: Displays attributes in the log. For instance, if we want to filter an attribute, say cases in AUS, we can add an Attribute starting block and select Country.
Metric: Displays performance metrics that can be derived from the log. If, for instance, we want to filter cases where the Case duration is greater than a value, we can add a Metric starting block and select Case duration.
Note
All block rows must begin with a starting block.
Chain blocks: This allows us to complete the filter criterion or continue expanding the block row. We can add multiple chain blocks to create a more complicated filter criterion on a block row. For instance, we can add a block row that filters cases where the discount rate * invoice amount = discount. In this example, there are two chain blocks — the invoice amount and the discount.
There are three types of chain block:
Attribute: Displays attributes in the log.
Metric: Displays performance metric in the log.
Value: Allows us to enter a specific value.
Operator: This can be a mathematical operator, such as greater than, less than, addition, etc., that defines the operation to be performed on two consecutive blocks. Apromore shows a dropdown of possible operators depending on the data type of the block on the left side. The available operators can be classified into three:
String operators: Appears when the block on the left side is a string data type, e.g., activity. The operators are starts with, ends with, contains, equal to, and not equal. All string operators return a boolean.
Numerical operators: Appears when the block on the left side is a numerical data type, e.g., case duration. This can either return a Boolean or non-boolean.
Boolean: The operators are equal, greater than, less than, greater than or equal to, less than or equal to, and not equal.
Non-boolean: The operators are addition, subtraction, division, multiplication, square root, and power.
Timestamp operators: Appears when the block on the left side is of timestamp data type. This can either return a boolean or a non-boolean.
Boolean: The operators are equal, greater than, less than, greater than or equal to, less than or equal to, and not equal.
Non-boolean: The operators are addition and subtraction.
Note
A boolean operator must be the last operator on a block row. When a Boolean operator is selected, the block row is considered complete, and we cannot add further chain blocks. Conversely, when a non-boolean operator is selected, the block row is considered incomplete, and another chain block must be added.
Logic operators: This determines how the filter criterion is fulfilled. It allows us to concatenate multiple block rows using AND or OR logical operators. There are two logic operators:
AND (A): Filter criterion is fulfilled only when all the filter conditions in the block rows hold true.
OR (O): Filter criterion is fulfilled if at least one of the filter conditions in any of the block rows holds true.
To demonstrate the use of Blocks filter, let’s create a filter that retains cases with the following criteria:
Cases in AUS.
Cases where the invoice amount + 20% of the invoice amount (assuming VAT) is greater than 100,000 AUD.
Cases where the case variant frequency is greater than 5.
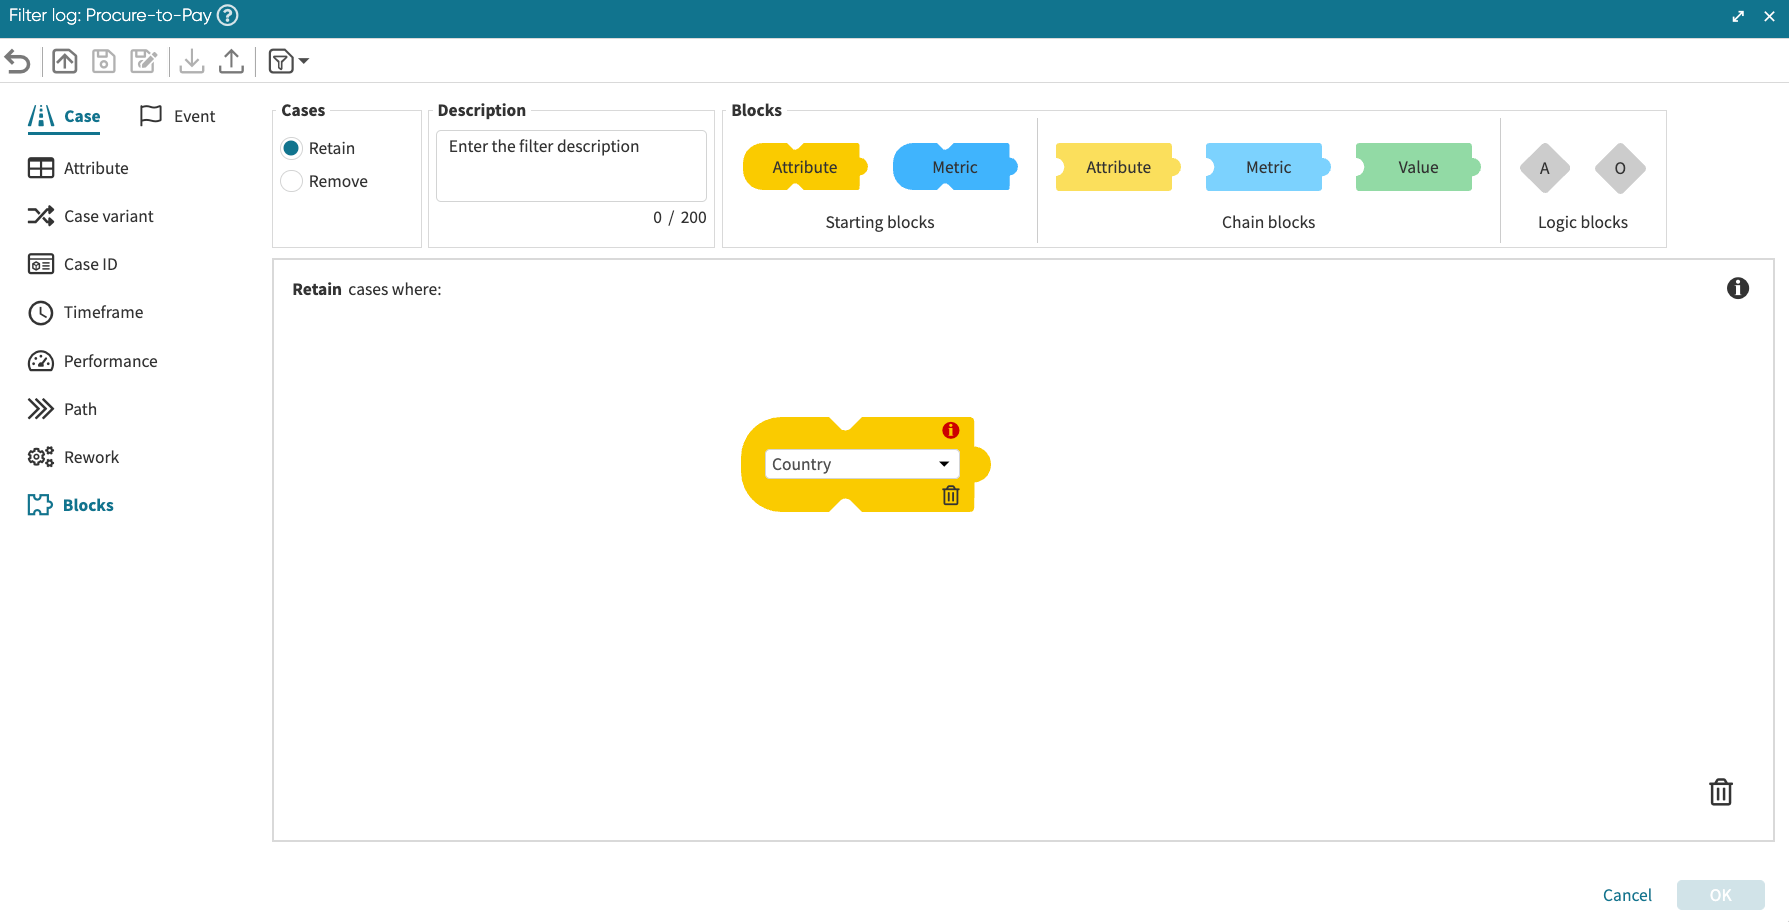
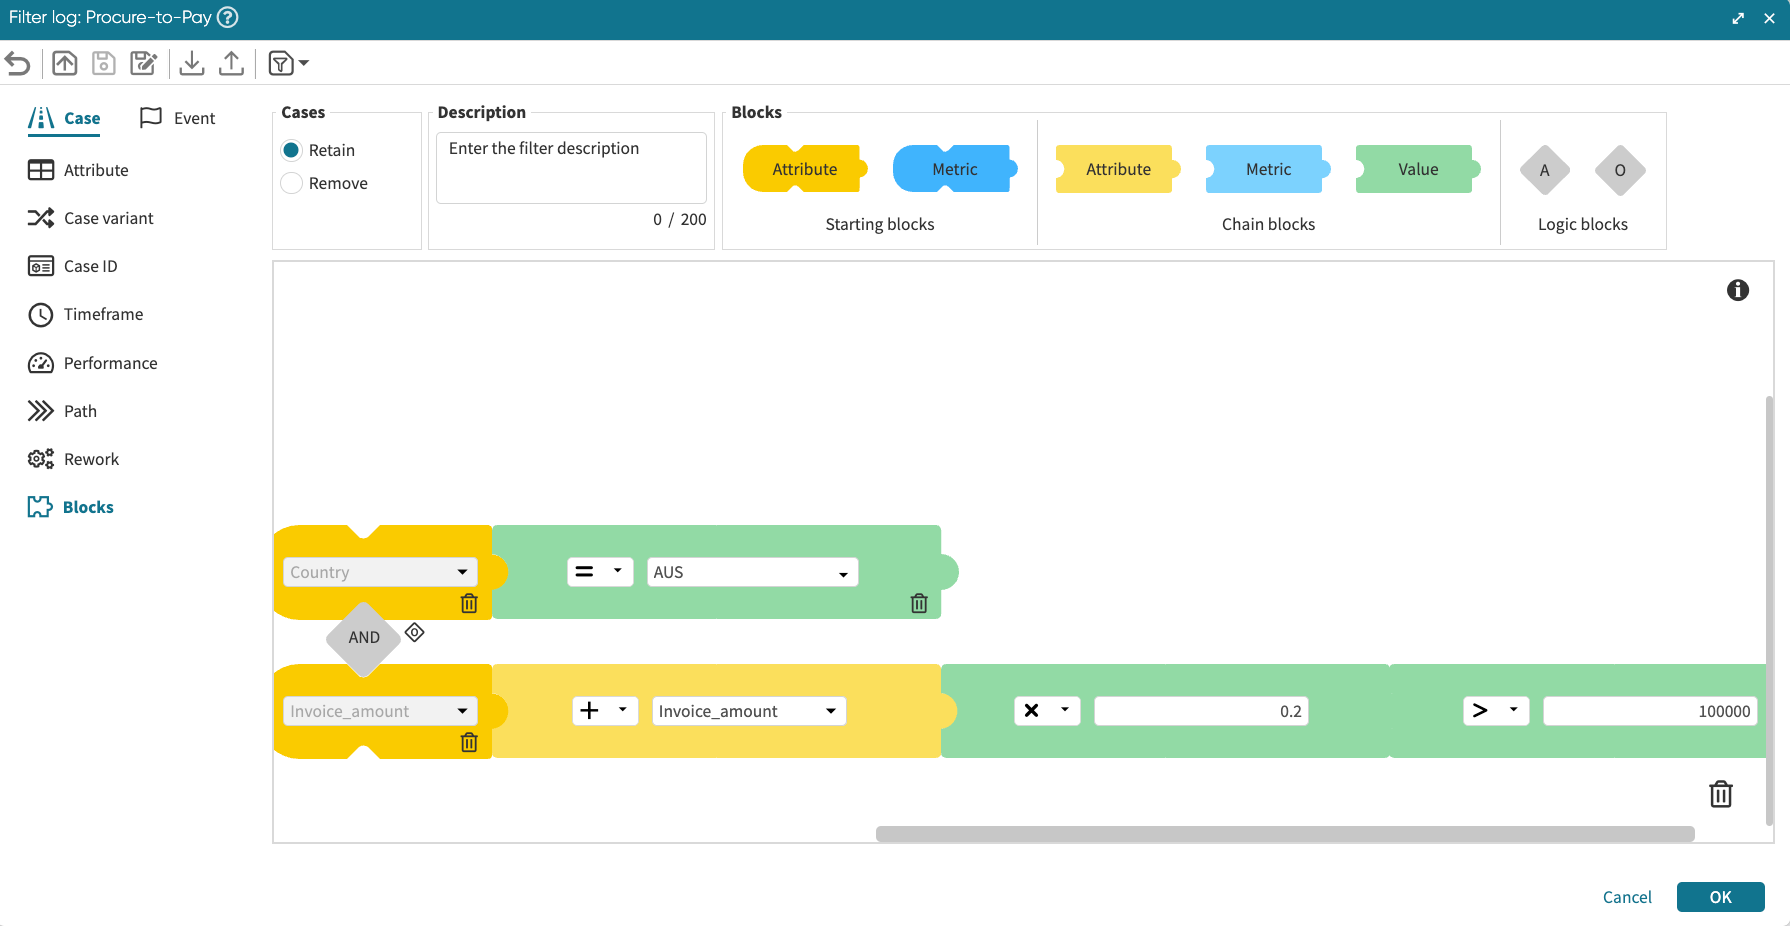
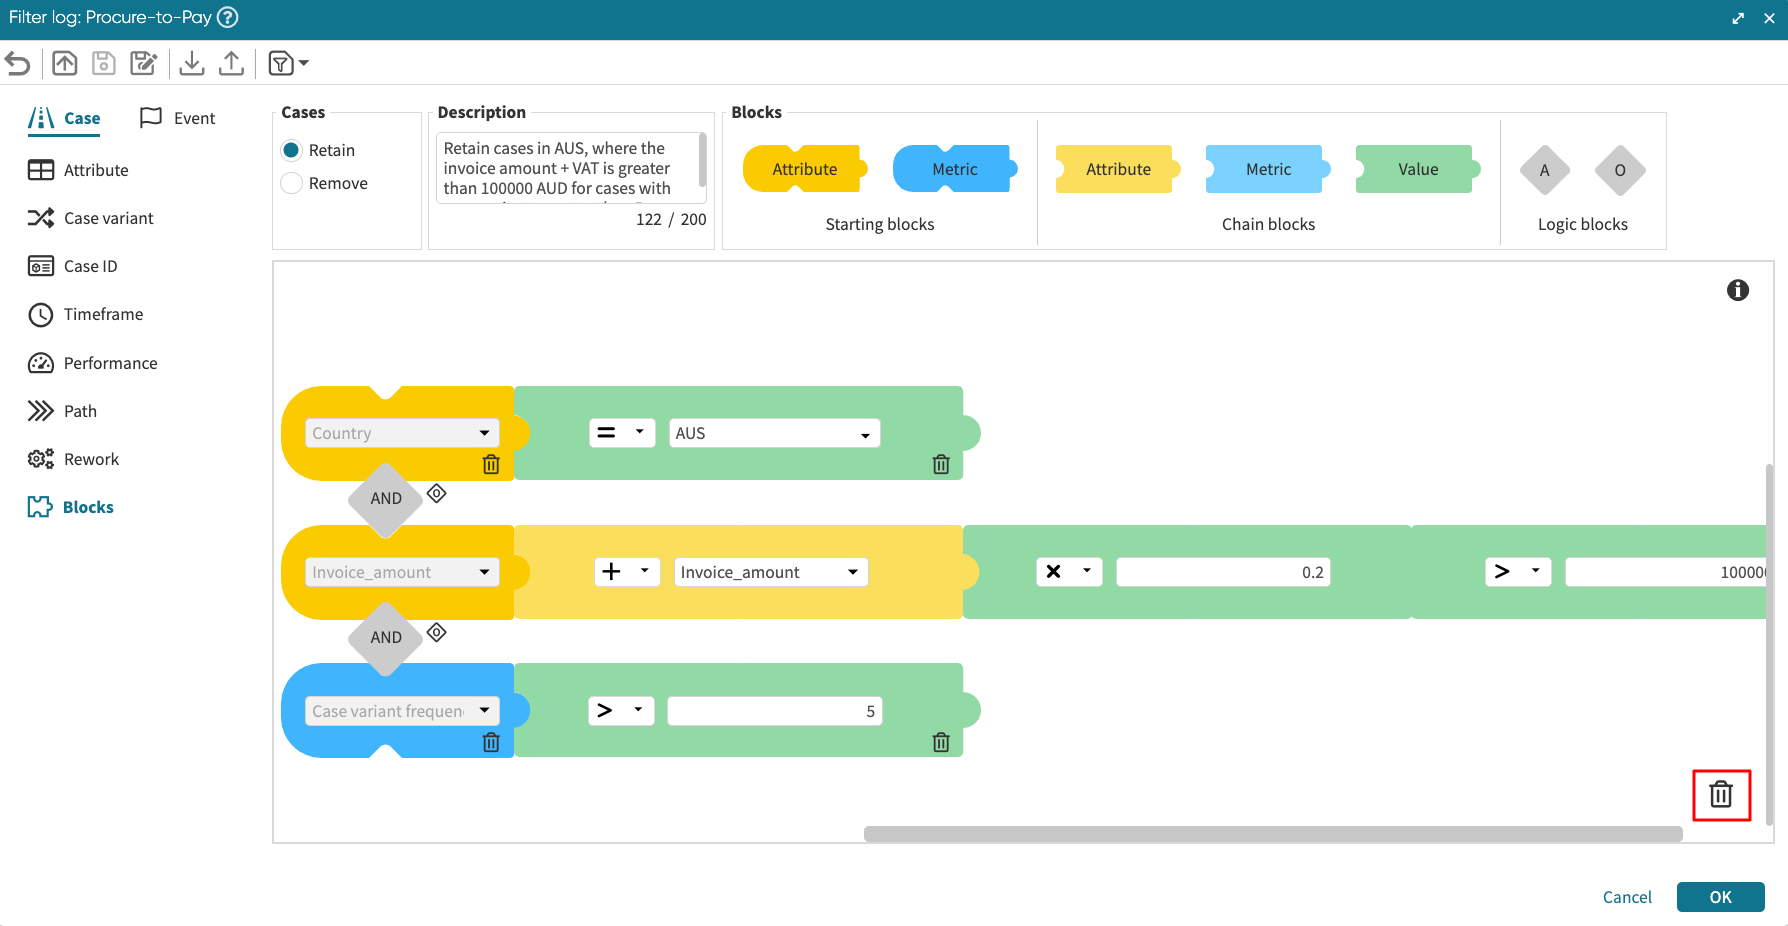
Since we have three separate criteria, we will create three block rows and concatenate them with the AND logic operator. For the first block row, add an attribute block. The dropdown contains a list of attributes from the log. Select Country.
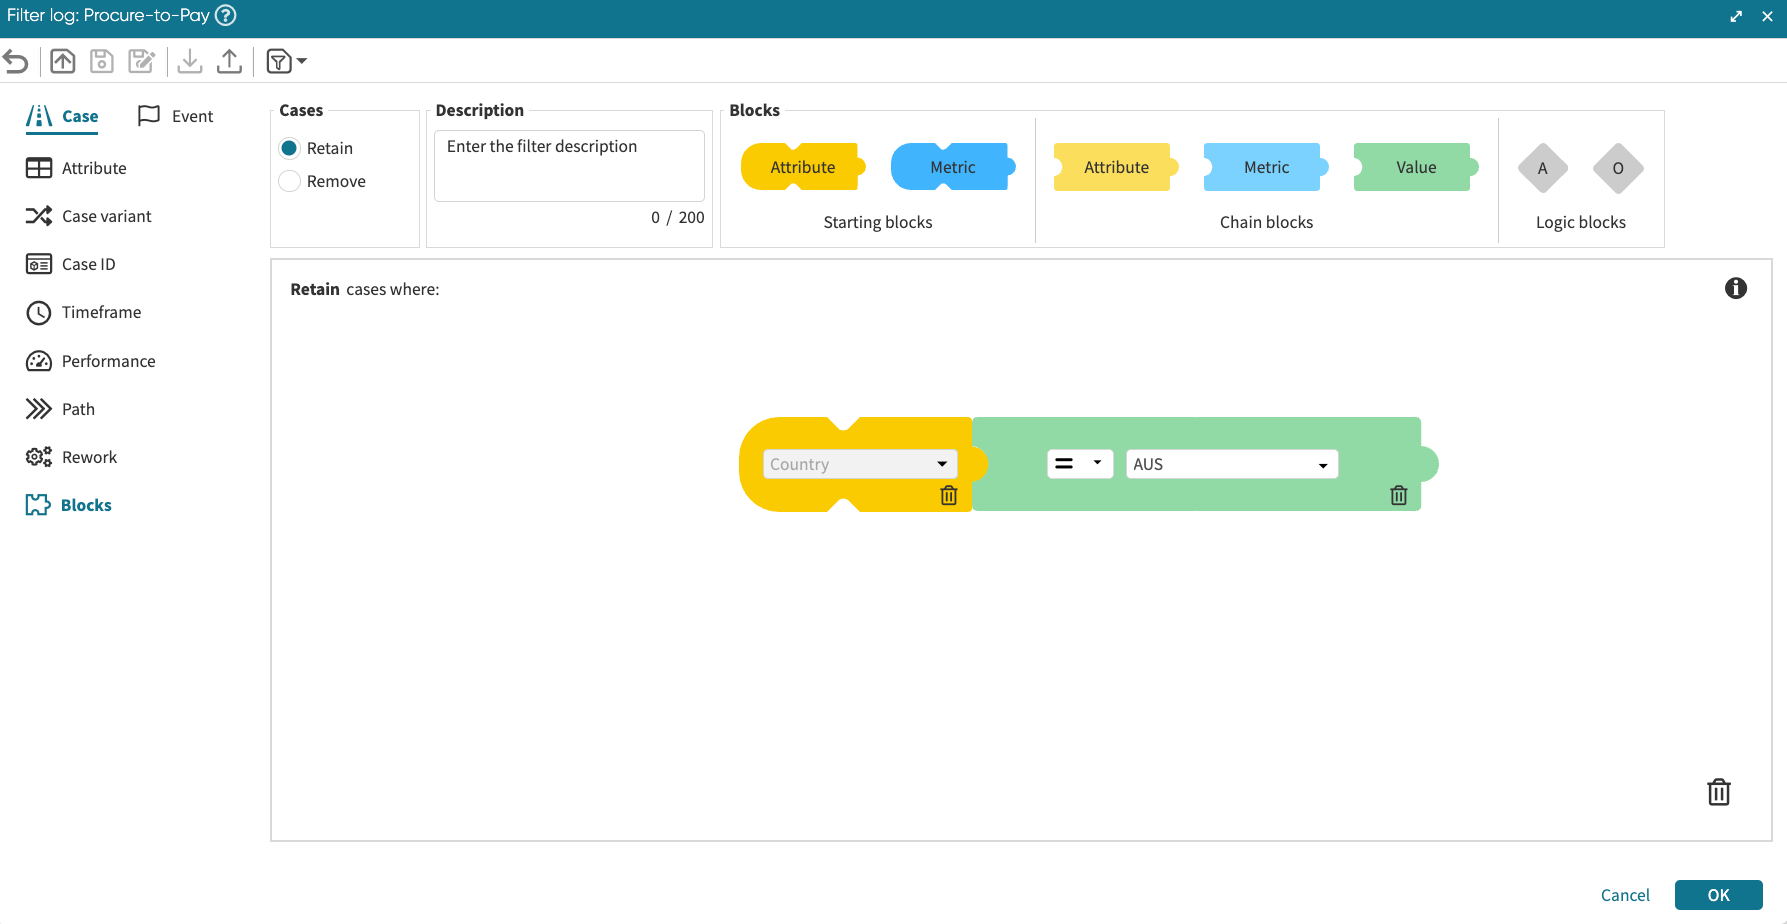
To complete the criterion, add a value chain block and select AUS from the dropdown. Ensure the condition is set to equal to (=).
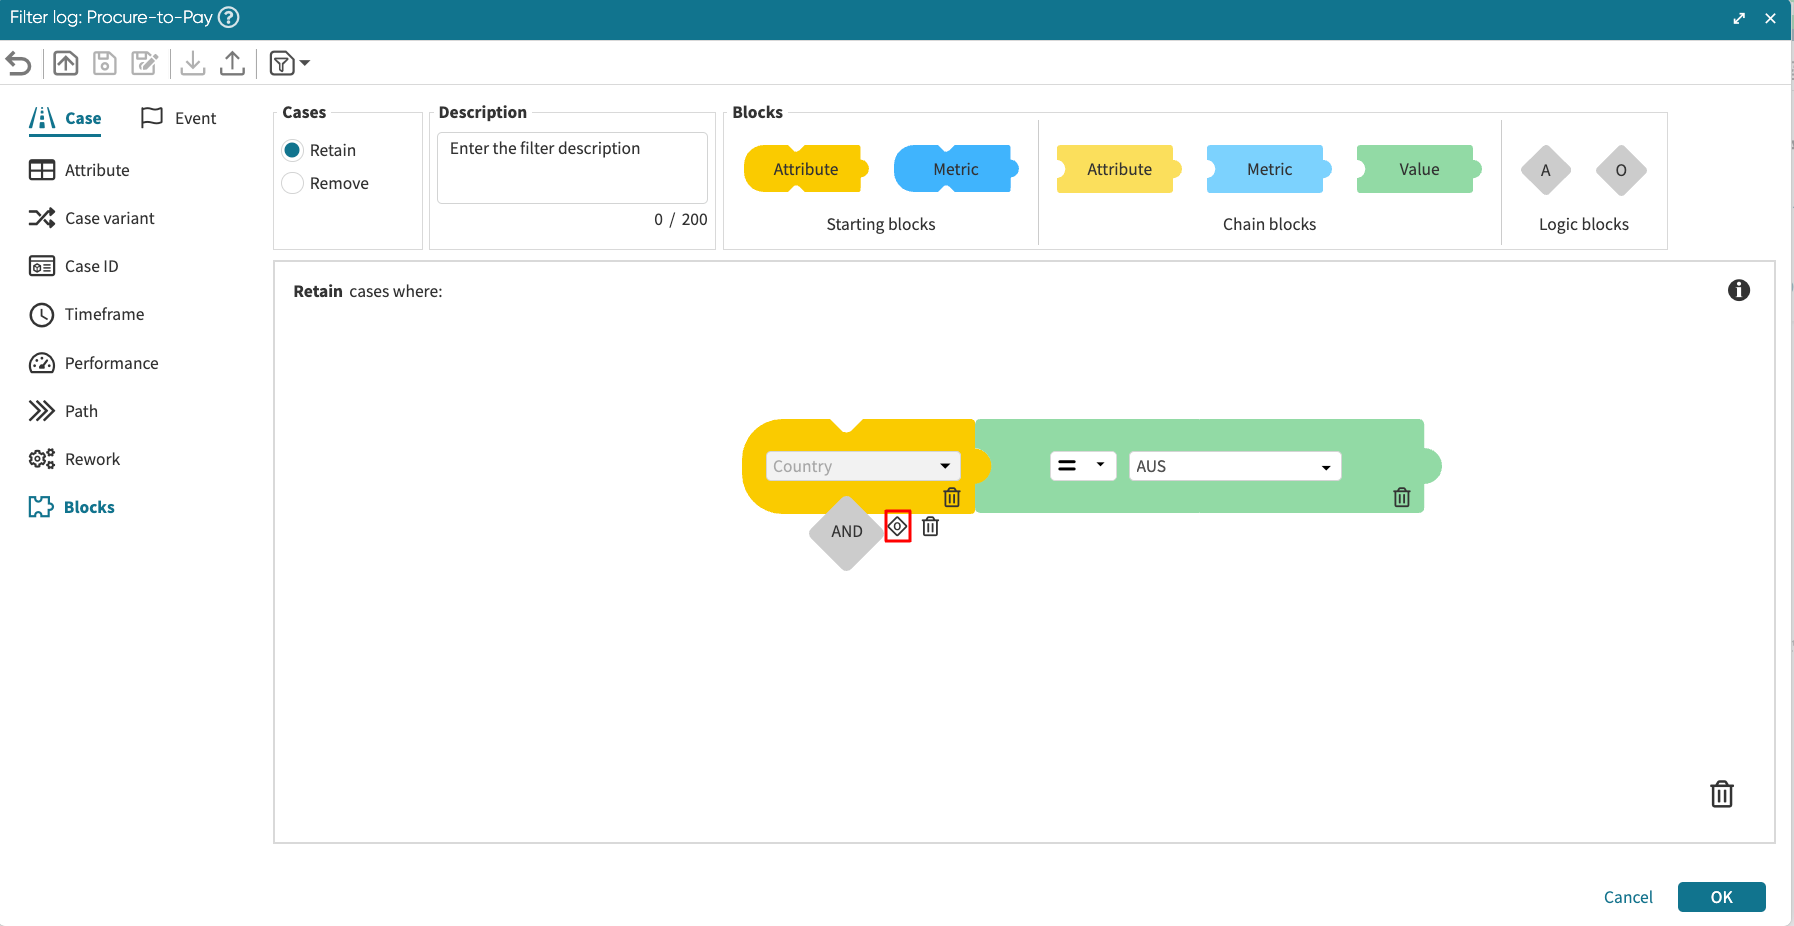
To add the next block row, drag the AND logic block under the first starting block.

If we wish, we can quickly switch from AND to OR by clicking the smaller-sized OR icon.
Next, we add the second block row. Add an attribute starting block and select Invoice_amount. Since we want to retain cases where the invoice amount + 20% of the invoice amounts is greater than 100,000 AUD, drag the attribute chain block and select Invoice_amount. Select the + operator.
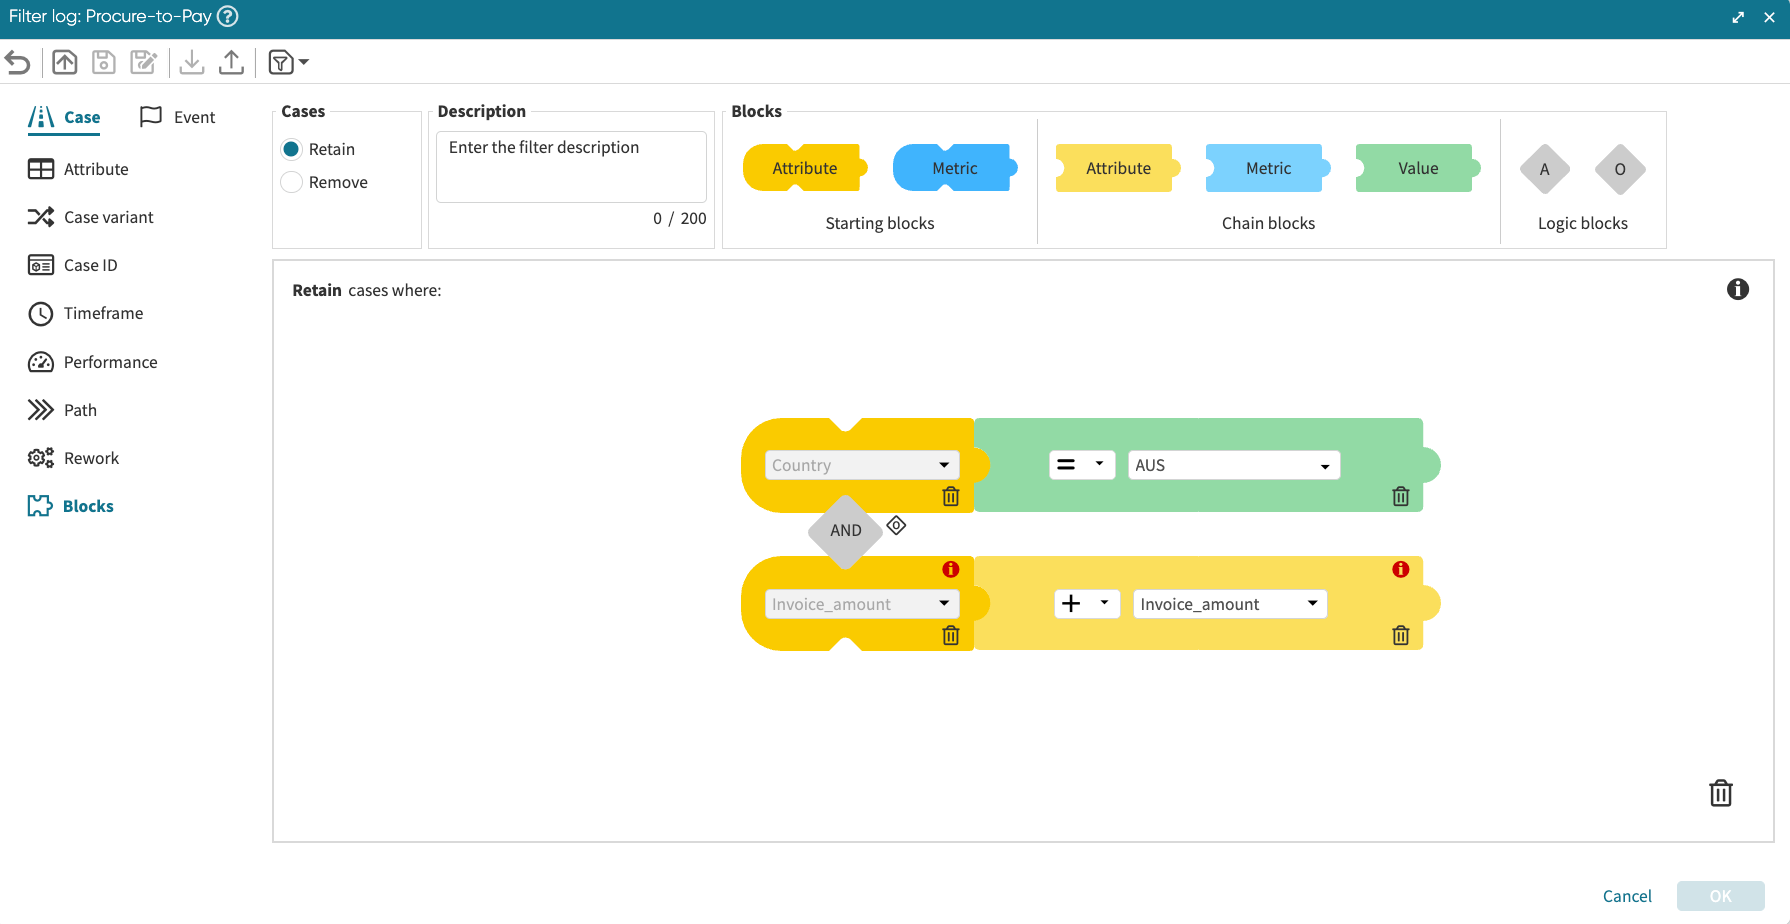
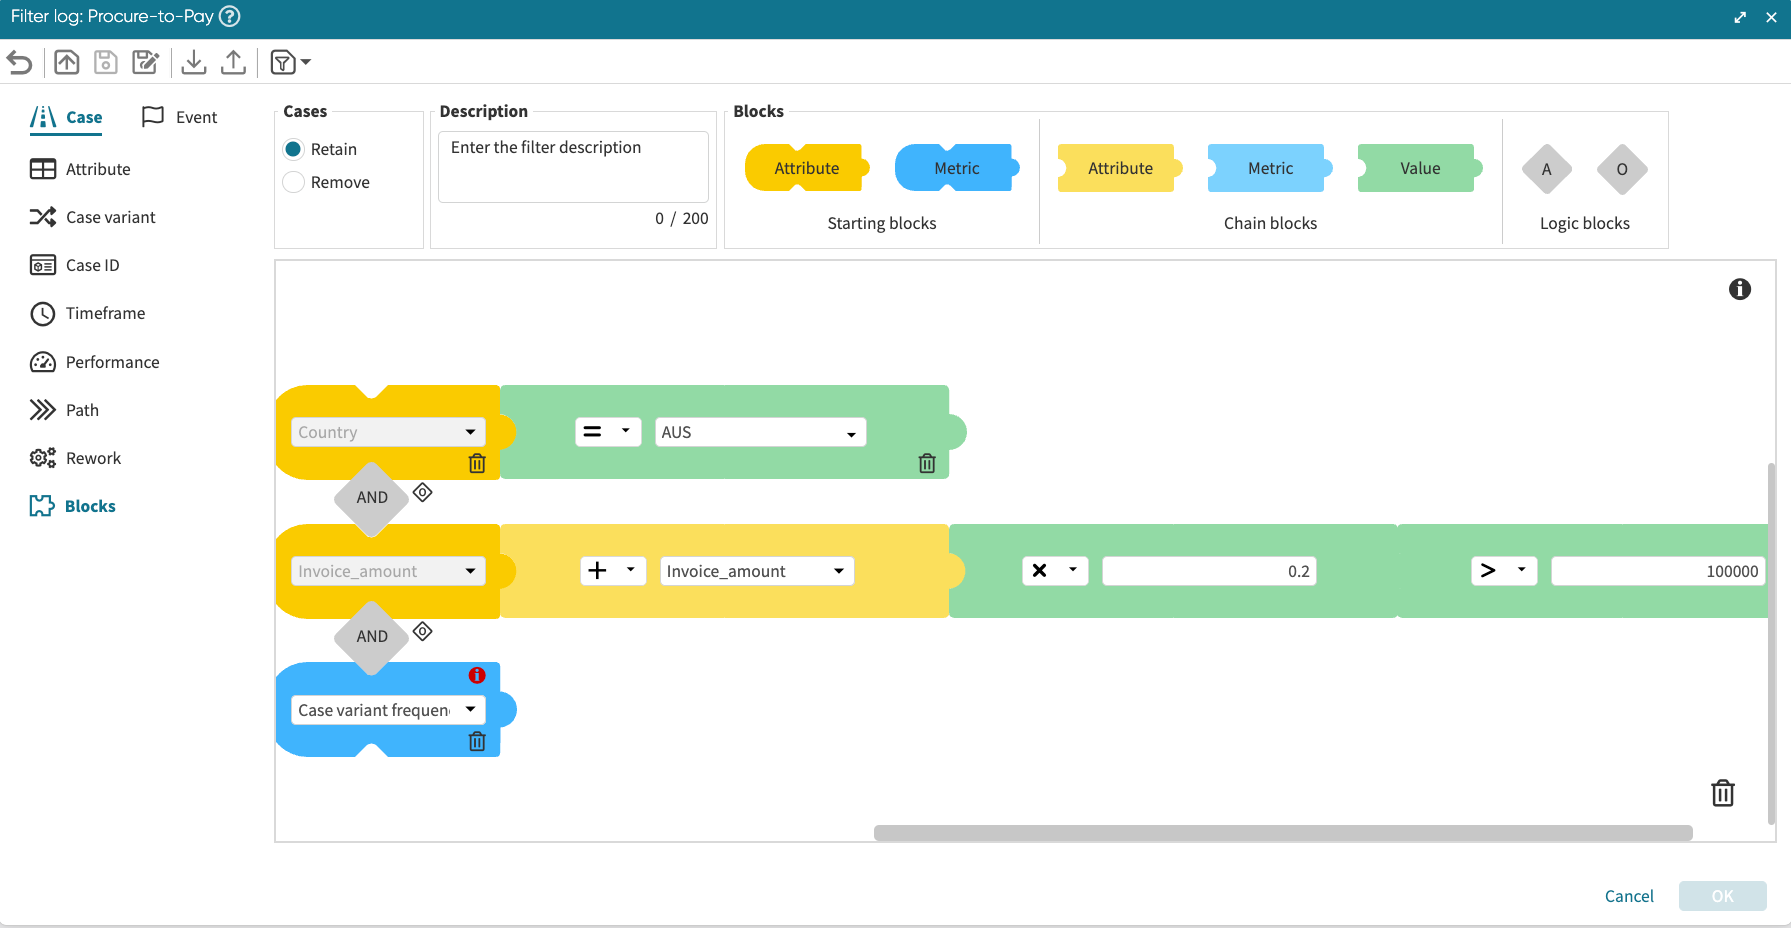
Note
The red warning sign indicates that the block row is not complete.
Now, let us complete the block row. Add a value chain block and enter 0.2. Select the × operator. Lastly, drag another value chain block and enter 100000. Select the > operator.
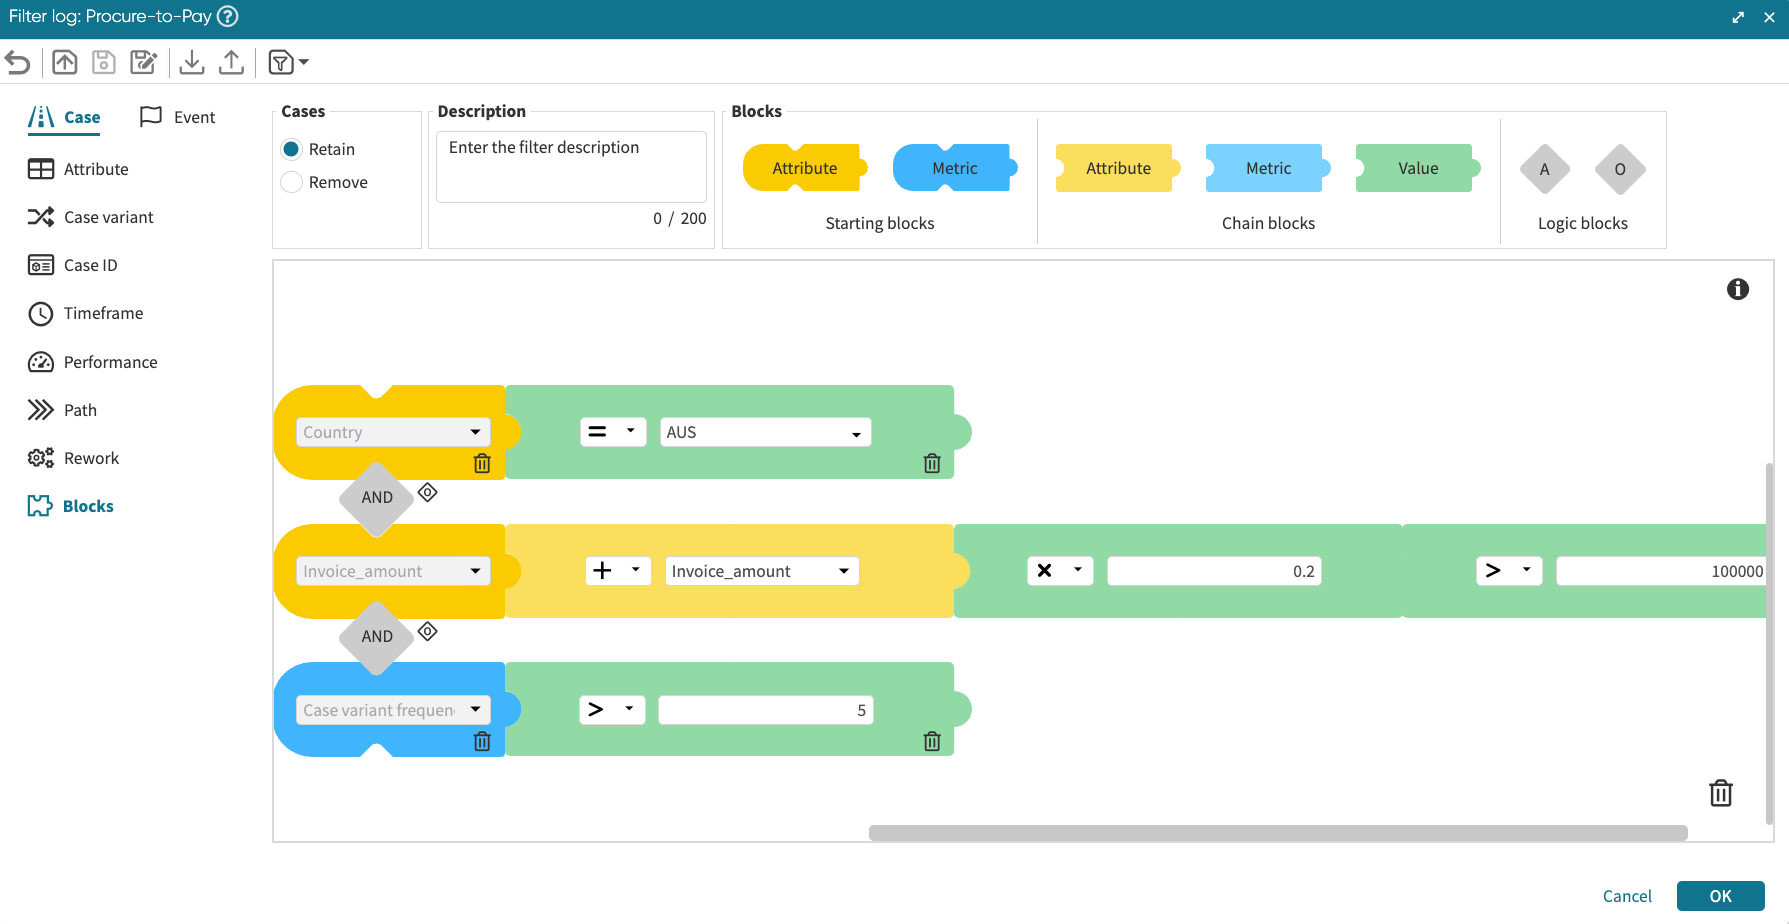
Next, the third block row. Drag and drop the AND logic block. We want to retain cases where the case variant frequency is greater than 5. Therefore, we use the Metric starting block. The dropdown contains a list of metrics such as Case duration, case length, case cost, etc. Select Case variant frequency from the dropdown.
Complete the condition by dragging the value chain block. Set the condition to > and enter the value 5.
We can add a description for this filter.
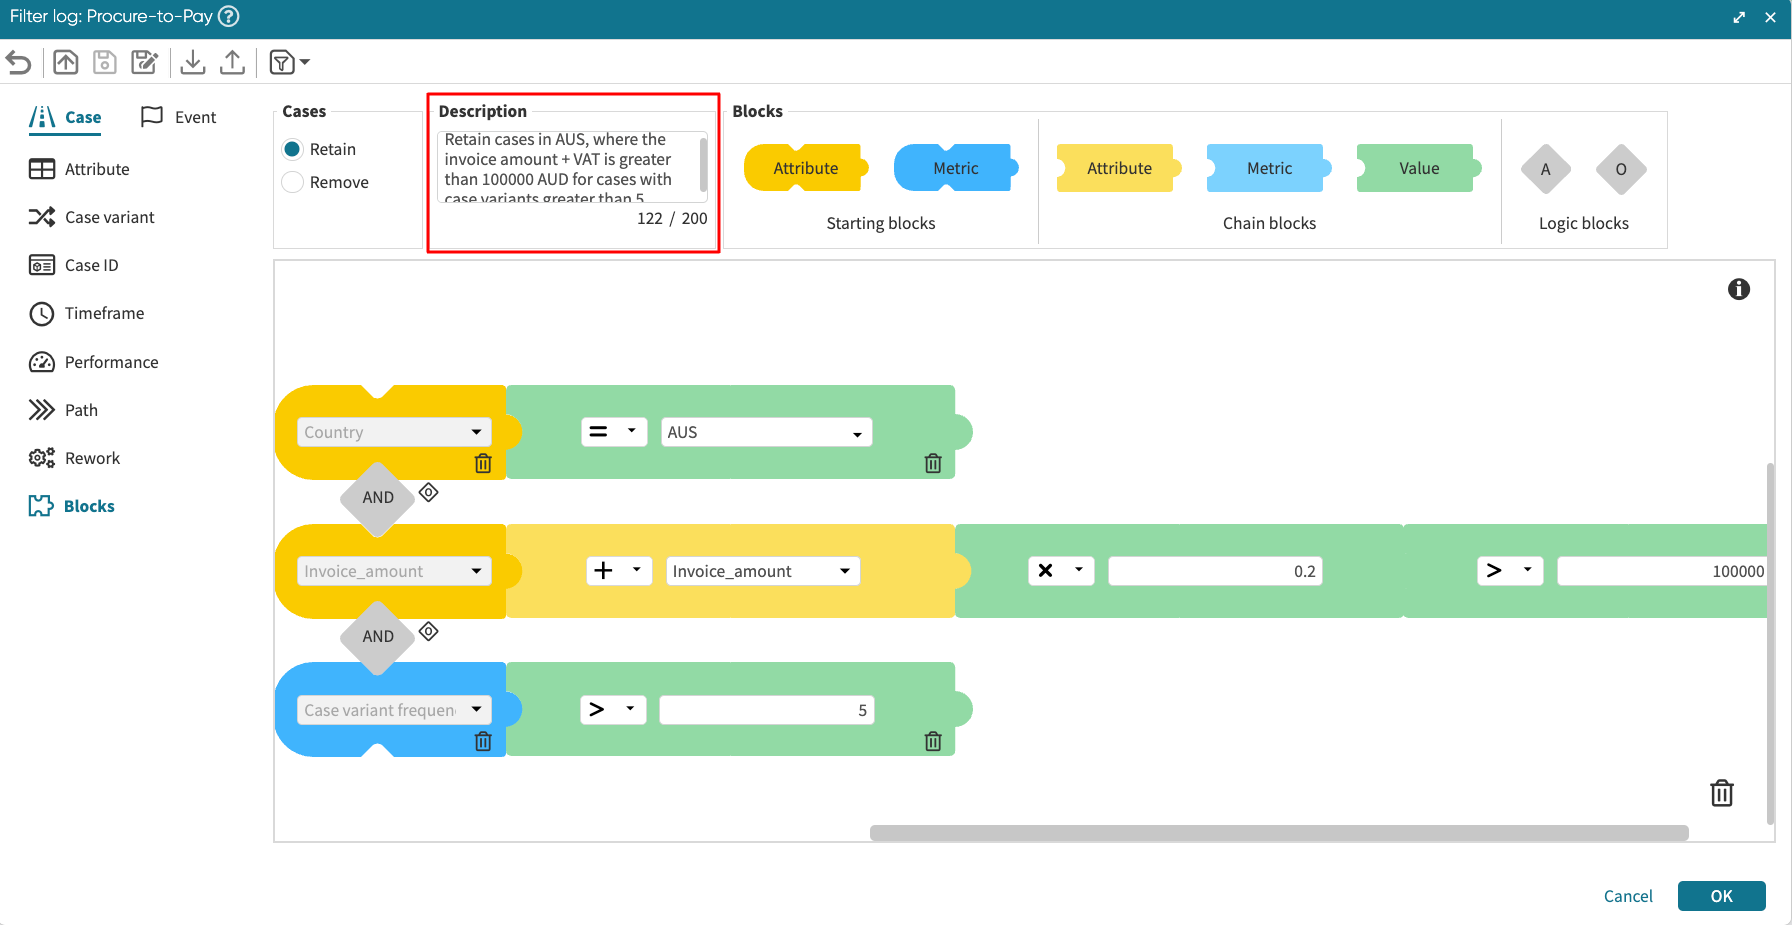
Click OK to apply the filter.
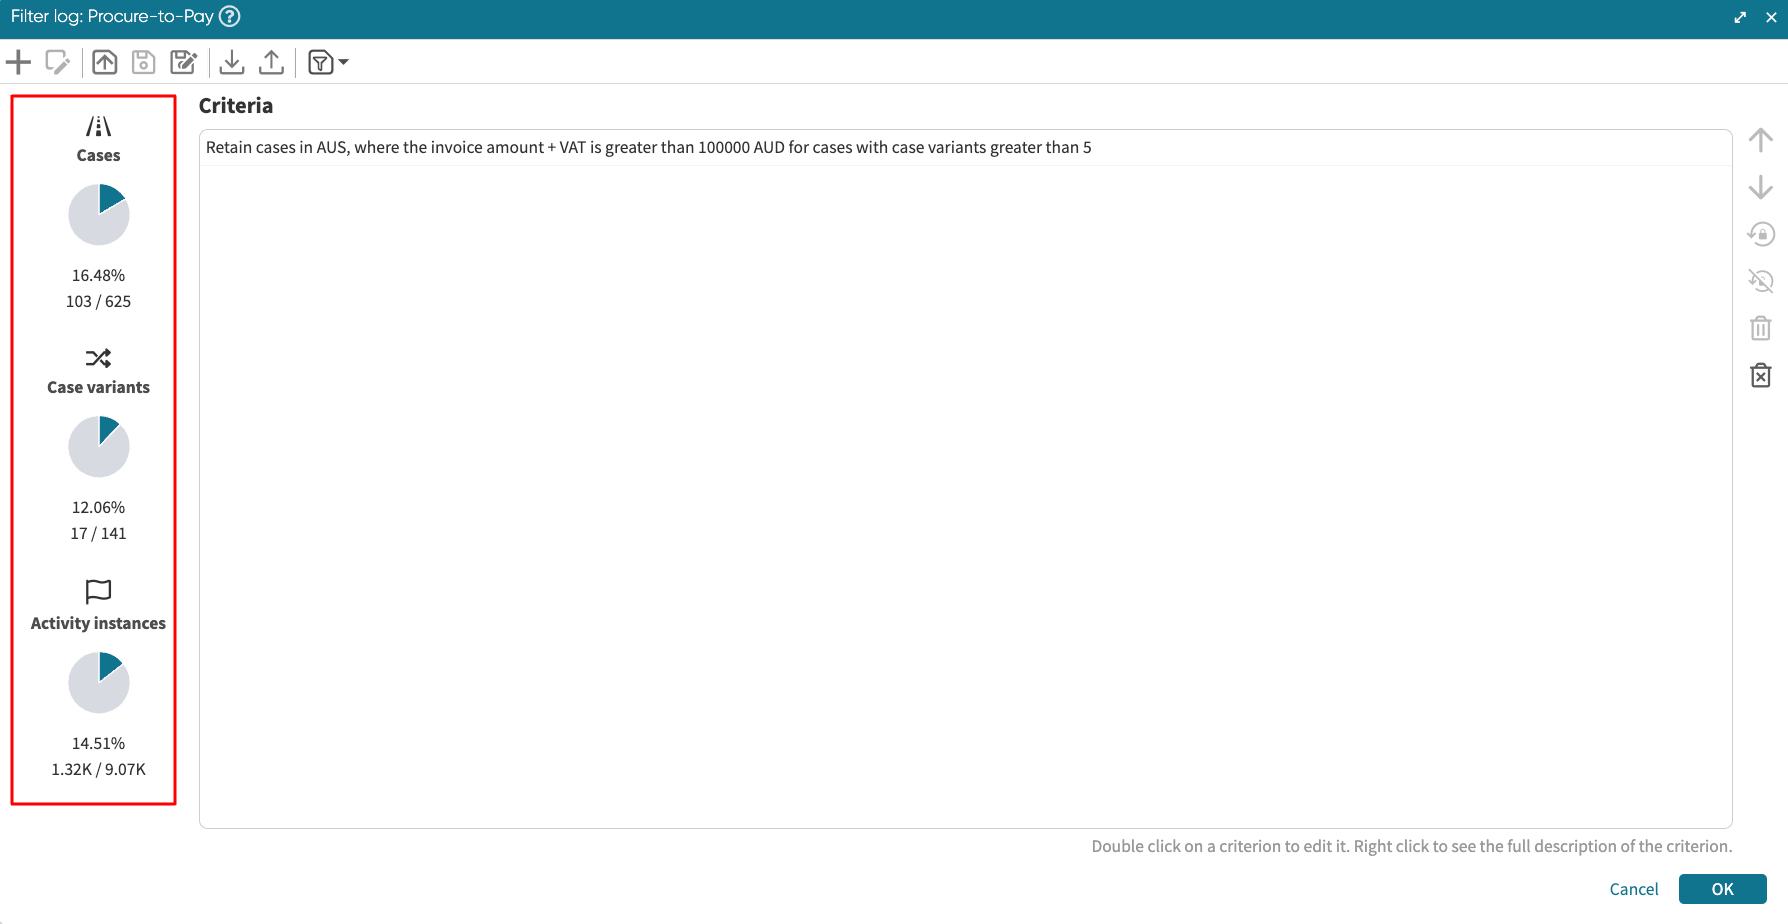
We see that 16.48% of the cases fulfill our filter criteria.
Note
We can delete a block at any time by clicking the smaller delete icon in the block. We can also delete all blocks by clicking the delete icon in the bottom-right corner.
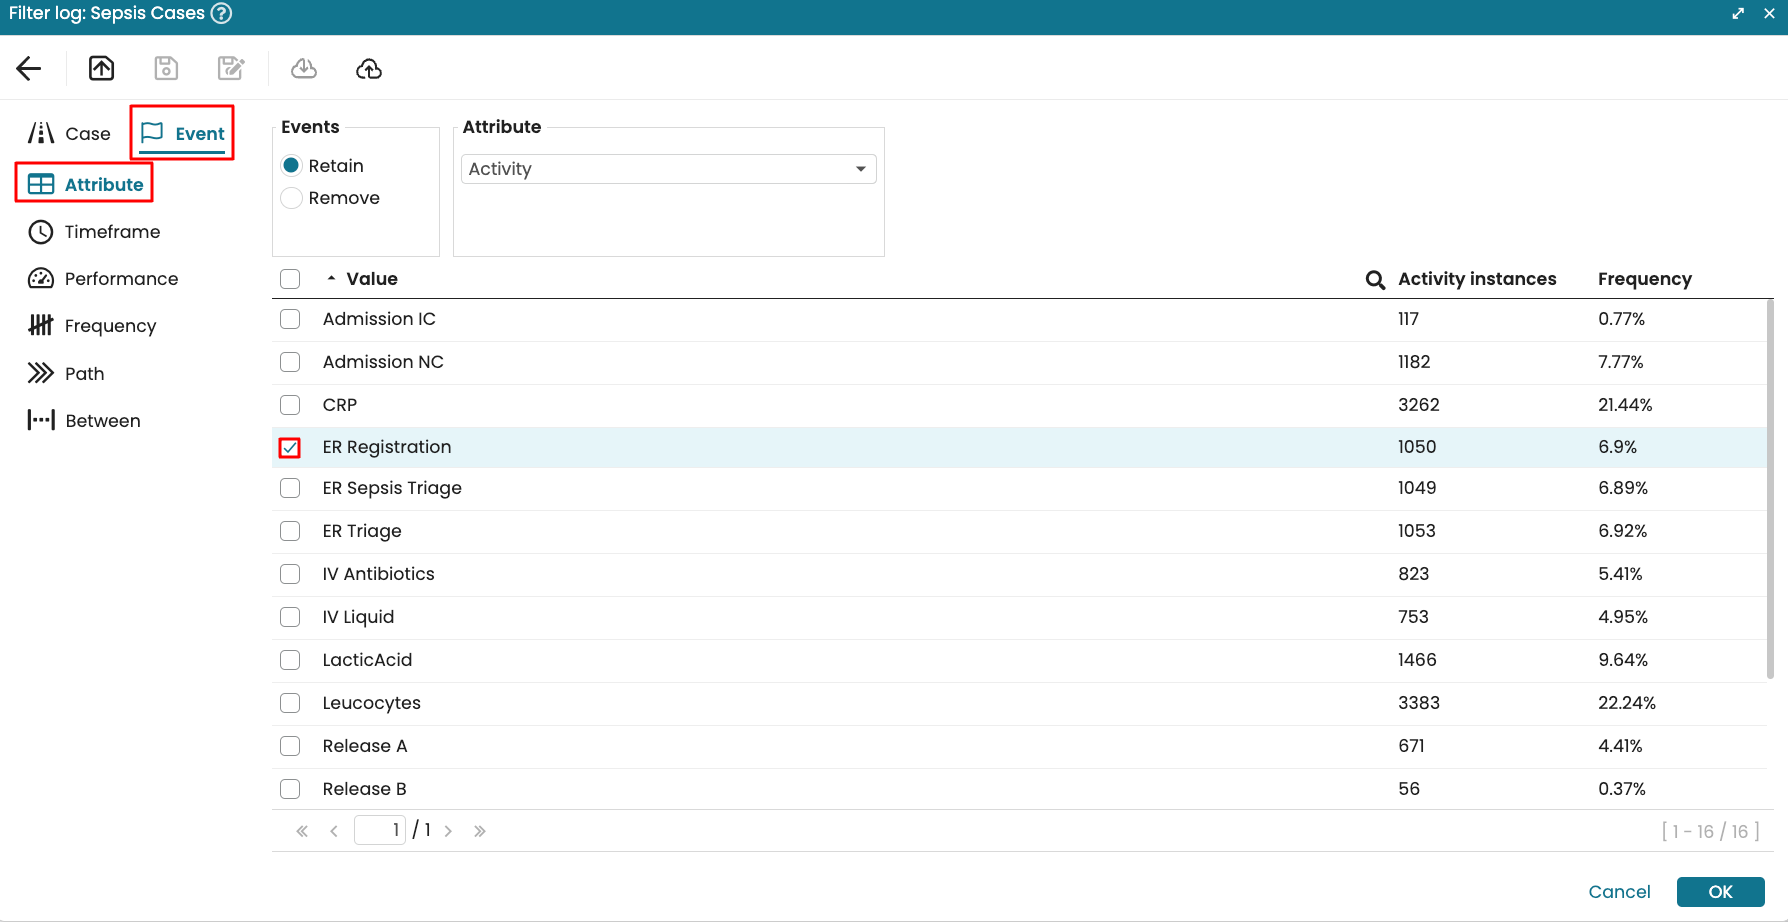
Event > Attribute filter
The Attribute event-level filter allows us to retain or remove those events that satisfy the values of a specific event attribute. For example, we may want to retain those events whose activity label is “Verify Claim”. This means effectively dice the log in such a way that it includes only events related to the activity “Verify Claim”.
Any other attribute in the log can be used to set conditions. For example, to retain all events where the role is “Claims Officer”, we can select Role from the drop-down list of event attributes and then select the specific value we may want to retain or remove.
However, there are situations where we need to define the filter on multiple conditions. For instance, we may want to retain all “Verify Claim” events performed by the Claims Officer that took more than 2 days. To accommodate these more complex scenarios, we use secondary conditions.
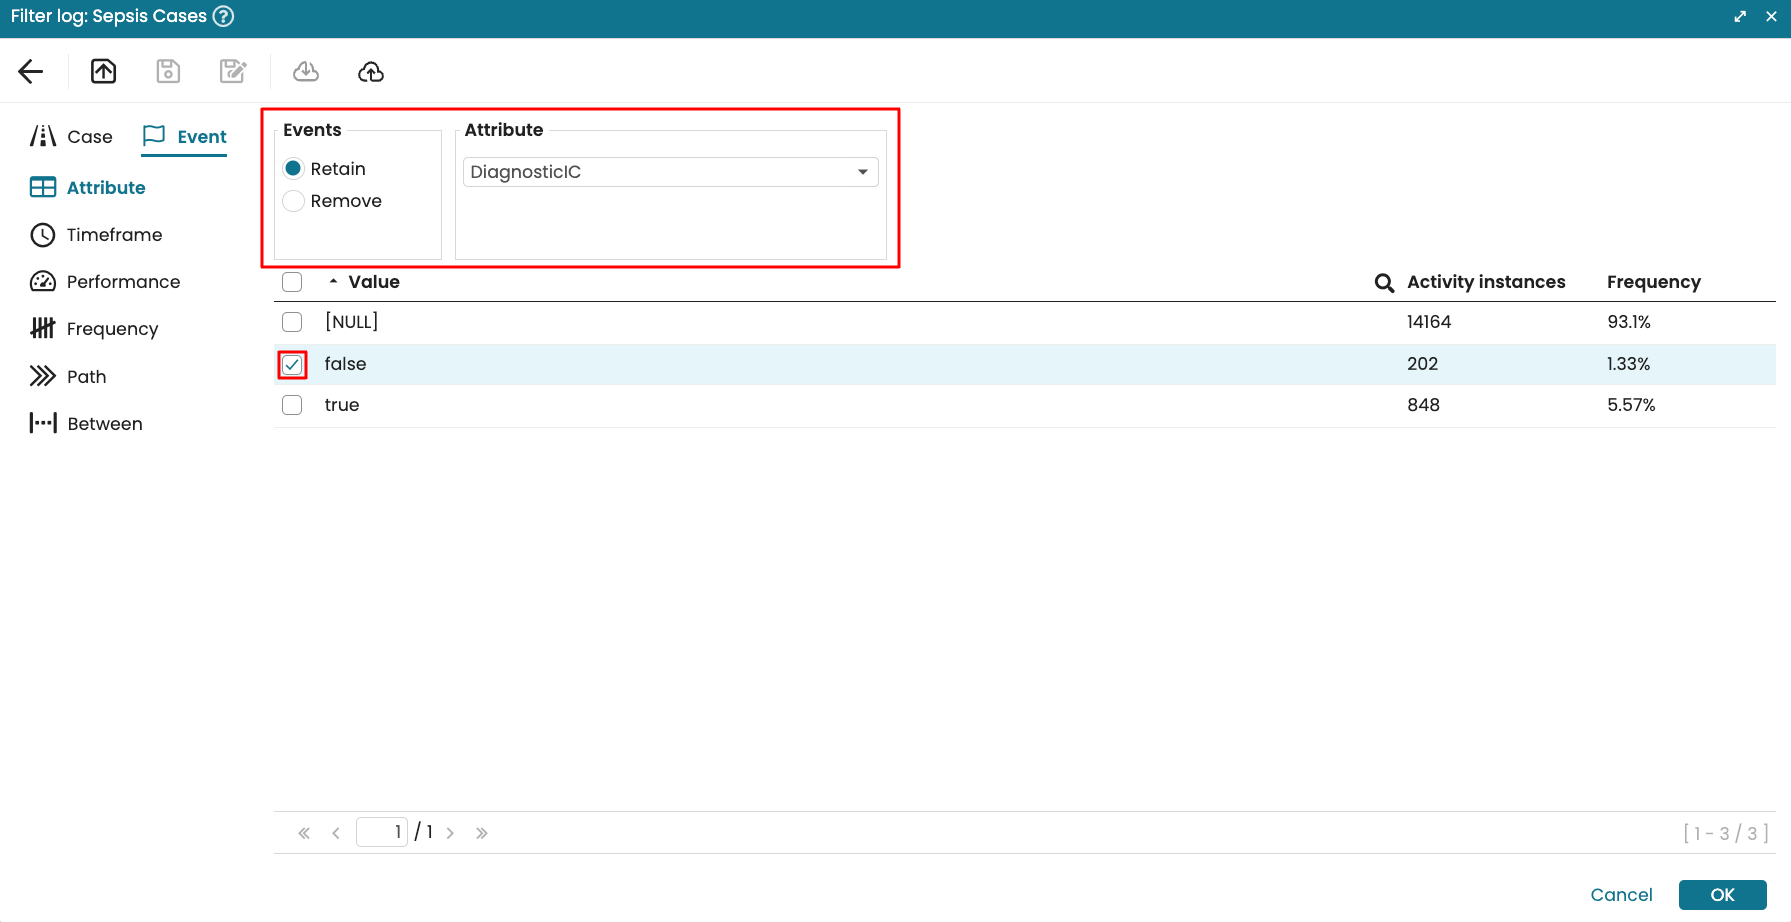
In the event-level Attribute tab, we can specify the following:
Events (Retain/Remove): Determines whether to keep or discard events that meet the specified conditions.
Attribute: Defines the event attribute from the log to be used as the primary filter condition.
Attribute condition: Specifies the secondary filter condition based on event attributes in the log.
Event performance: Allows us to specify an additional filter condition based on performance metrics such as duration, processing time, or cost.
Matching (Any value/All values): Specifies whether to return events that satisfy any condition (OR logic) or all conditions (AND logic).
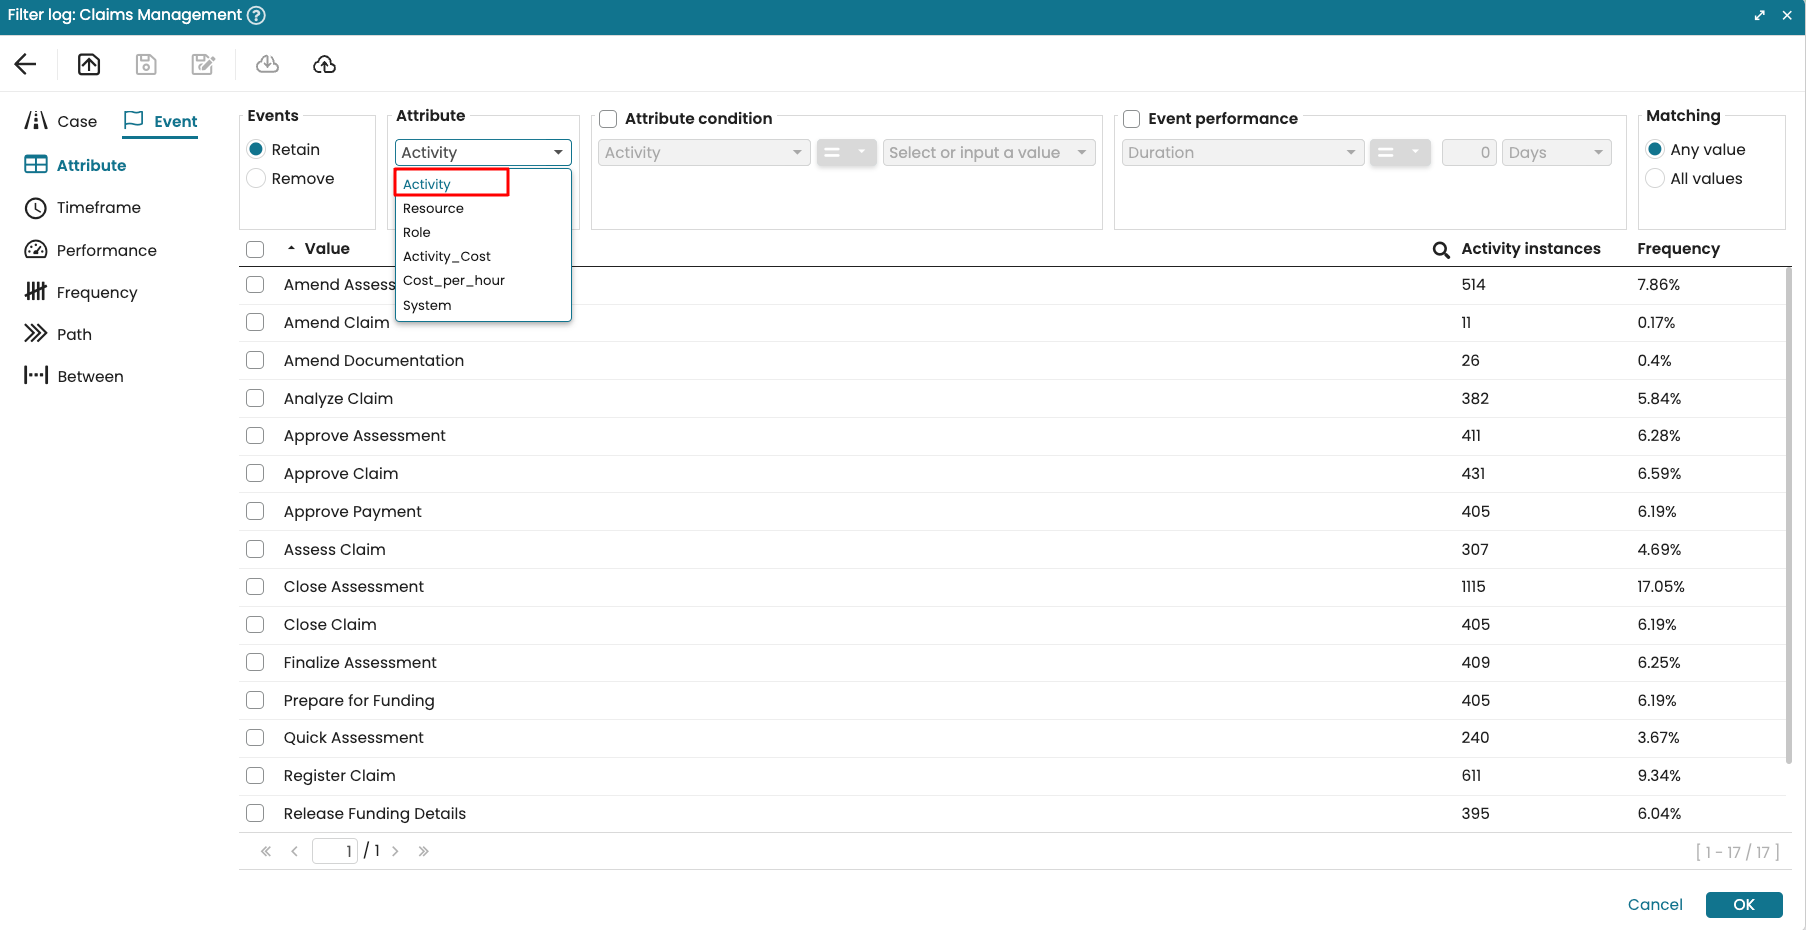
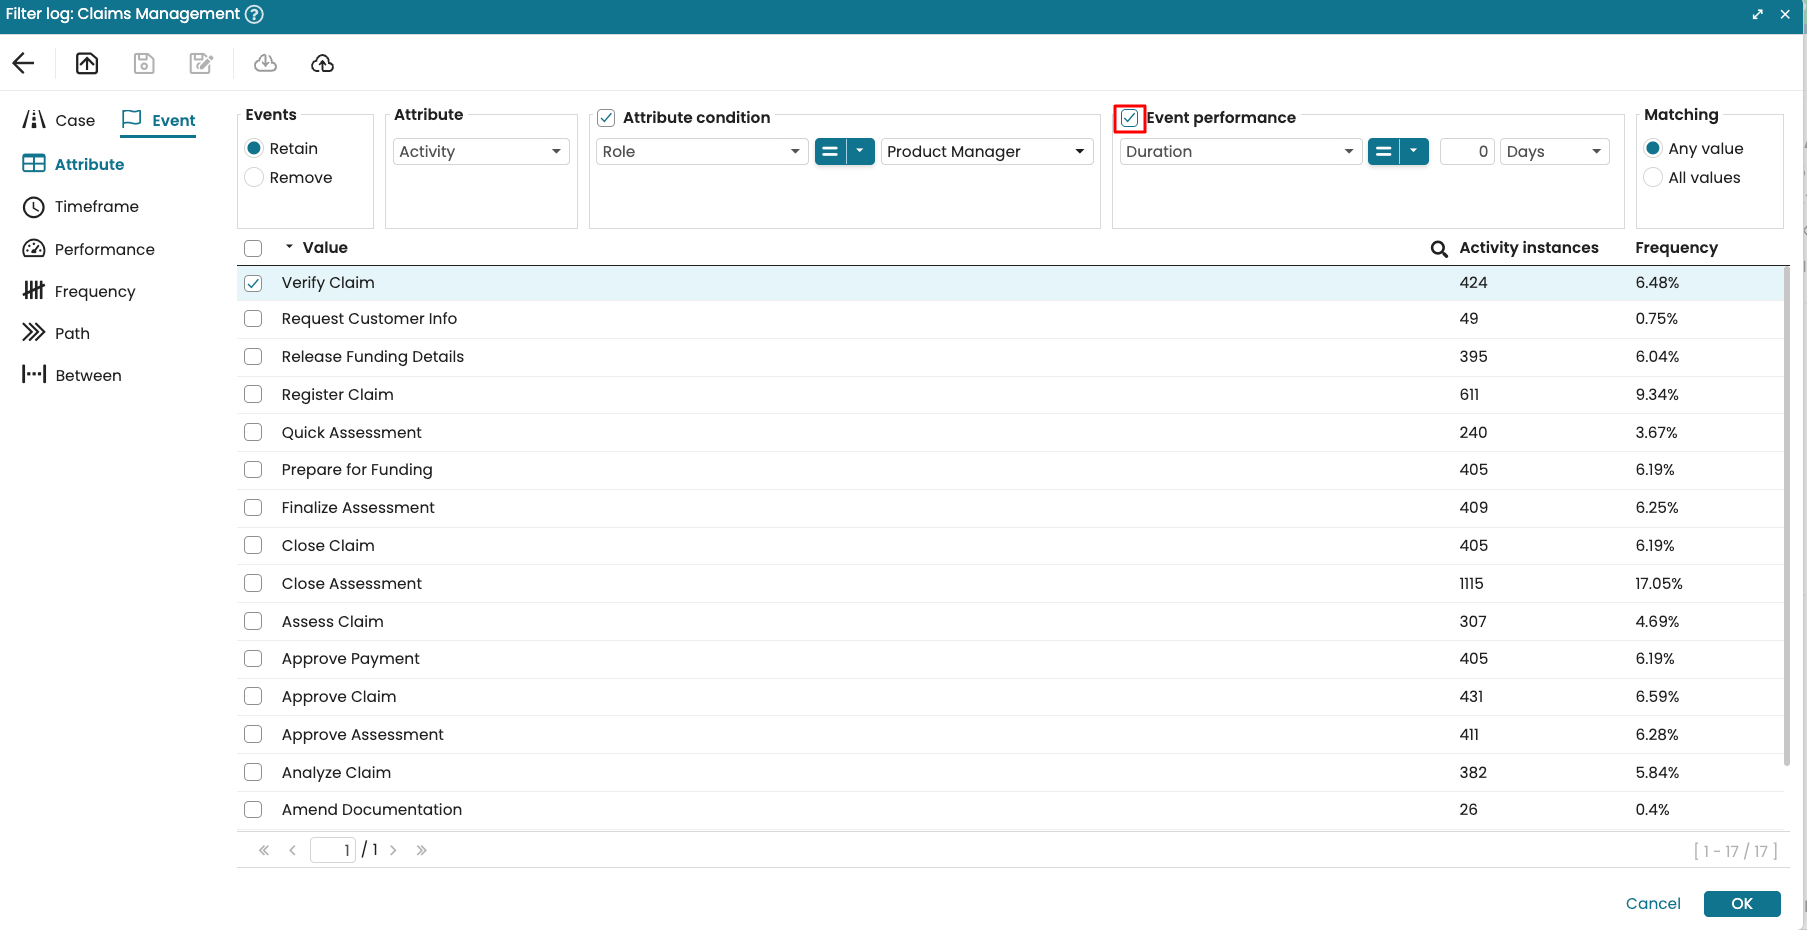
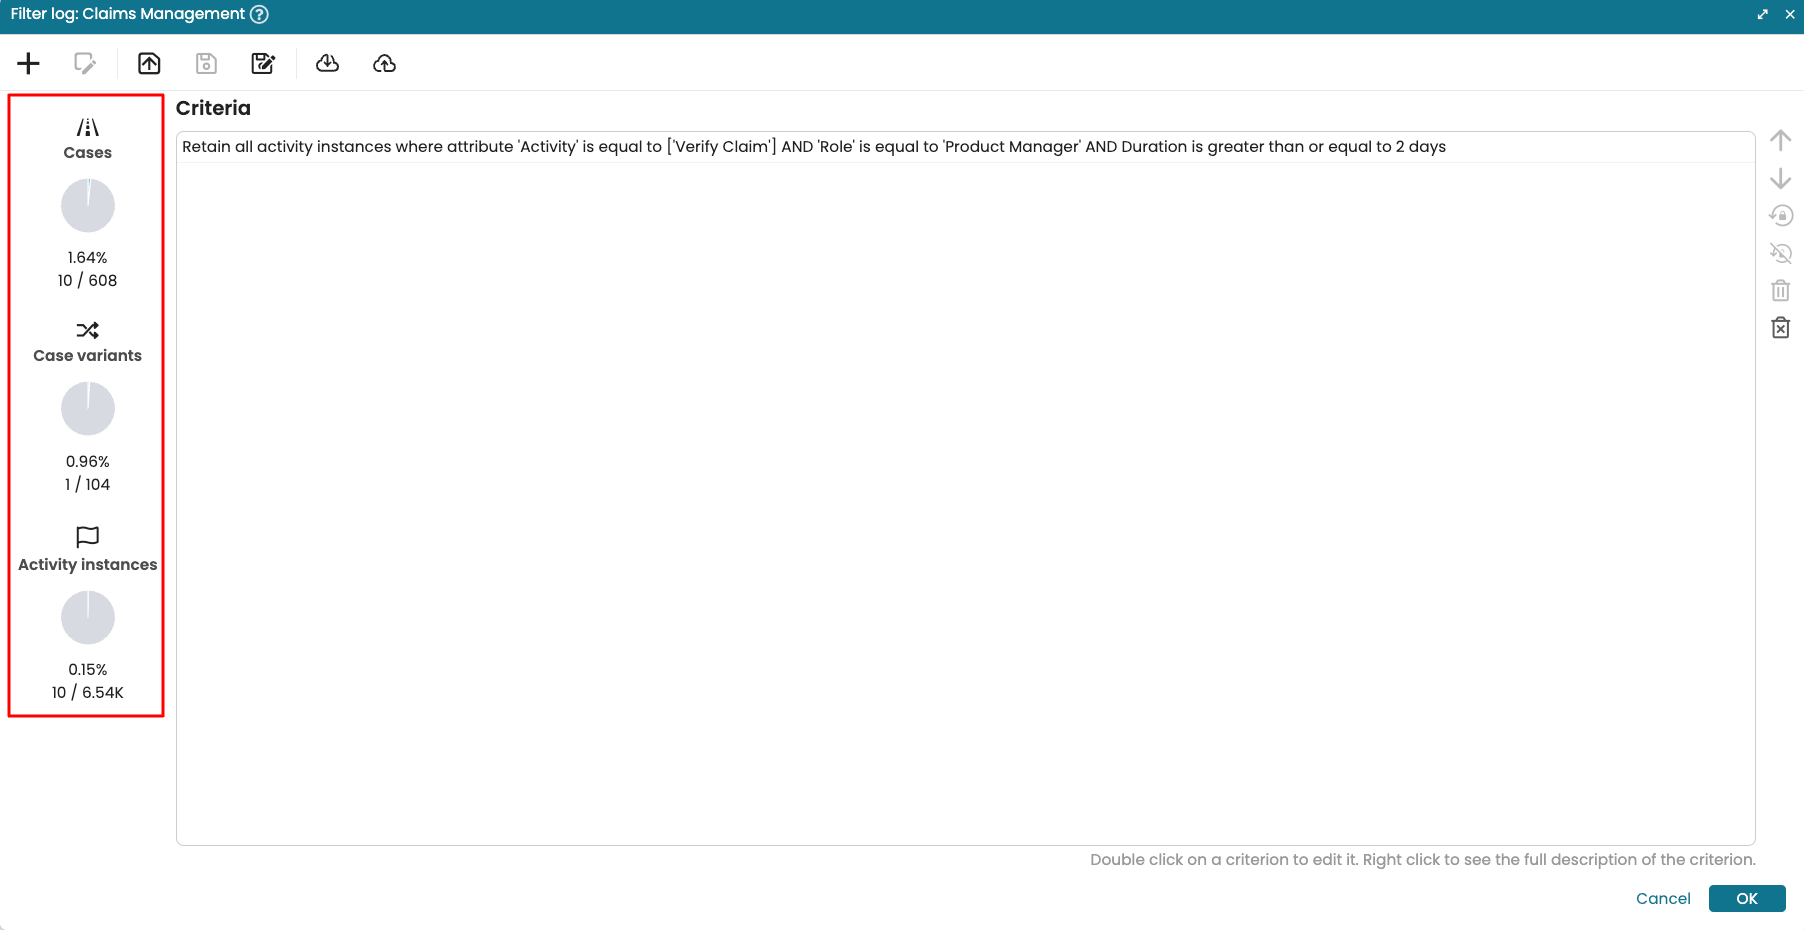
For illustration, imagine we want to retain all “Verify Claim” events performed by the Product Manager that took more than 2 days. In Attribute, select Activity since “Verify Claim” is an activity.
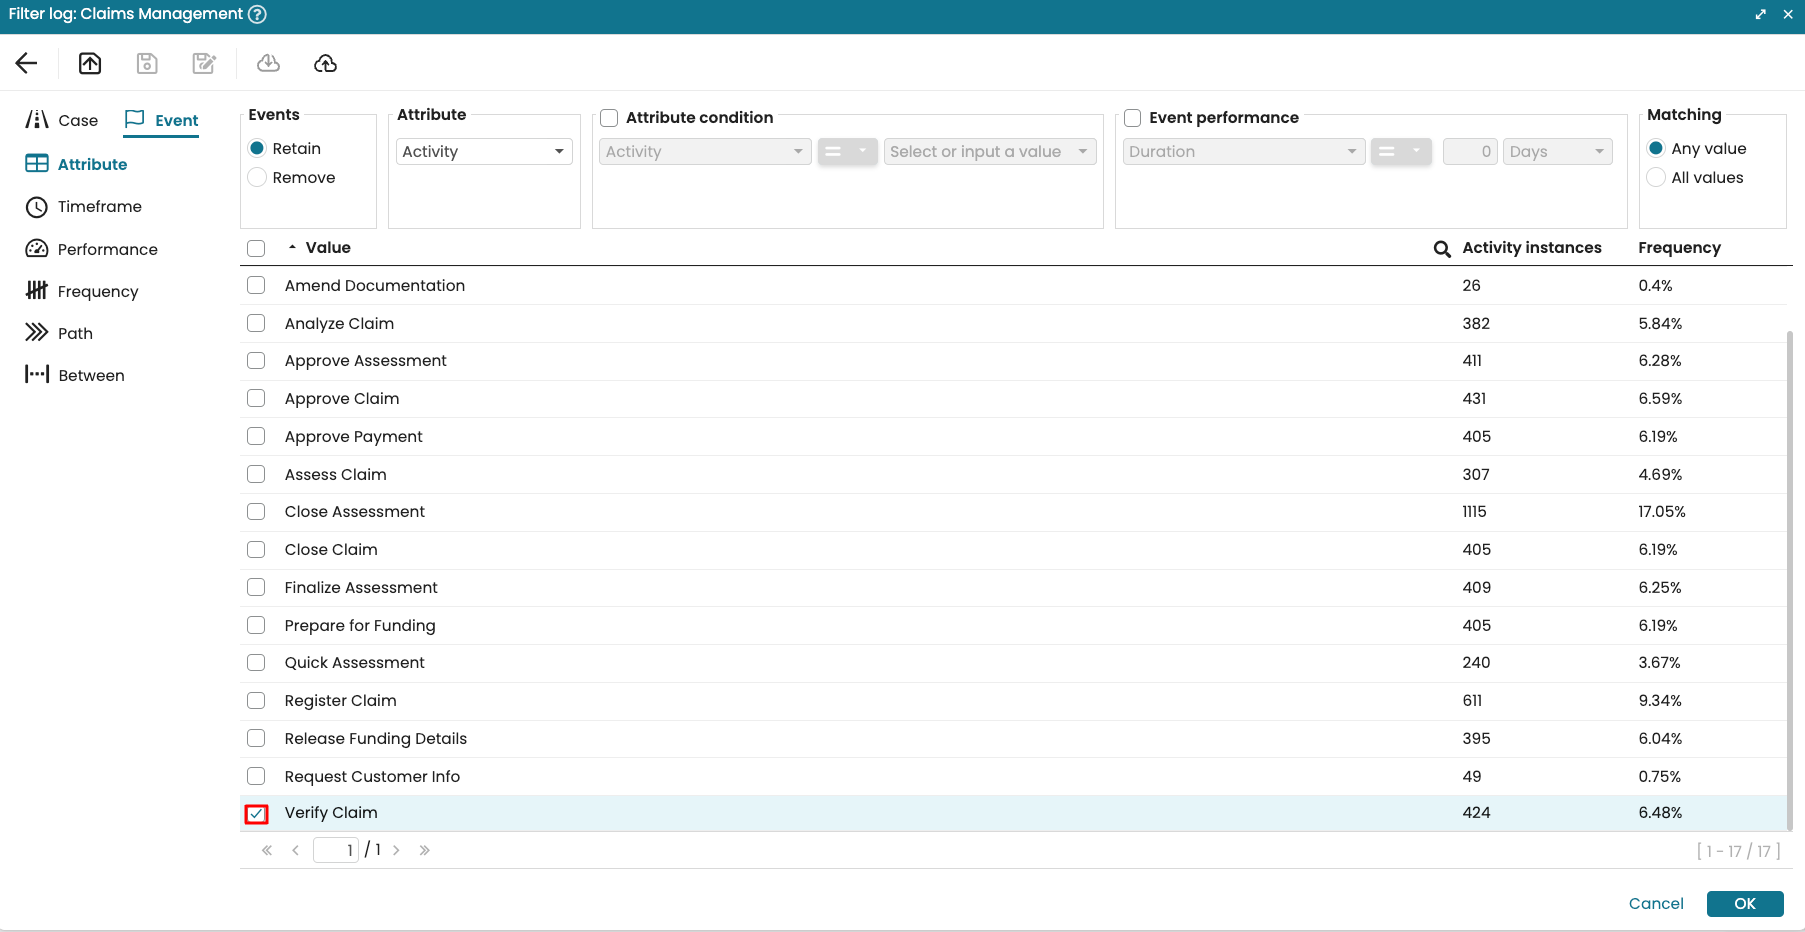
Select Verify Claim from the list of values.
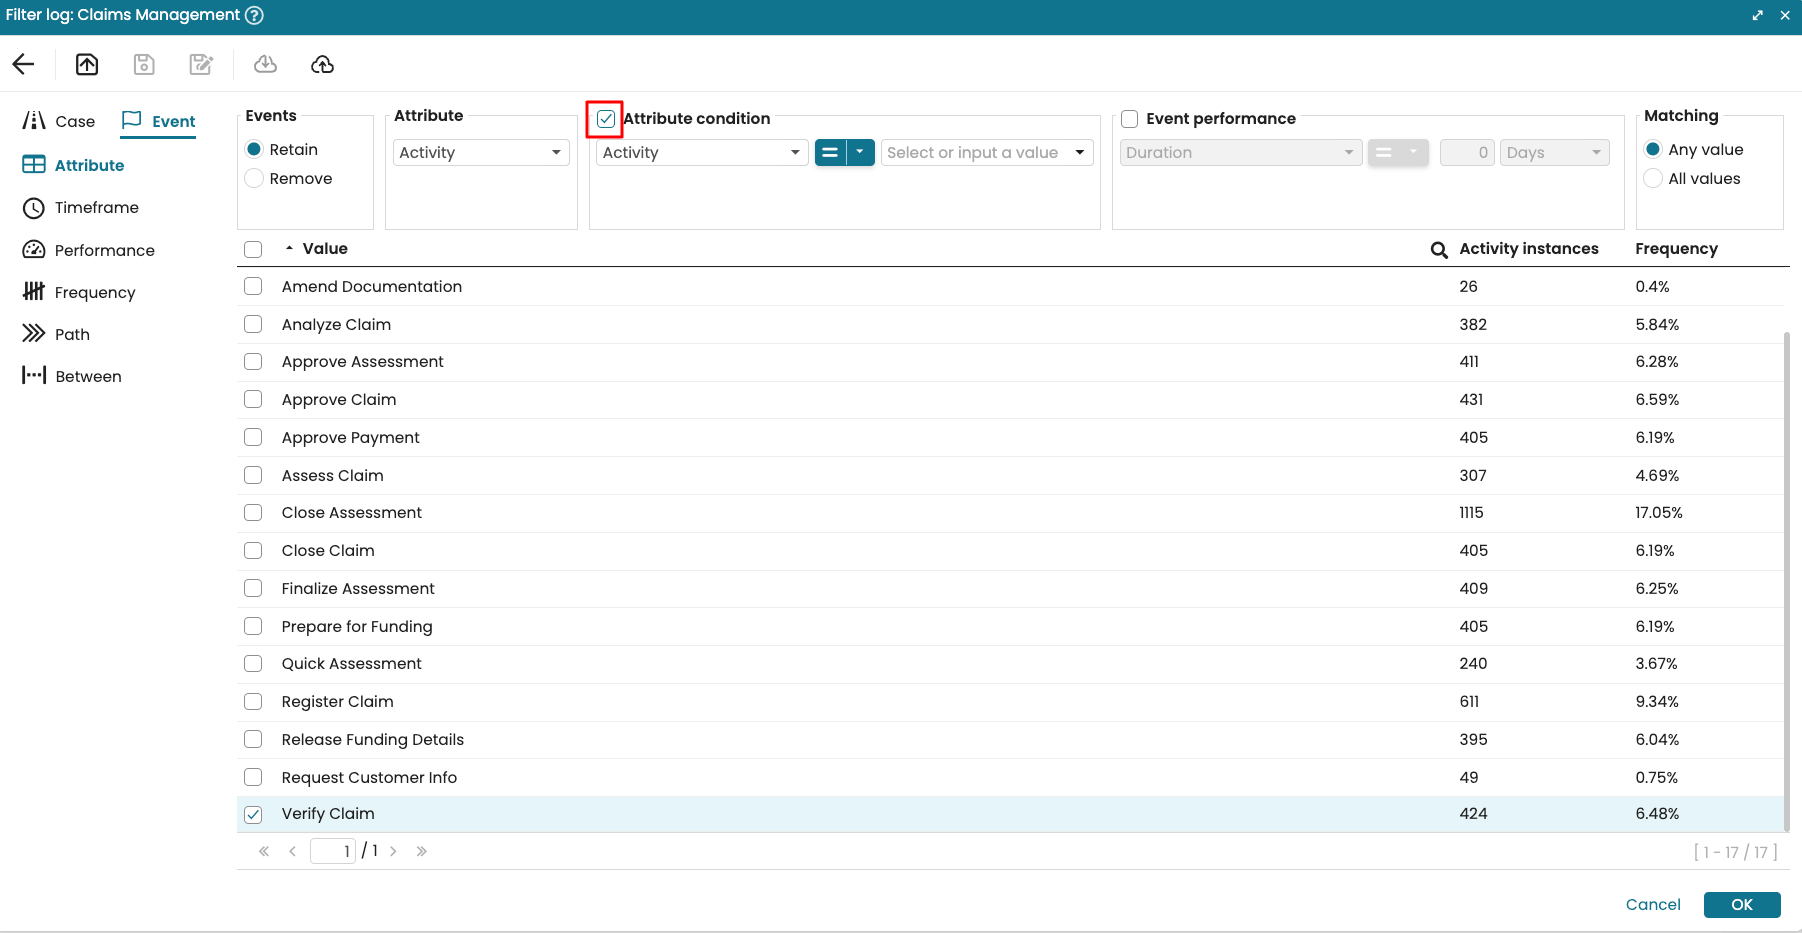
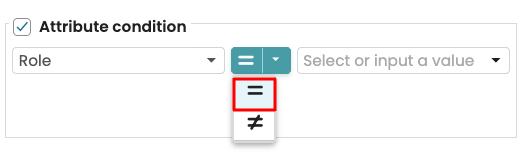
To define a second condition, check Attribute condition.
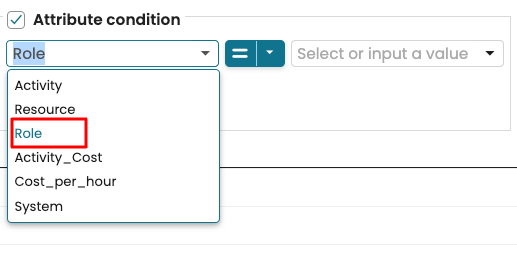
The second condition is that the event is performed by the Product Manager, i.e., a role. Select Role from the dropdown.
We define the comparison operator. There are two options:
Equals to: A value that fulfills the condition.
Not equals to: A value that would not fulfill the condition.
In our case, we select equal to (=).
We can define this condition by comparing it to event attribute values in the event log or by entering a custom value. When using event attribute comparison, Apromore matches events where both attribute values are the same. To define the condition based on event attributes in the log, select an attribute from the dropdown.
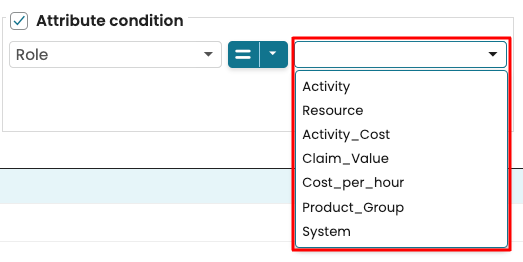
In our case, however, we specify a custom value. Type in “Product Manager”.
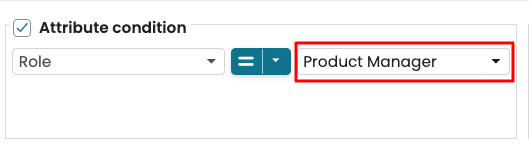
Note
Custom values are case-sensitive, so we must exactly enter the value as-is in the log.
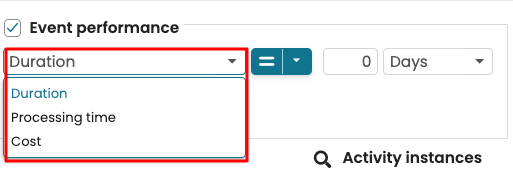
Lastly, we can define a condition based on event performance. To do this, select Event Performance.
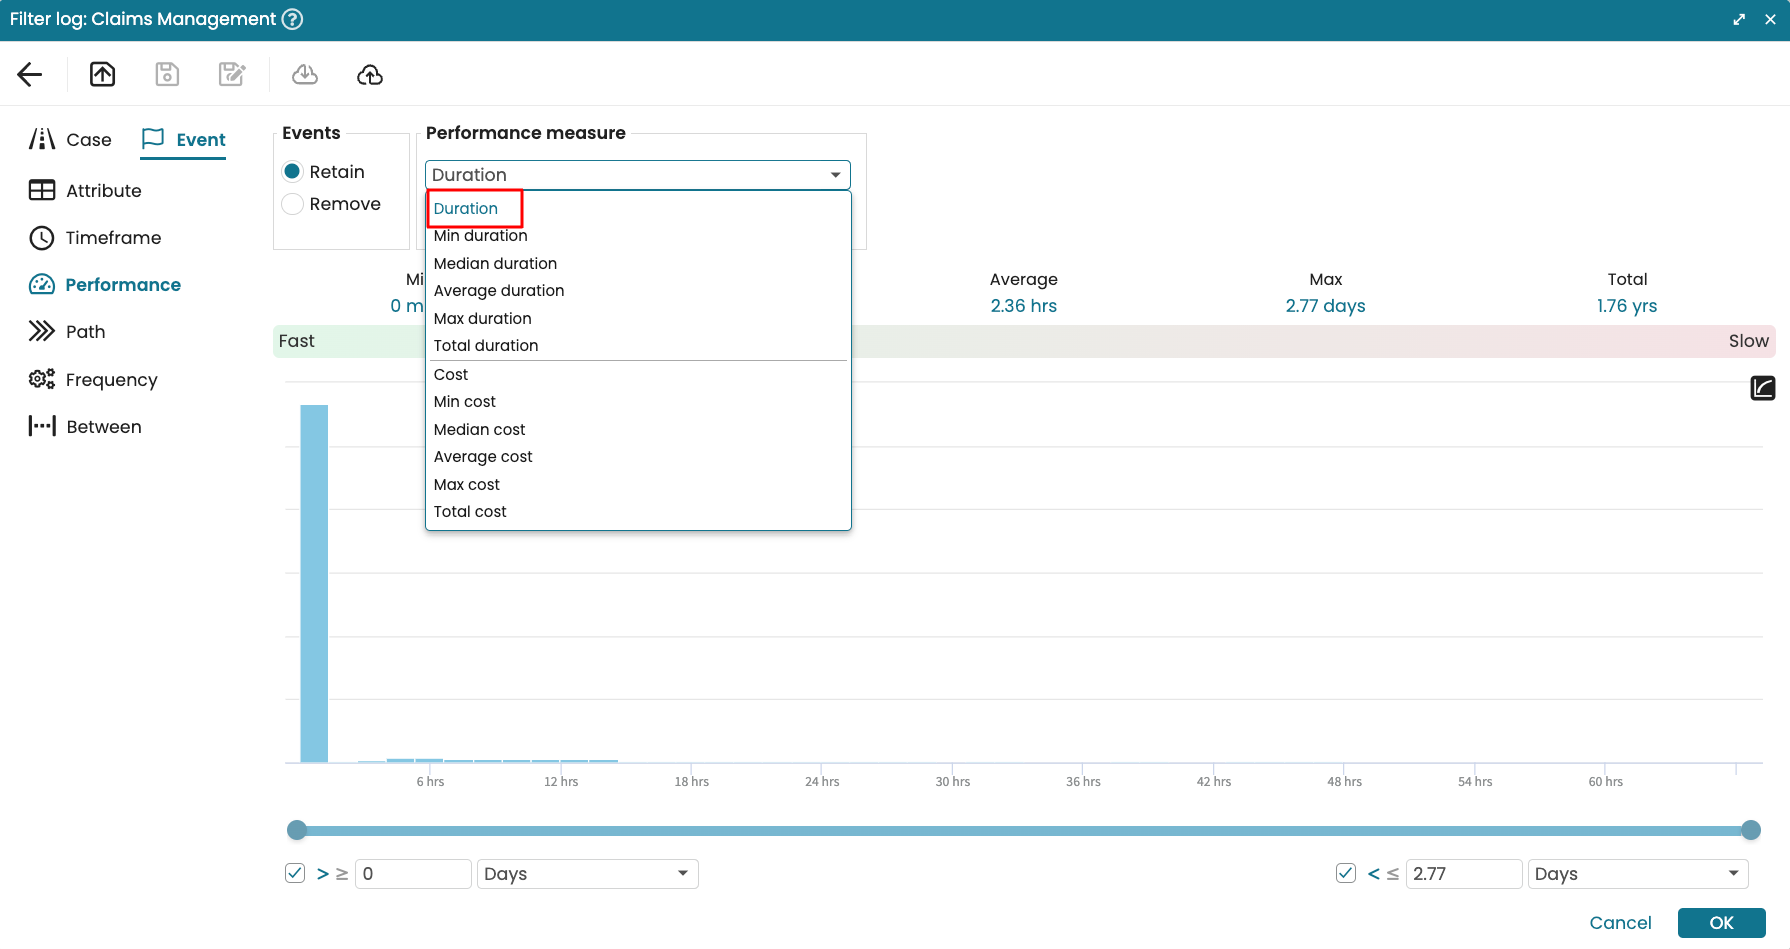
The event performance can be based on:
Duration: The end_time - start_time of the event without factoring in the role’s calendar.
Processing time: The portion of the event’s duration that falls within the working hours defined by the role’s calendar.
Cost (if cost center is defined): The cost of the event.
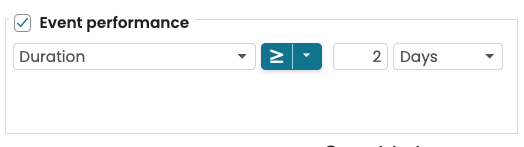
We select Duration. Select the mathematical operator for the comparison. In our case, we select greater than equals to.
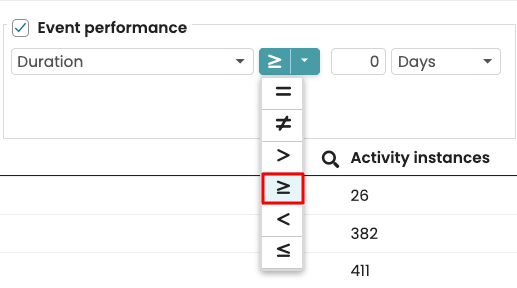
Specify the value, 2 days in our case.
Because we want the filter to match events where all conditions were fulfilled, we select All values in Matching.
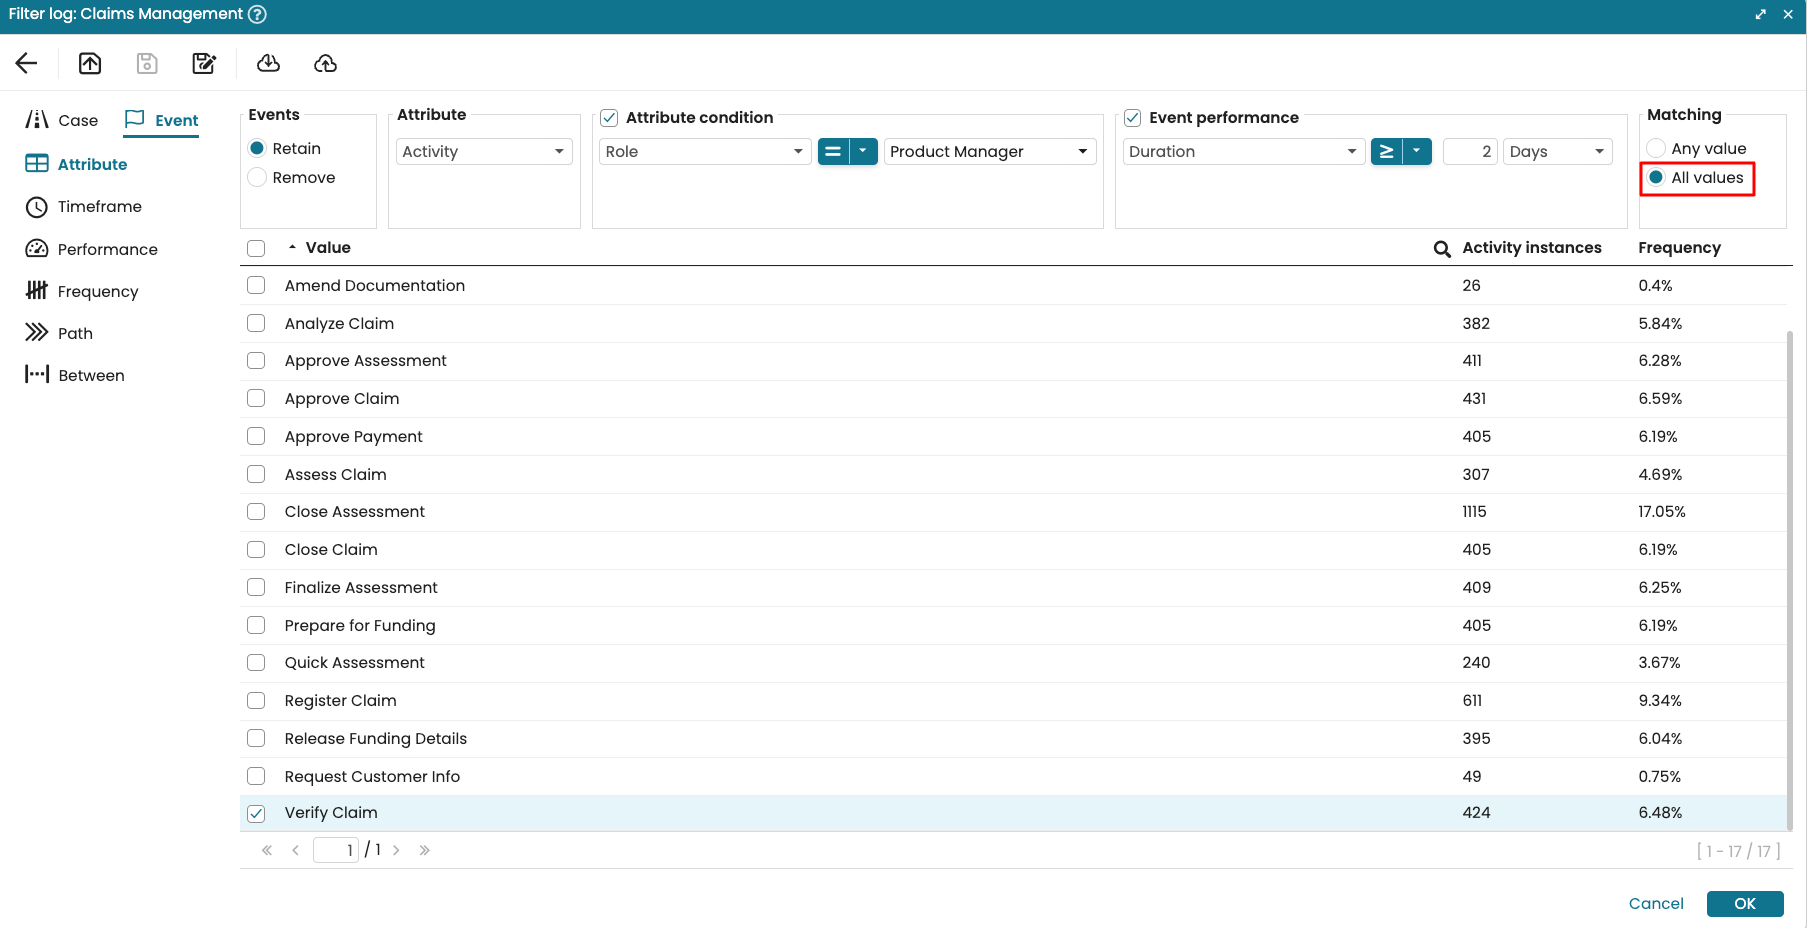
Click OK to apply the filter. As seen, there are 2 cases where “Verify Claim” was performed by the Product Manager and the event took more than 2 days.
We can click OK to see the process map of the filtered log.
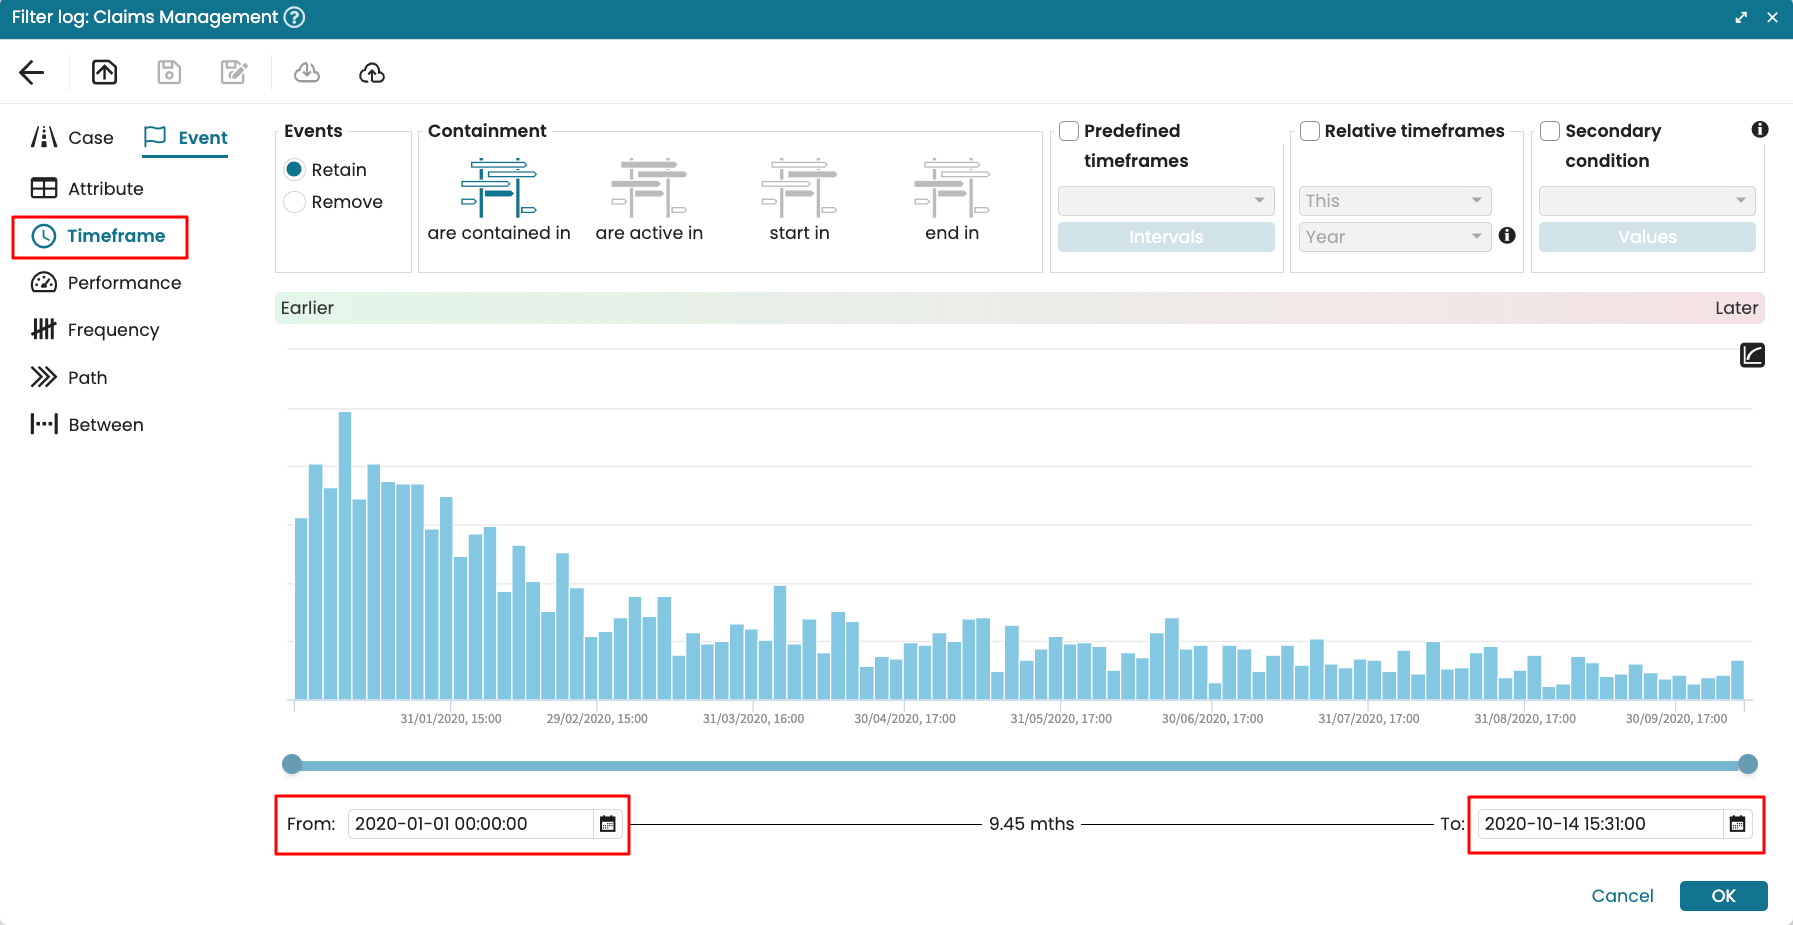
Event > Timeframe filter
The Timeframe event-level filter allows allows us to retain or remove events based on a particular timeframe. We can set the desired timeframe by entering the Start and End dates or using the time slider at the bottom of the Filter criteria window.
There however are complex situations where we need to specify other nuances within a specific timeframe. For instance, we may want to retain only activity instances/events that were active within a timeframe, or filter based on well-known periods (e.g., Q4 2020). Additionally, we often need to define relative time periods such as “the last quarter” without constantly updating filters as time progresses. Also, there are situations where after applying the initial filter, we need an additional secondary filter. We can perform all these in the timeframe event filter.
When specifying a timeframe event filter, we can now specify the following:
Events (Retain or Remove): This specifies whether to retain or remove activity instances/events that fulfils the filter condition.
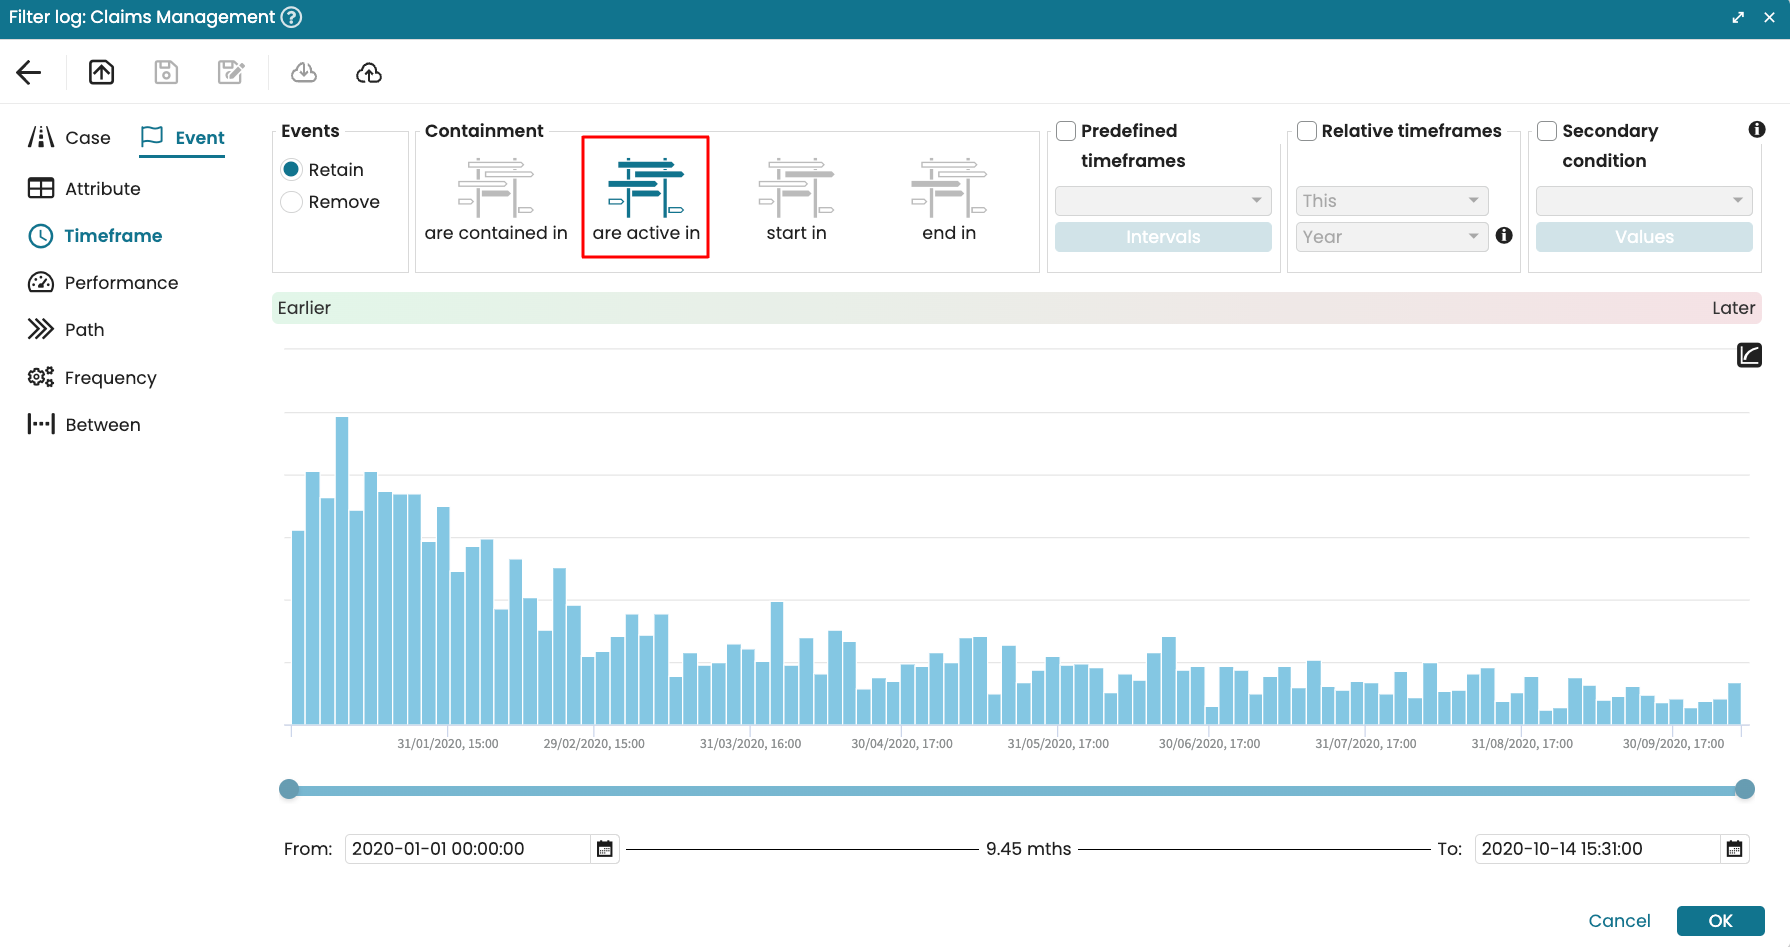
Containment: This allows us to specify how the timeframe condition is fulfilled.
Are contained in: Filters only events that begin and ends within the timeframe.
Are active in: Filters events that are opened within the timeframe.
Start in: Filters events that began within the timeframe. The event may either still be opened or are closed.
End in: Filters events that ends within the timeframe.
Predefined timeframes: This allows us to define events within a popular time period. It would be within a year, semester, quarter, month or week.
Relative timeframes: This allows us to define a timeframe filter with respect to the current date. For instances, events active in the last one year.
Secondary condition: This allows us to define additional criterion on the specific timeframe selected by the user. For instance, we want to retain all the events, but for the events active in the last one year we want to retain only those that are performed by the Product Manager role.
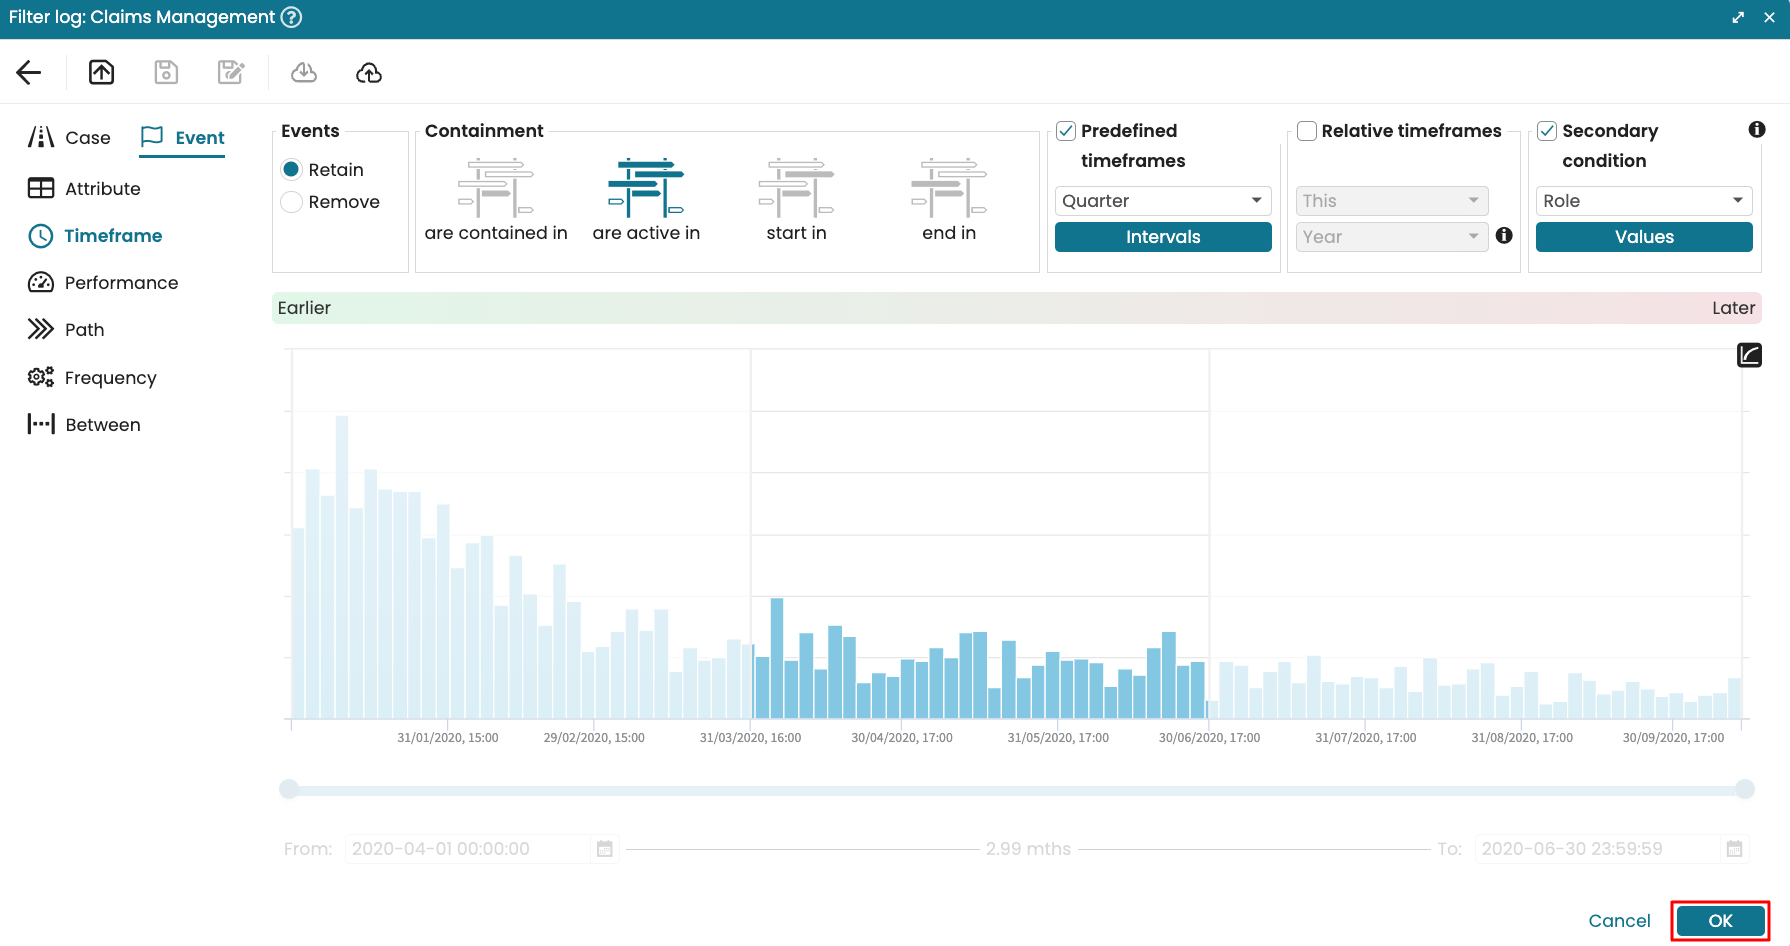
Imagine that in a claims management event log, we want to analyze only events that were done in Q2 of 2020. We can retain only activities performed within this period.
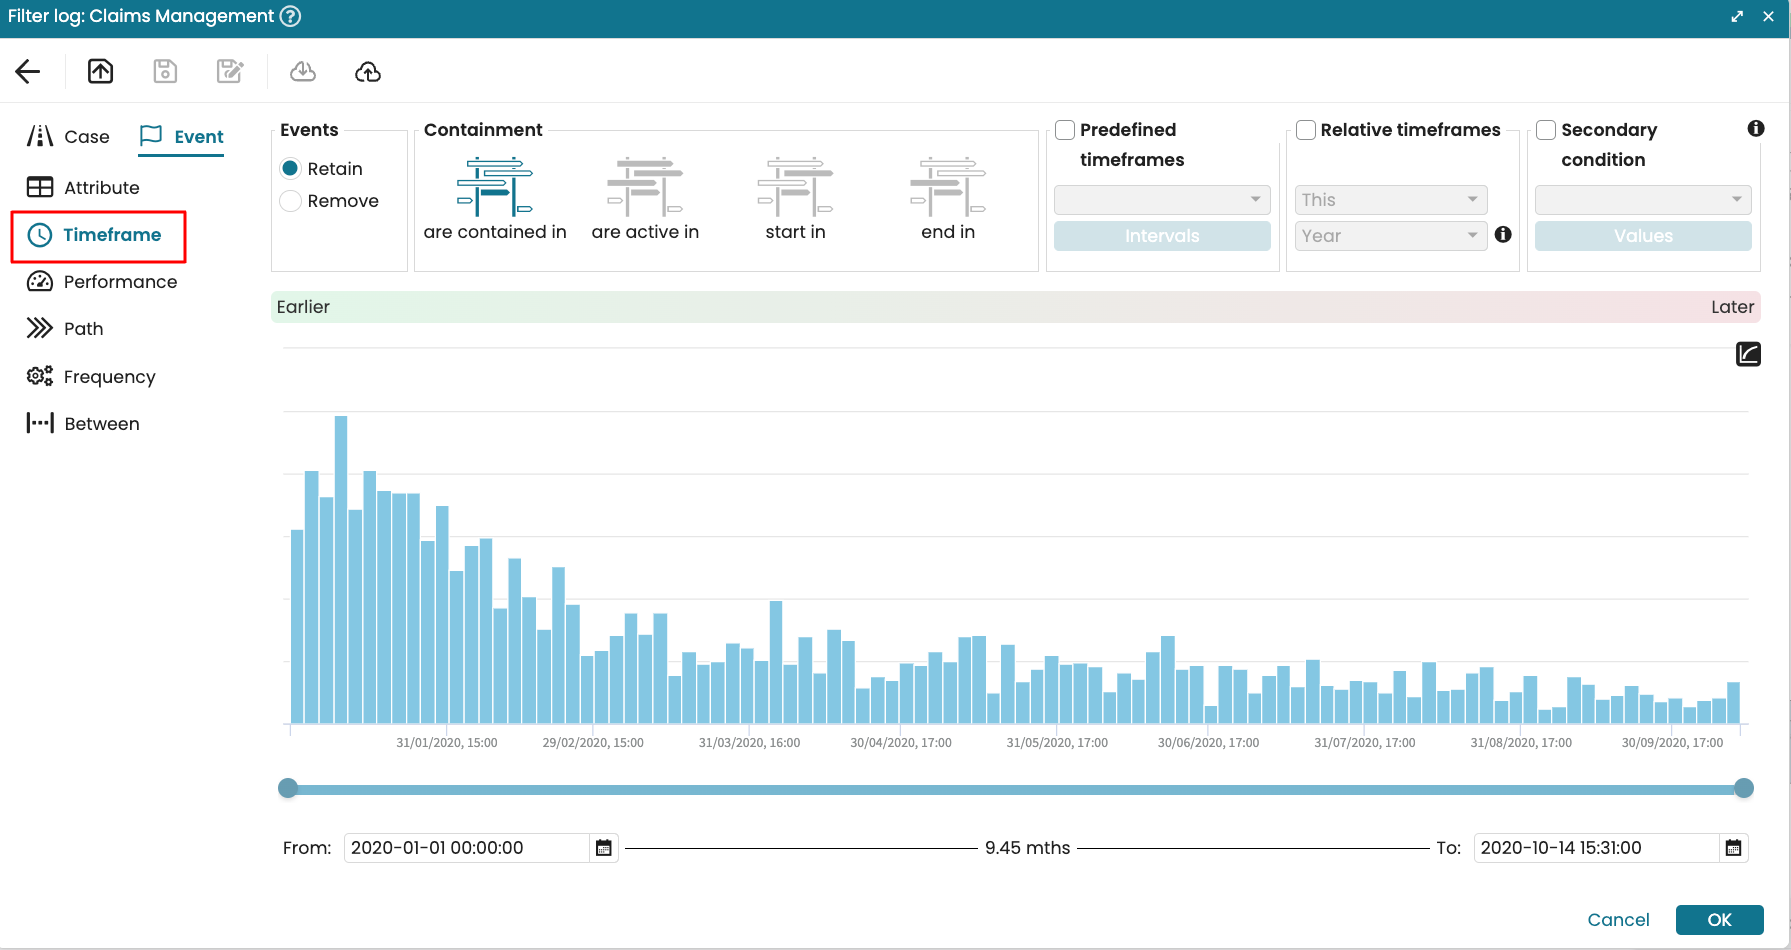
Go to the timeframe event filters.
We specify the containment. In our case, we chose cases that are active in.
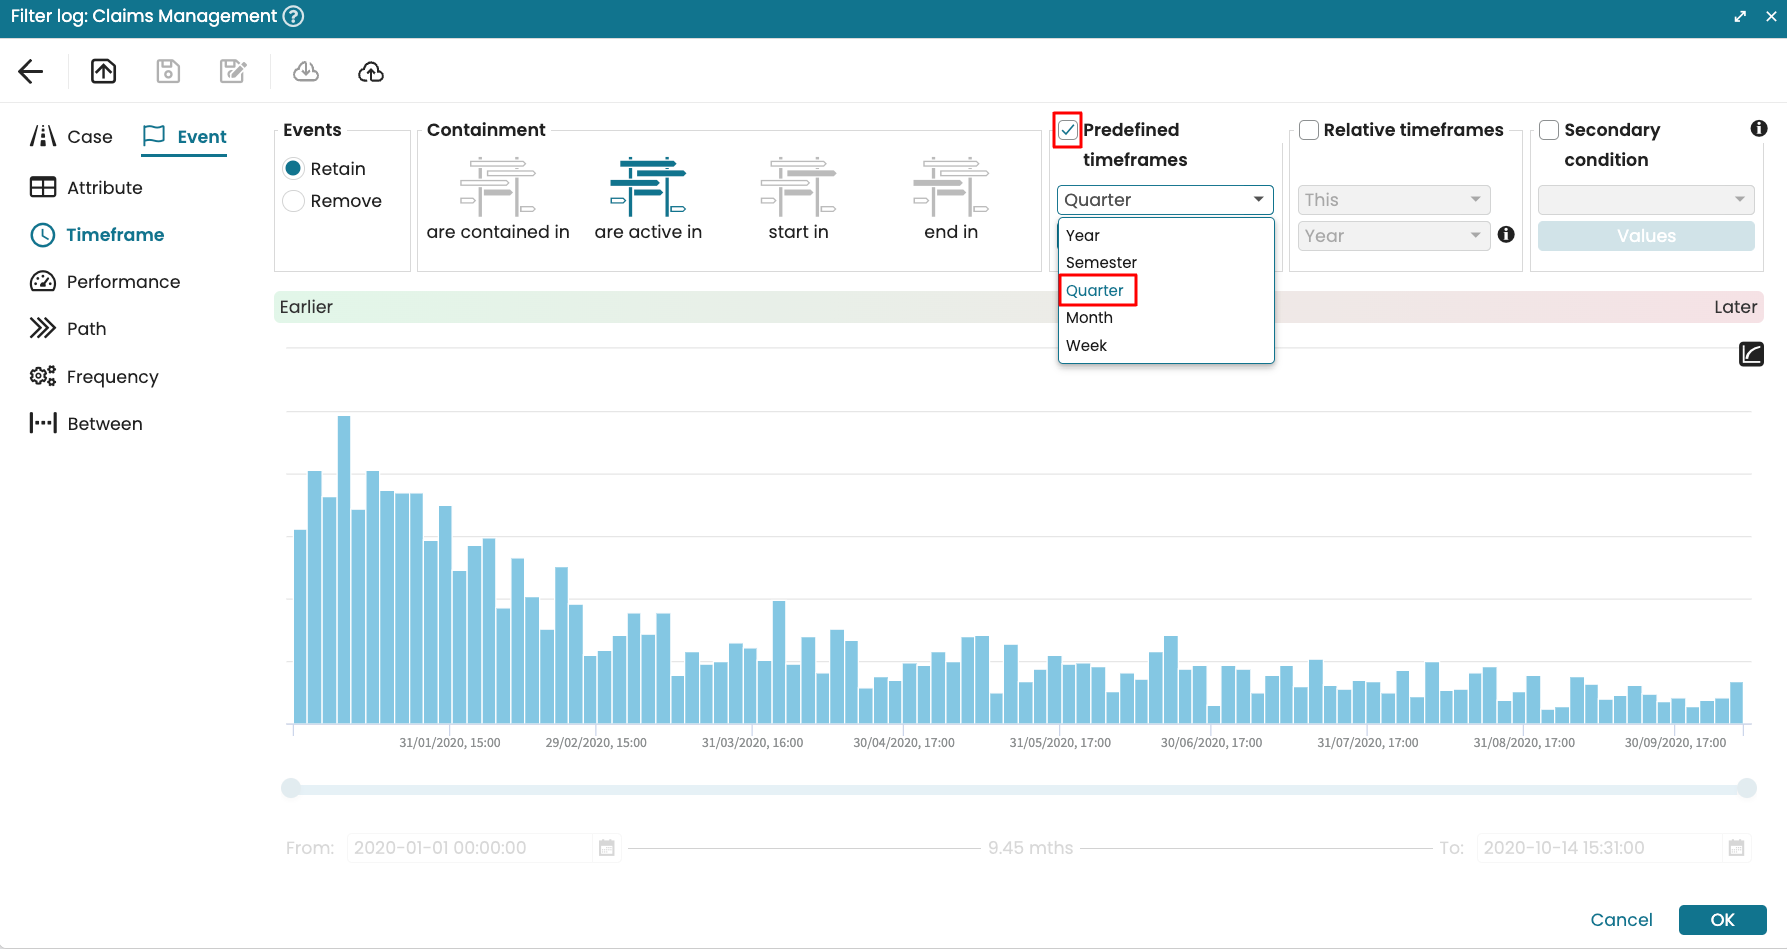
To filter by a predefined timeframe, select the Predefined timeframes option. In the dropdown, select Quarter.
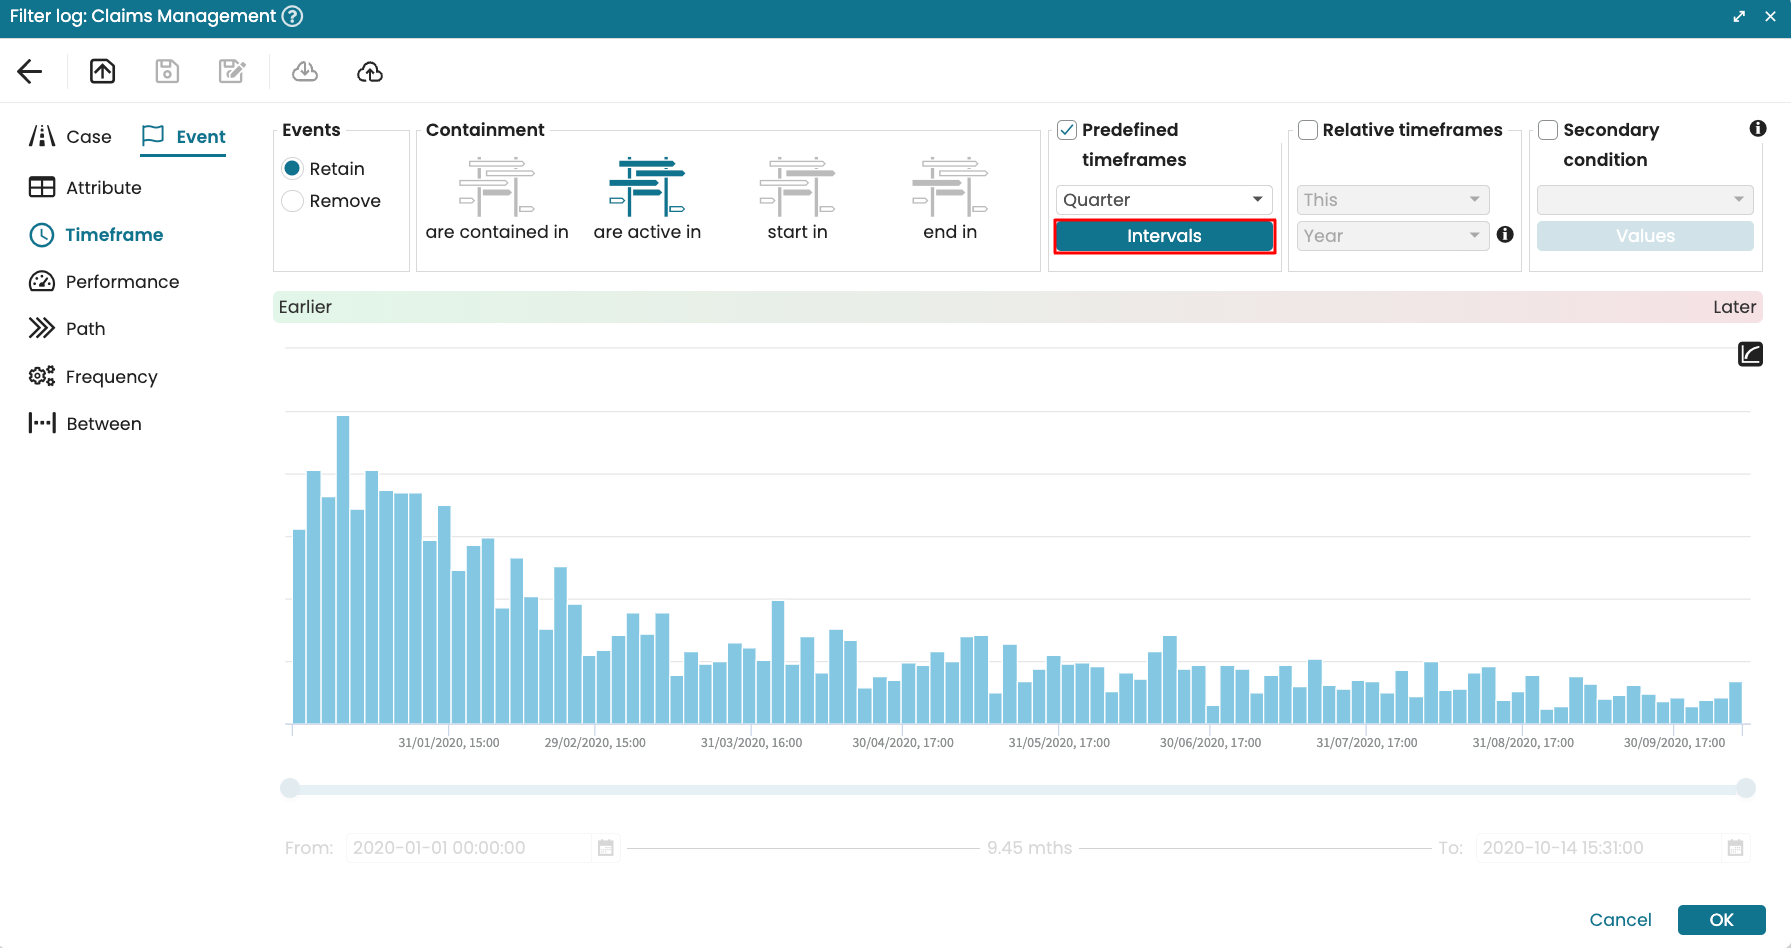
Click Intervals to specify the quarterly interval of interest.
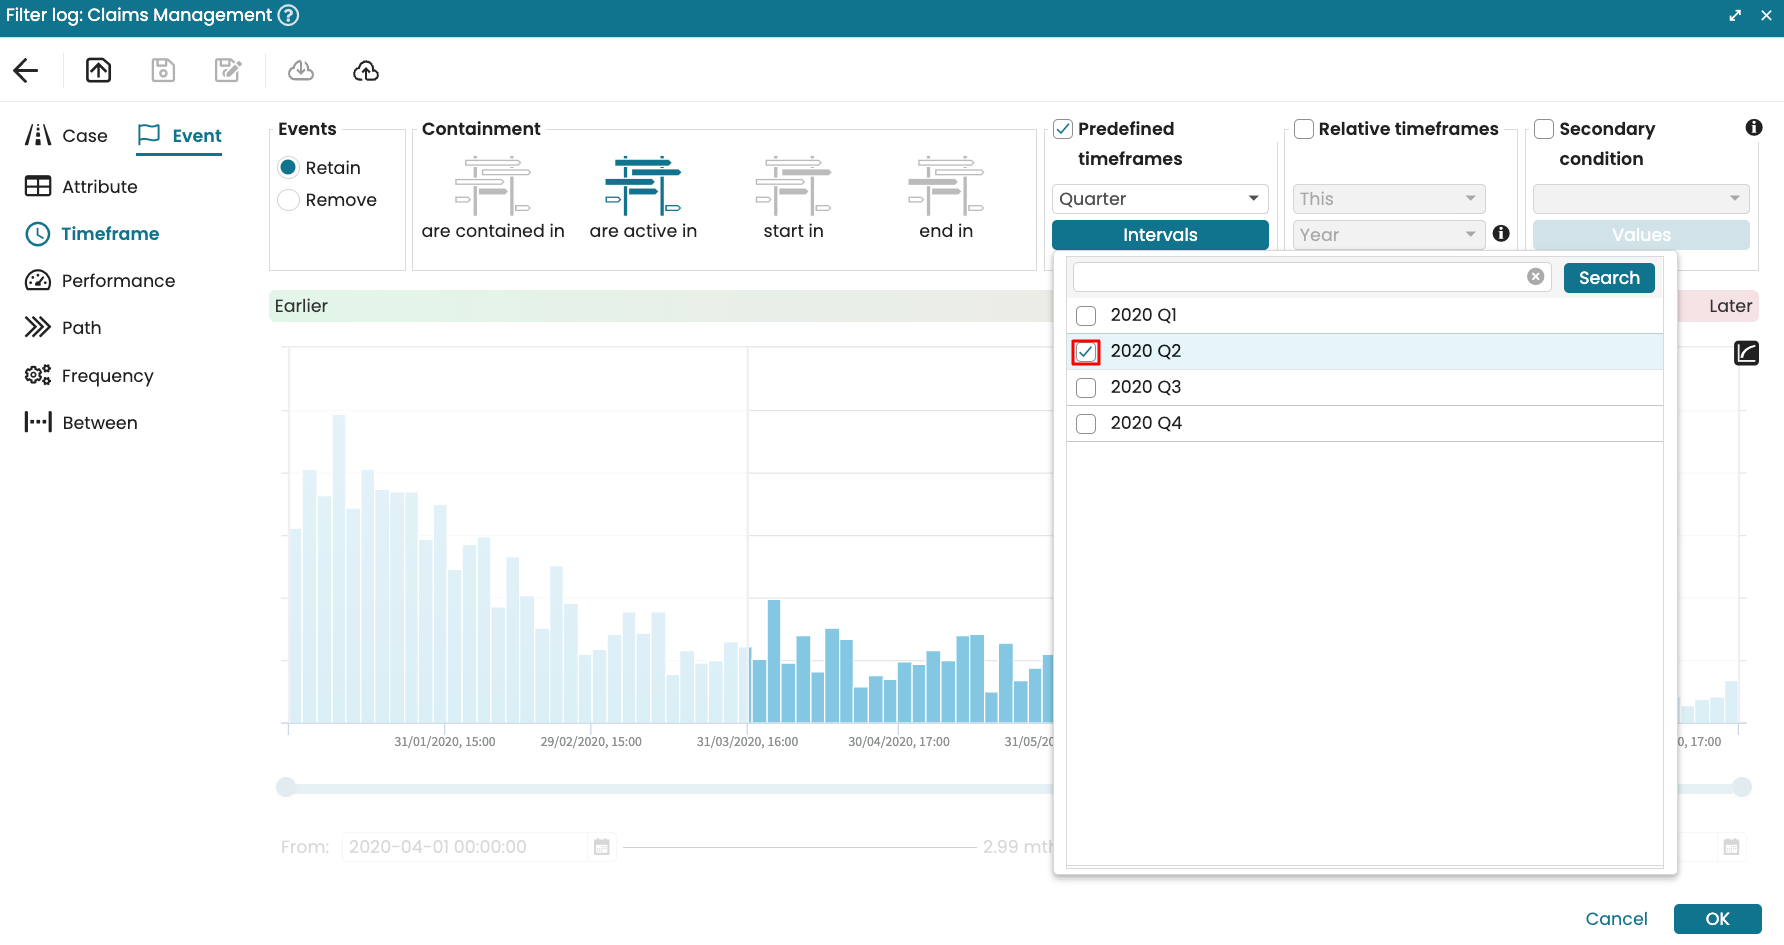
Select 2020 Q2.
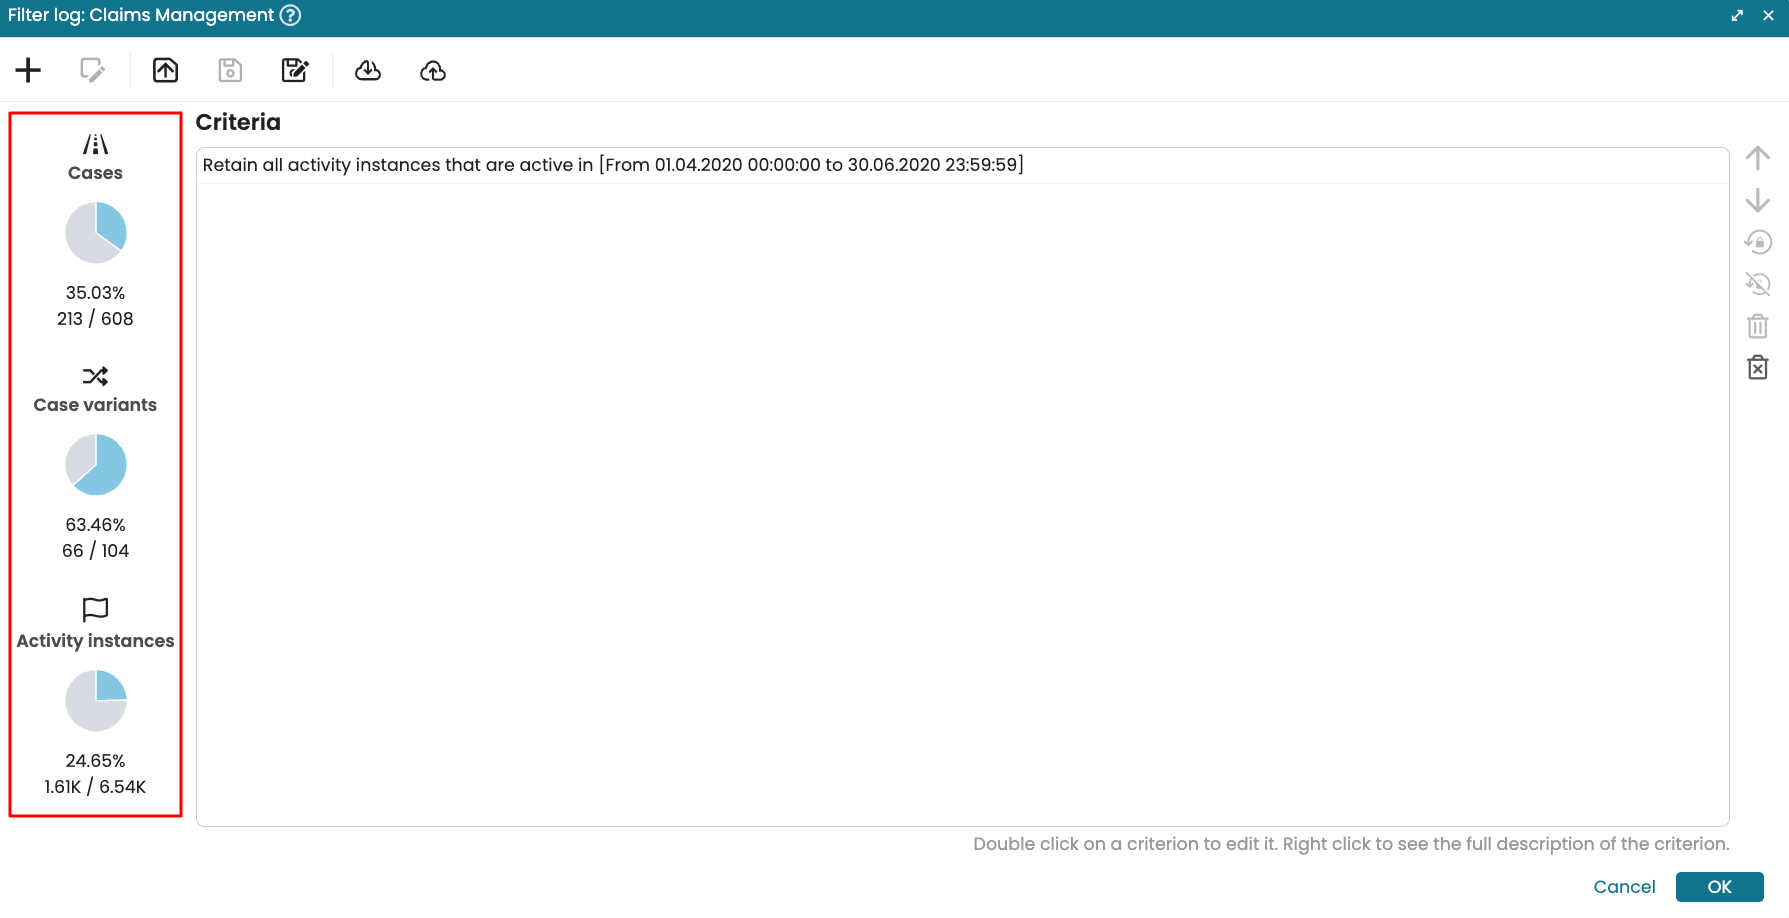
Click OK to apply the filter.
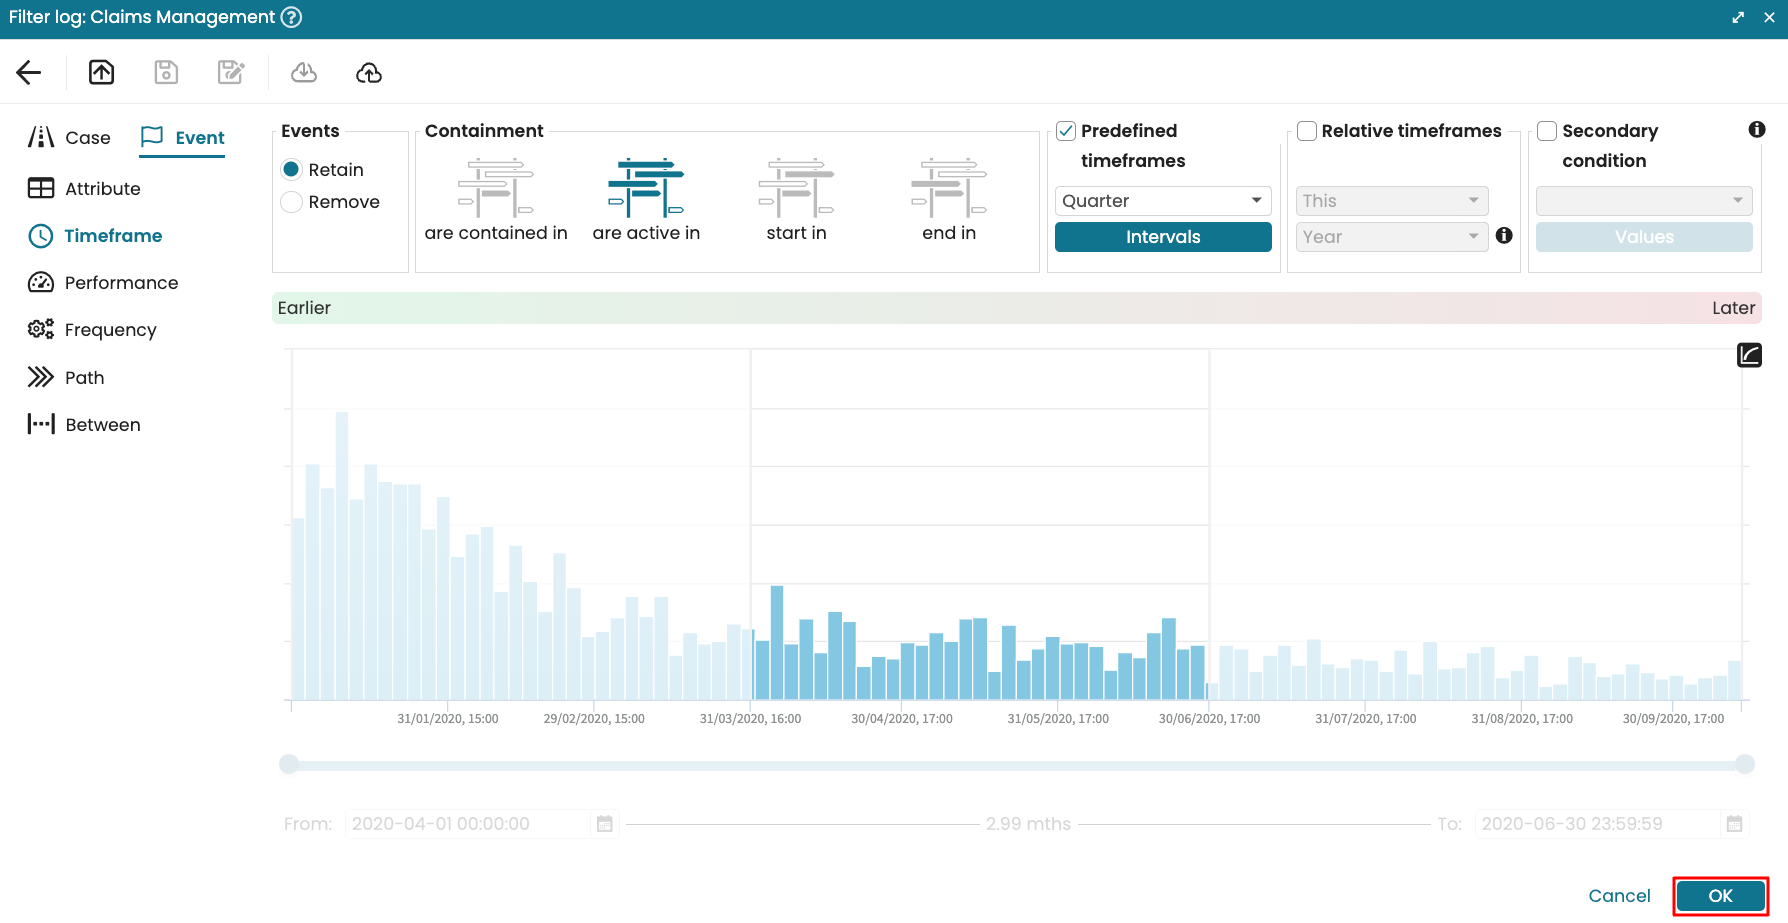
And we see the result of the filter condition.
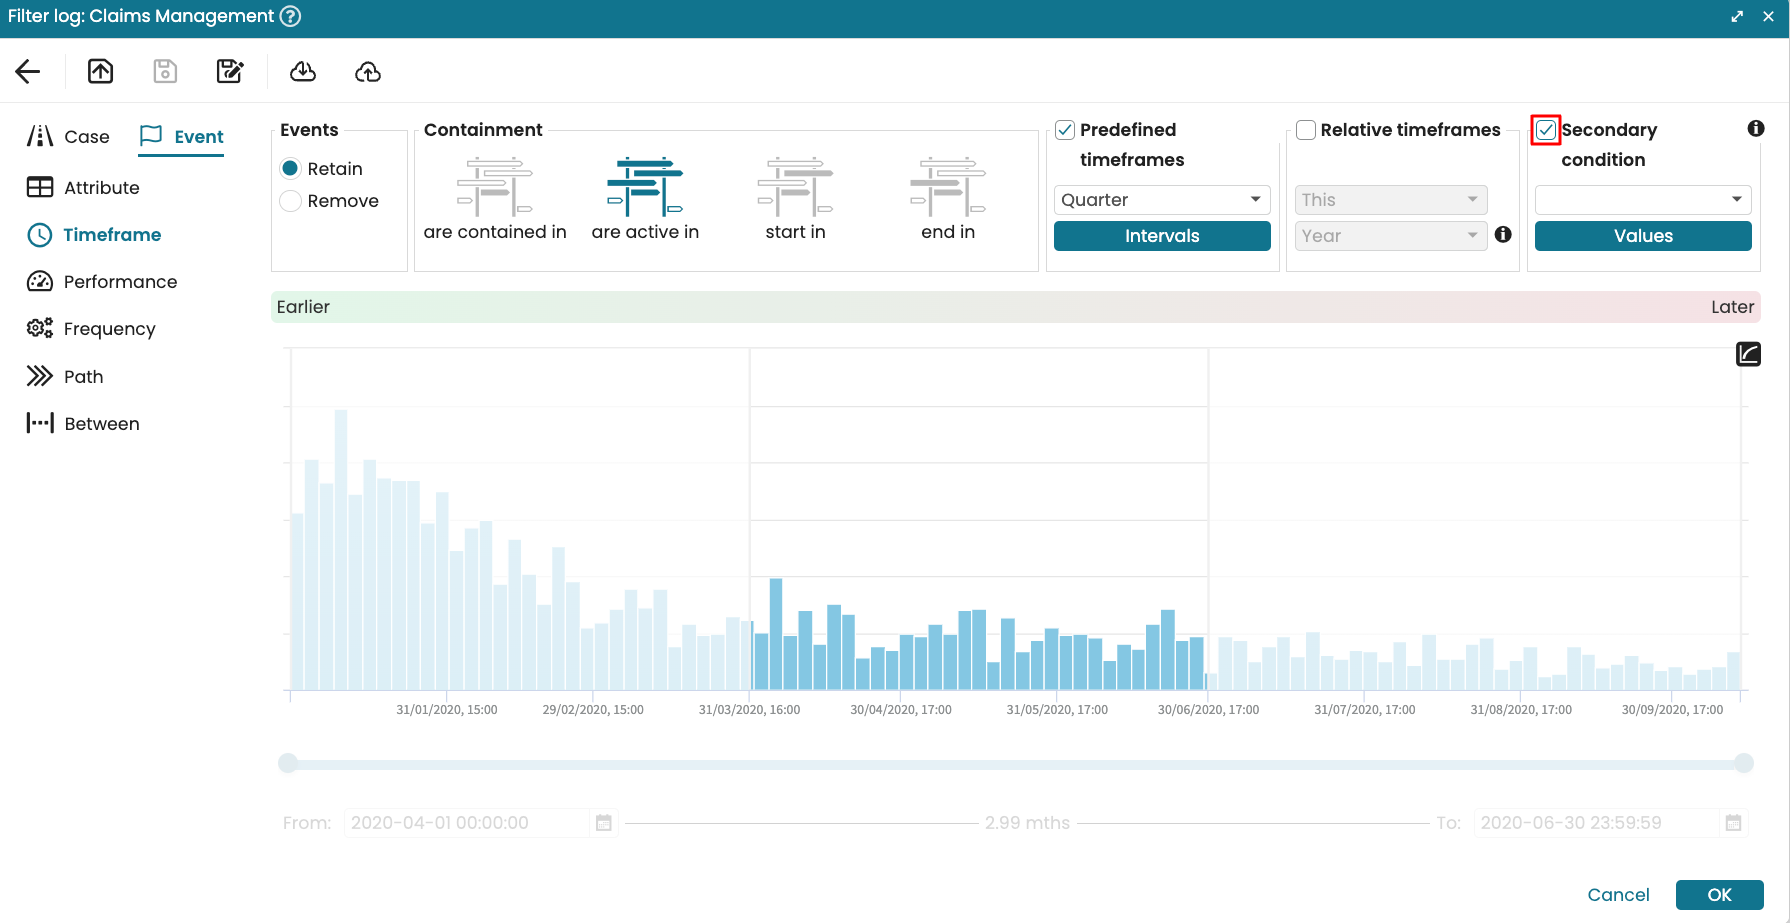
We can also create secondary filters when creating a timeframe filter. This allows us to filter events by attributes within a timeframe while retaining the remaining log. For instance, when analyzing the claims management process, we may want the event log, but for Q2 of 2020, retain only events done by the managerial roles. We can do so by specifying it as a secondary condition.
When defining the timeframe event filter, select Secondary condition.
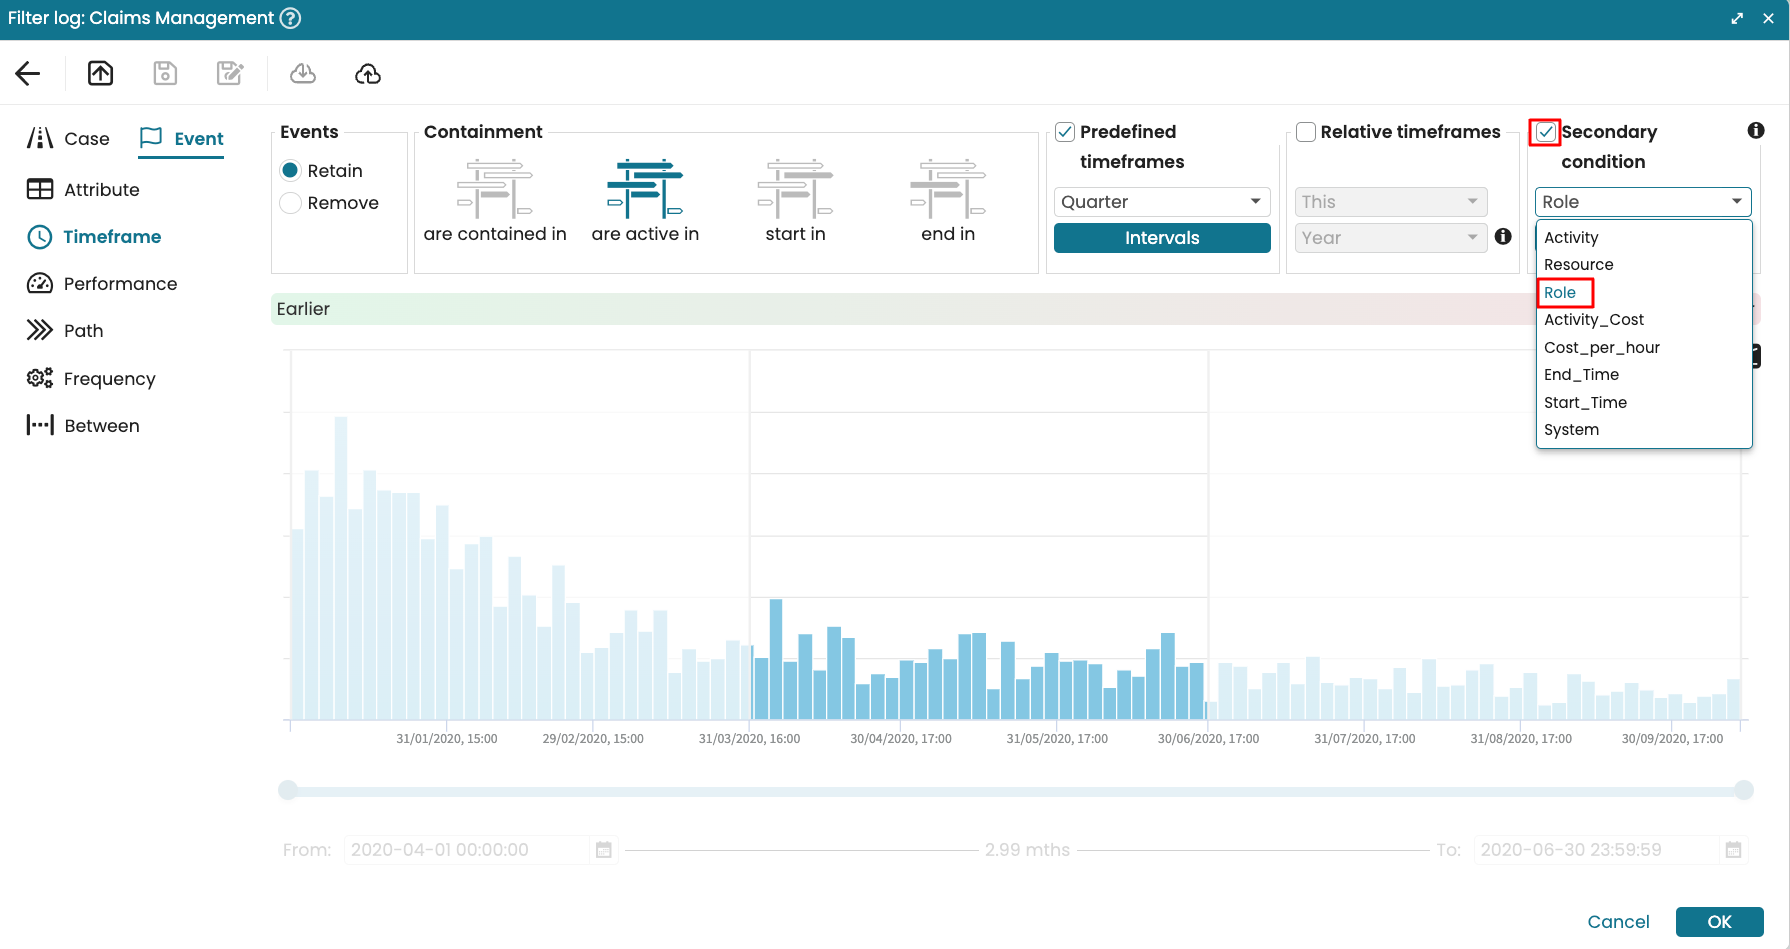
Since our condition is based on roles, in the dropdown, select Roles.
Click Values to specify the roles of interest.

Select the managers, i.e., Finance Manager, Operations Manager and Product Manager.
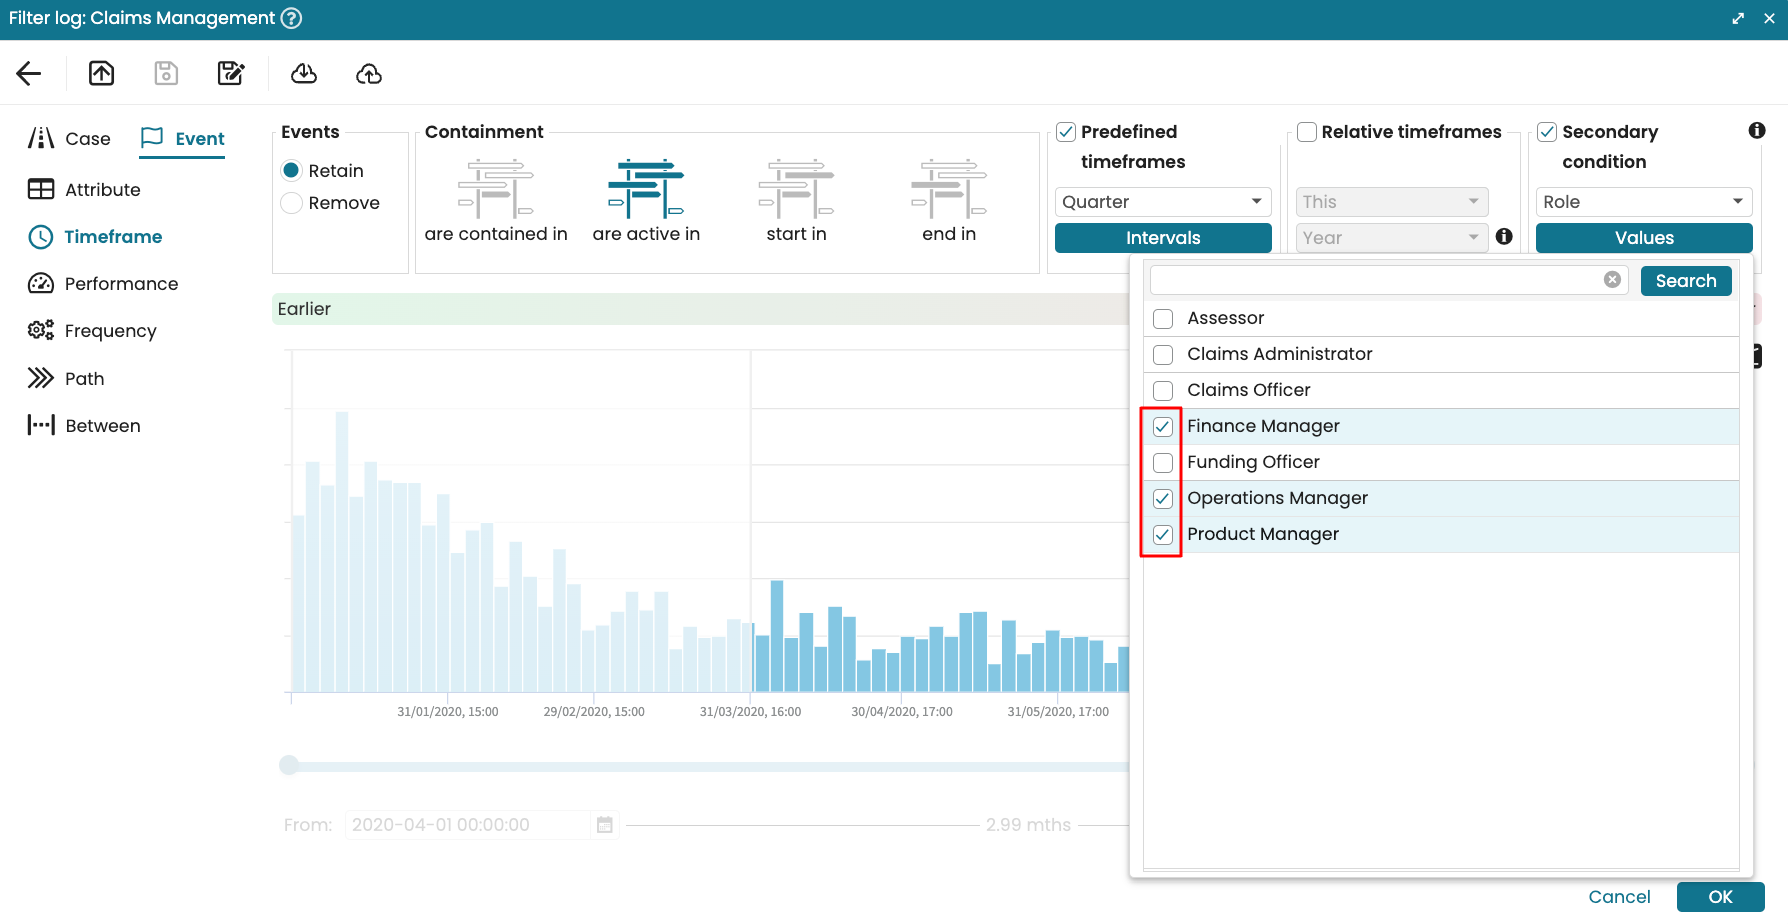
Click OK to confirm the filter condition.
We see the results of the filter.
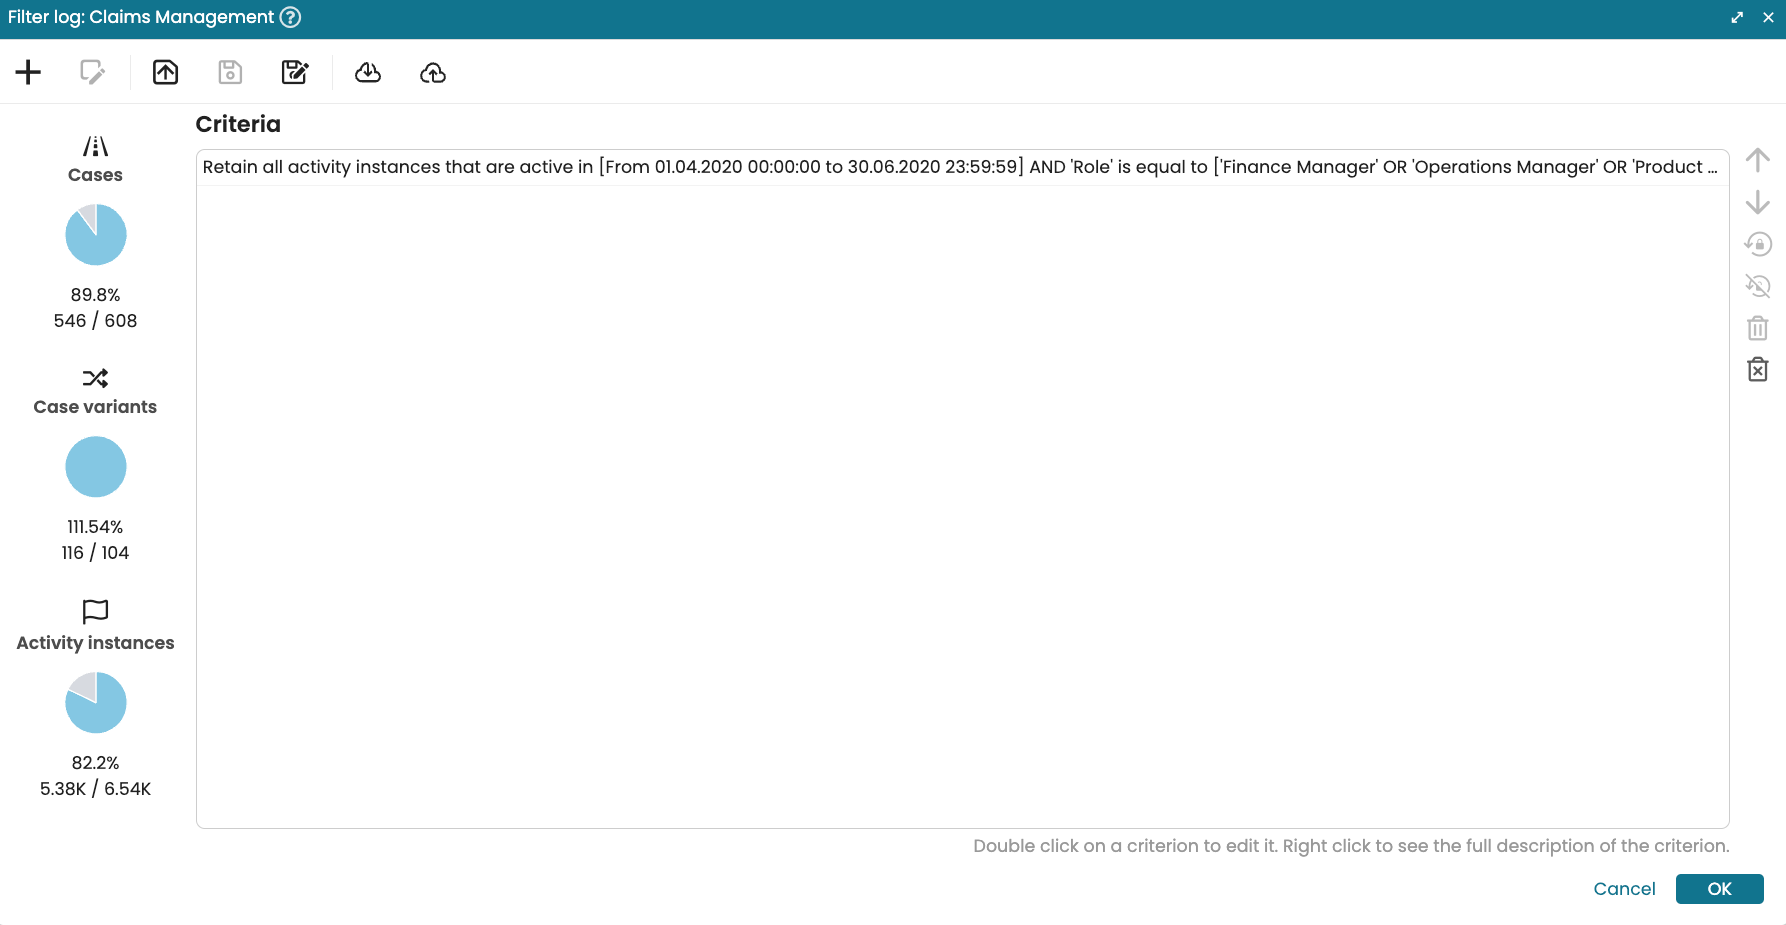
Click OK to apply it.
Event > Frequency filter
The frequency event-level filter allows us to dice an event log based on how often activities or other attributes in the log occur. The frequency event-level filter can particularly help us identify hidden patterns such as rework and bottlenecks. For instance, we can retain only activities that were repeated within a case, giving us a clear picture of how often and where rework occurs in the process.
To create a frequency event-level filter, open the filter window and click Events. This displays the event-level filters.
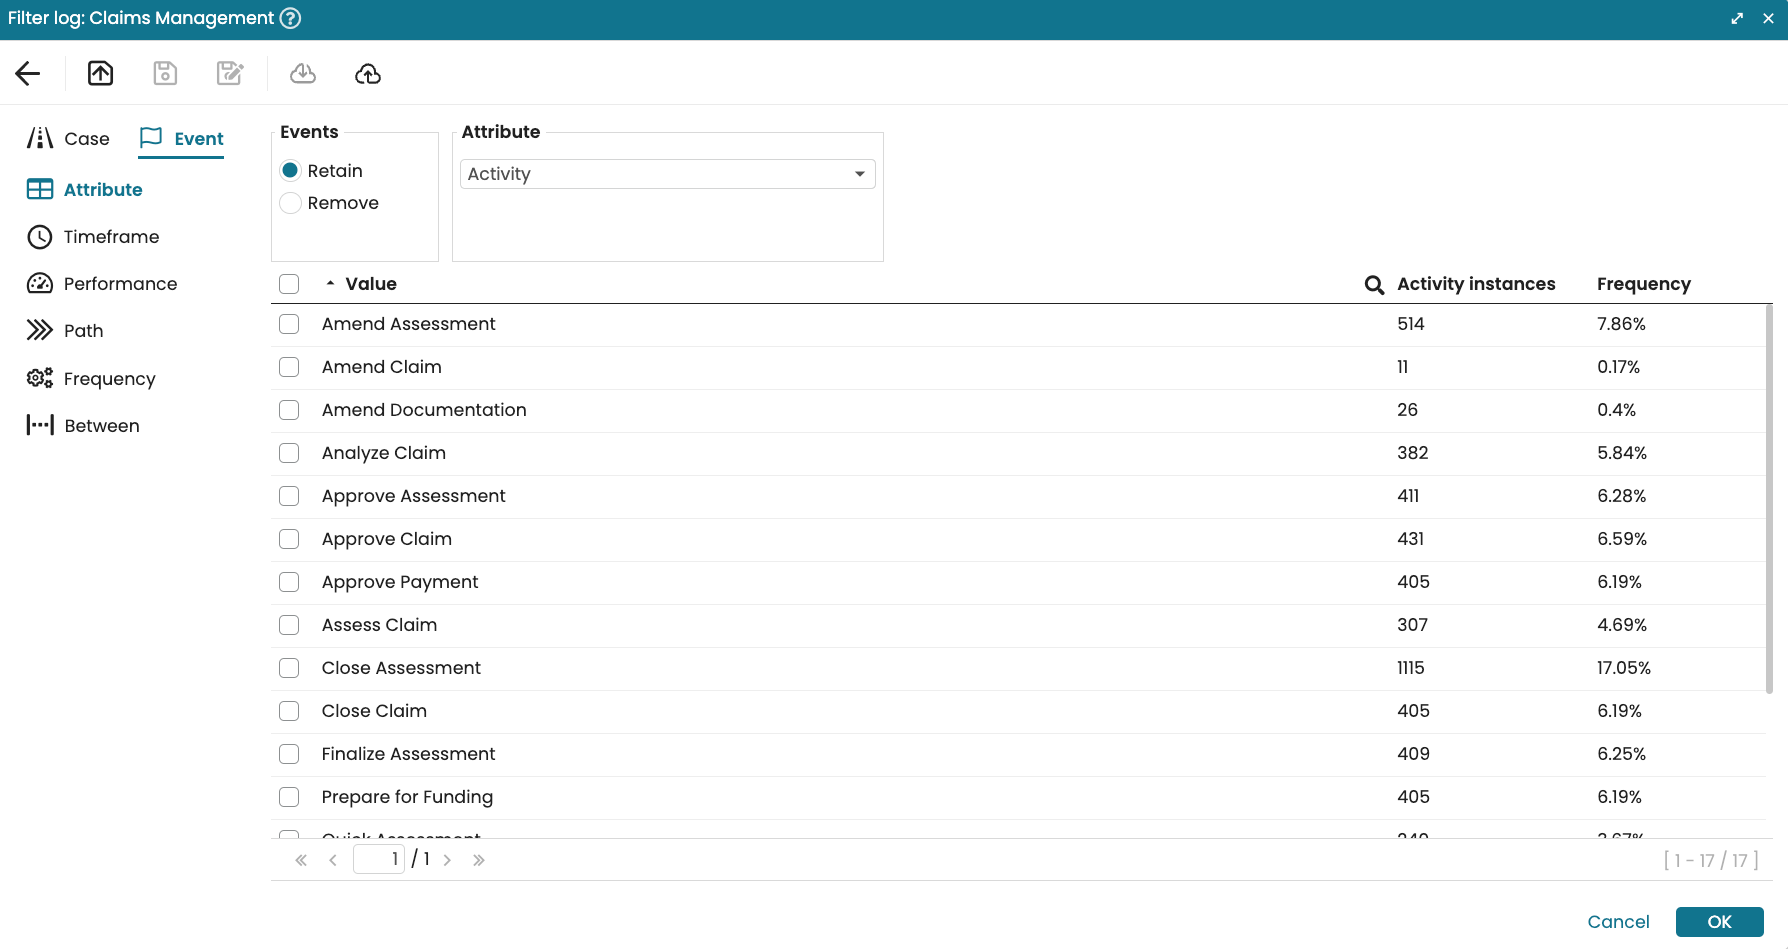
To create a frequency event-level filter, click Frequency.
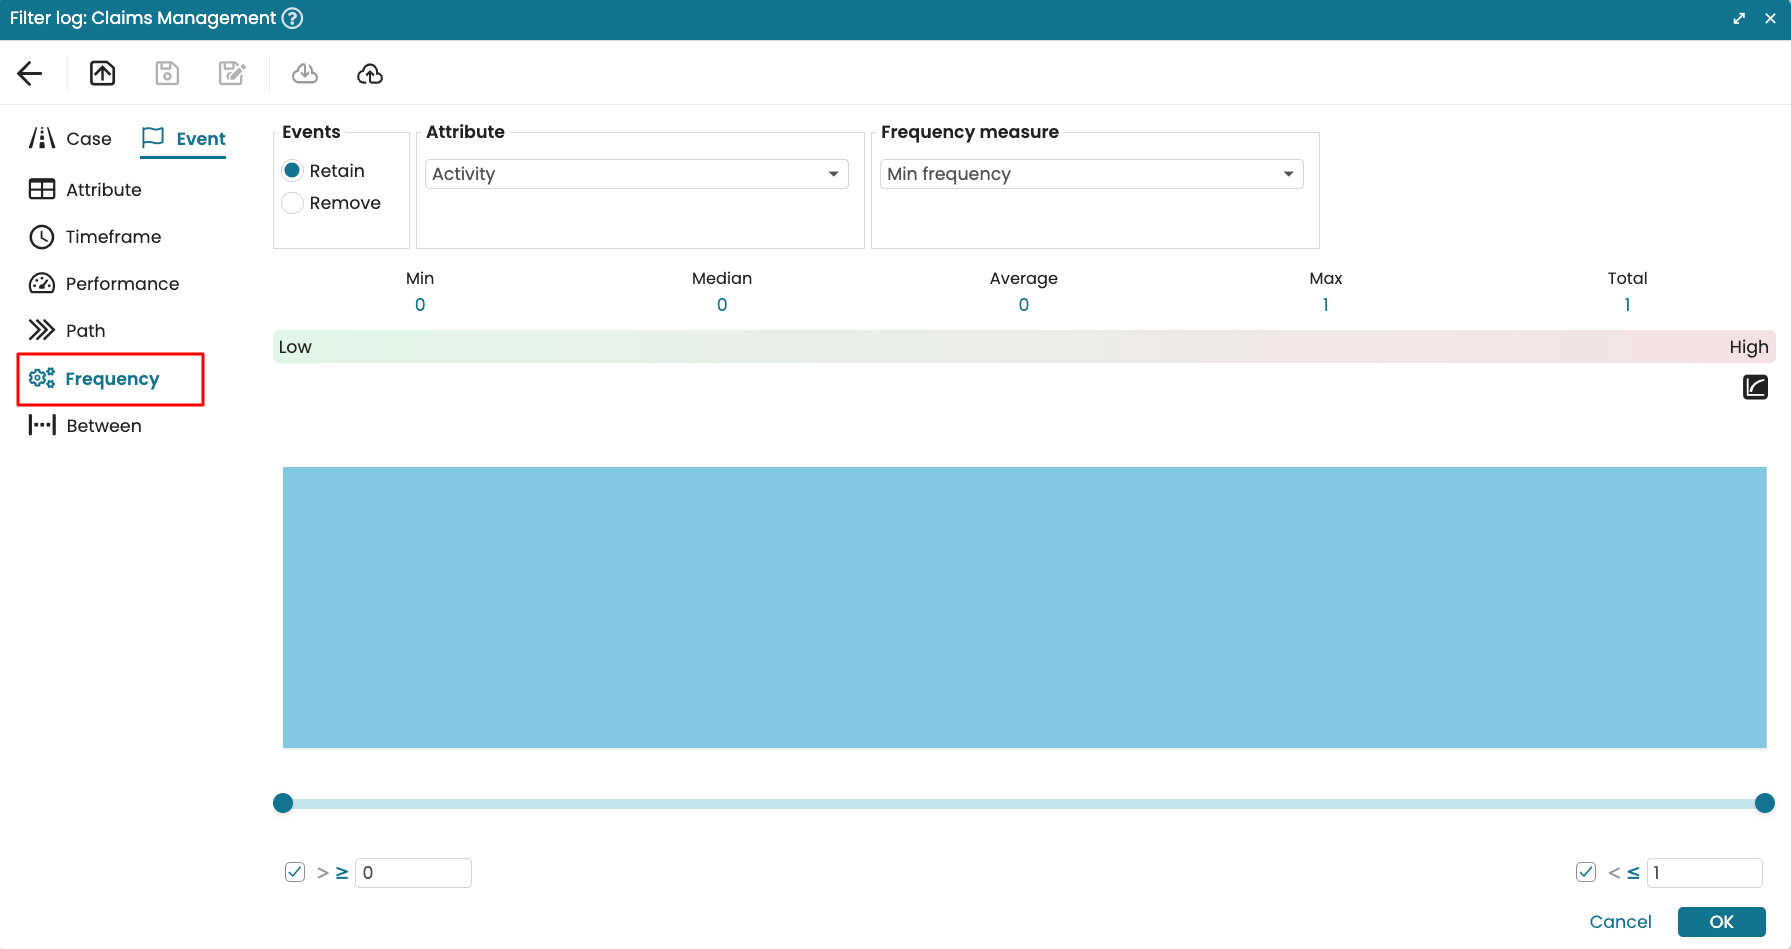
We can filter by any case attribute in the process. Imagine that we want to retain only activities that were reworked three times or more in a case, click select Activity.

We need to also specify the frequency measure. This could be the minimum, median, average, maximum, total or case frequency. In our case, since we want to retain activities that were reworked, we retain activities where the maximum frequency is greater than or equal to 3.
In other words, activities where the maximum frequency in a case is 1 or 2 will not appear. Select the Frequency measure dropdown and click Max frequency.
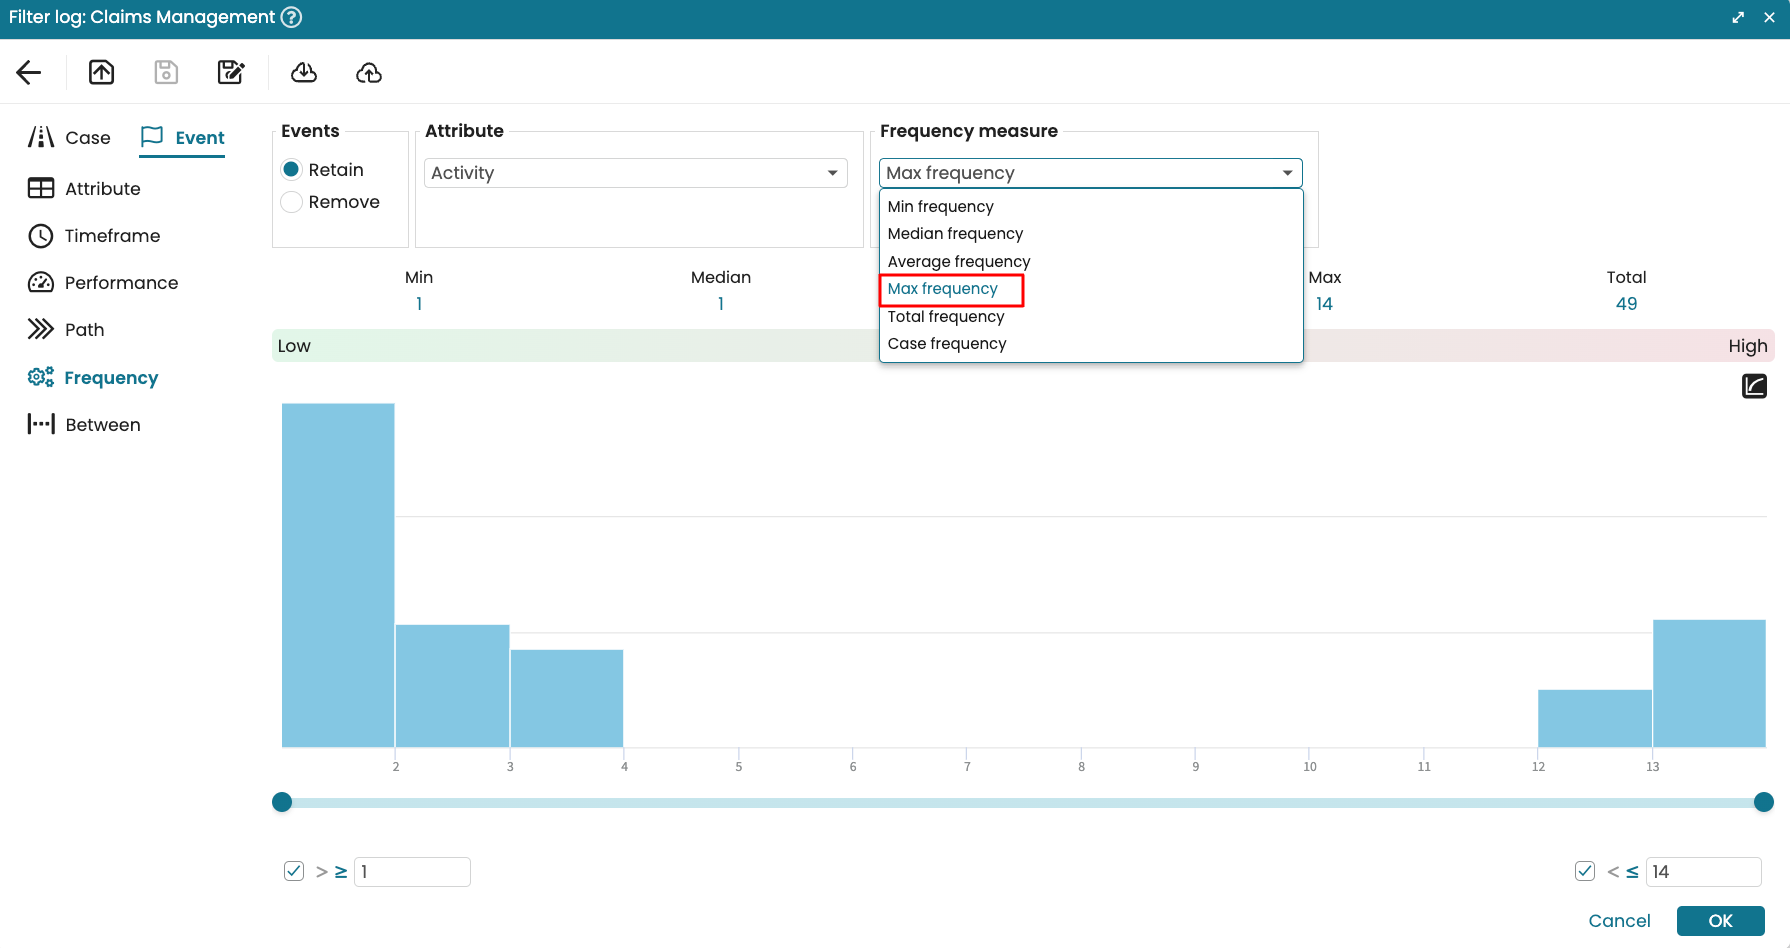
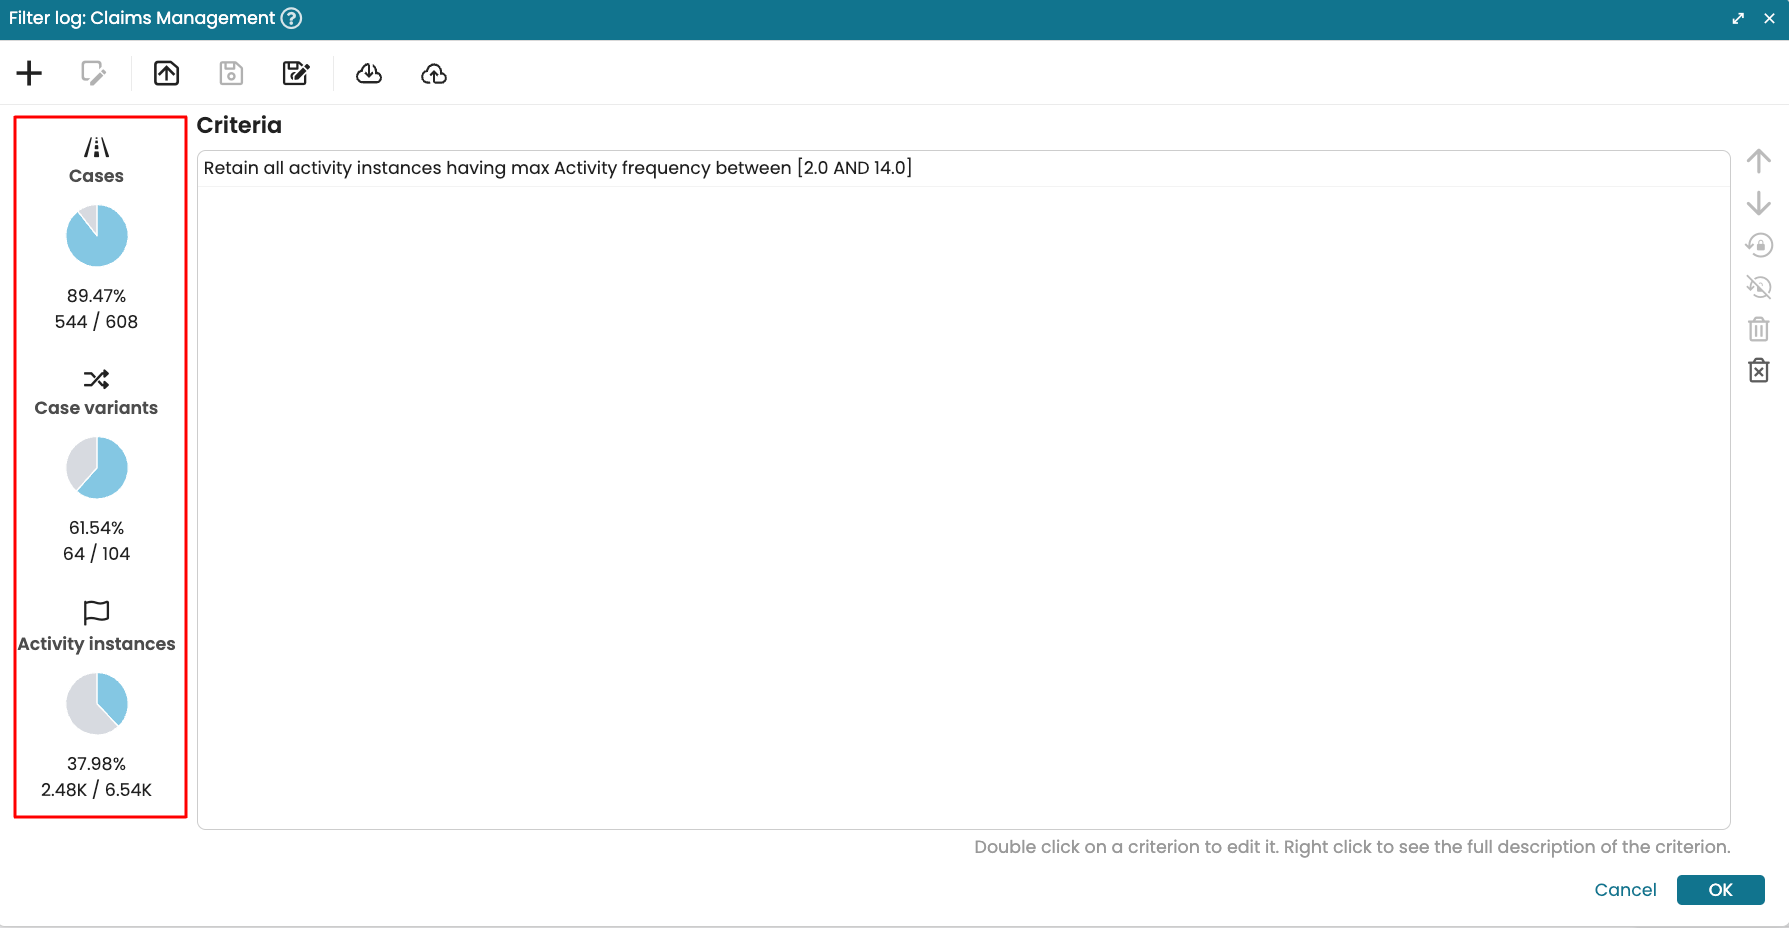
Click the “greater than or equal to” symbol and enter to 3. Click OK.
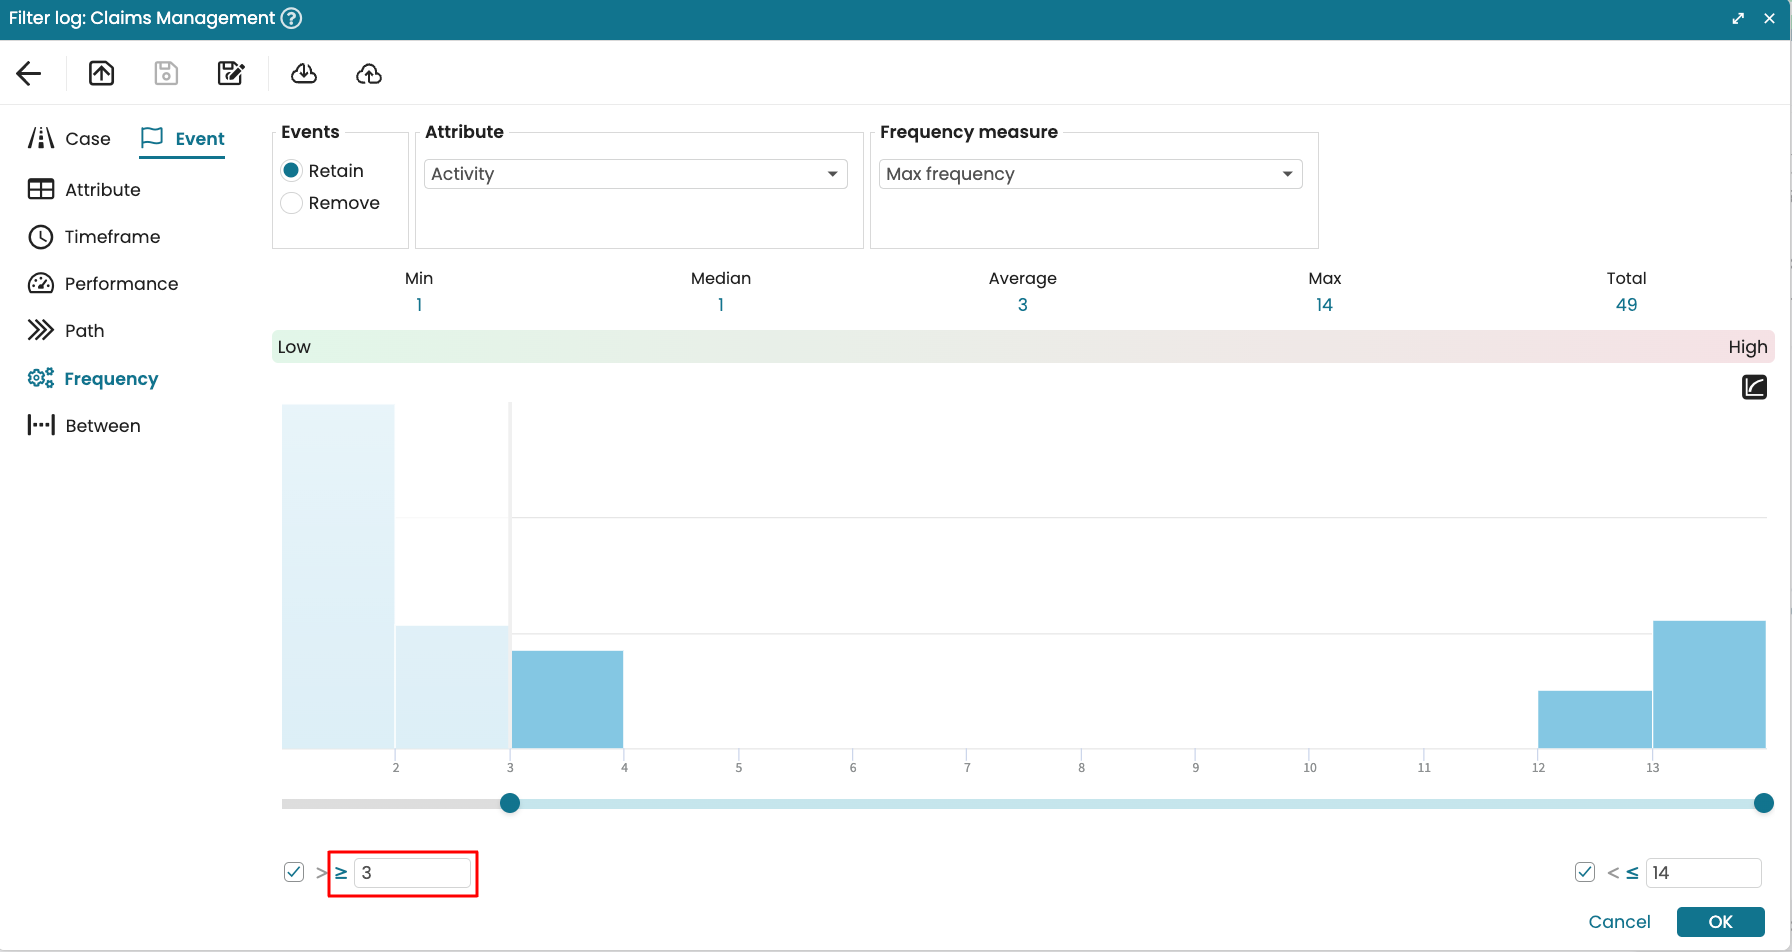
We see the filter results.
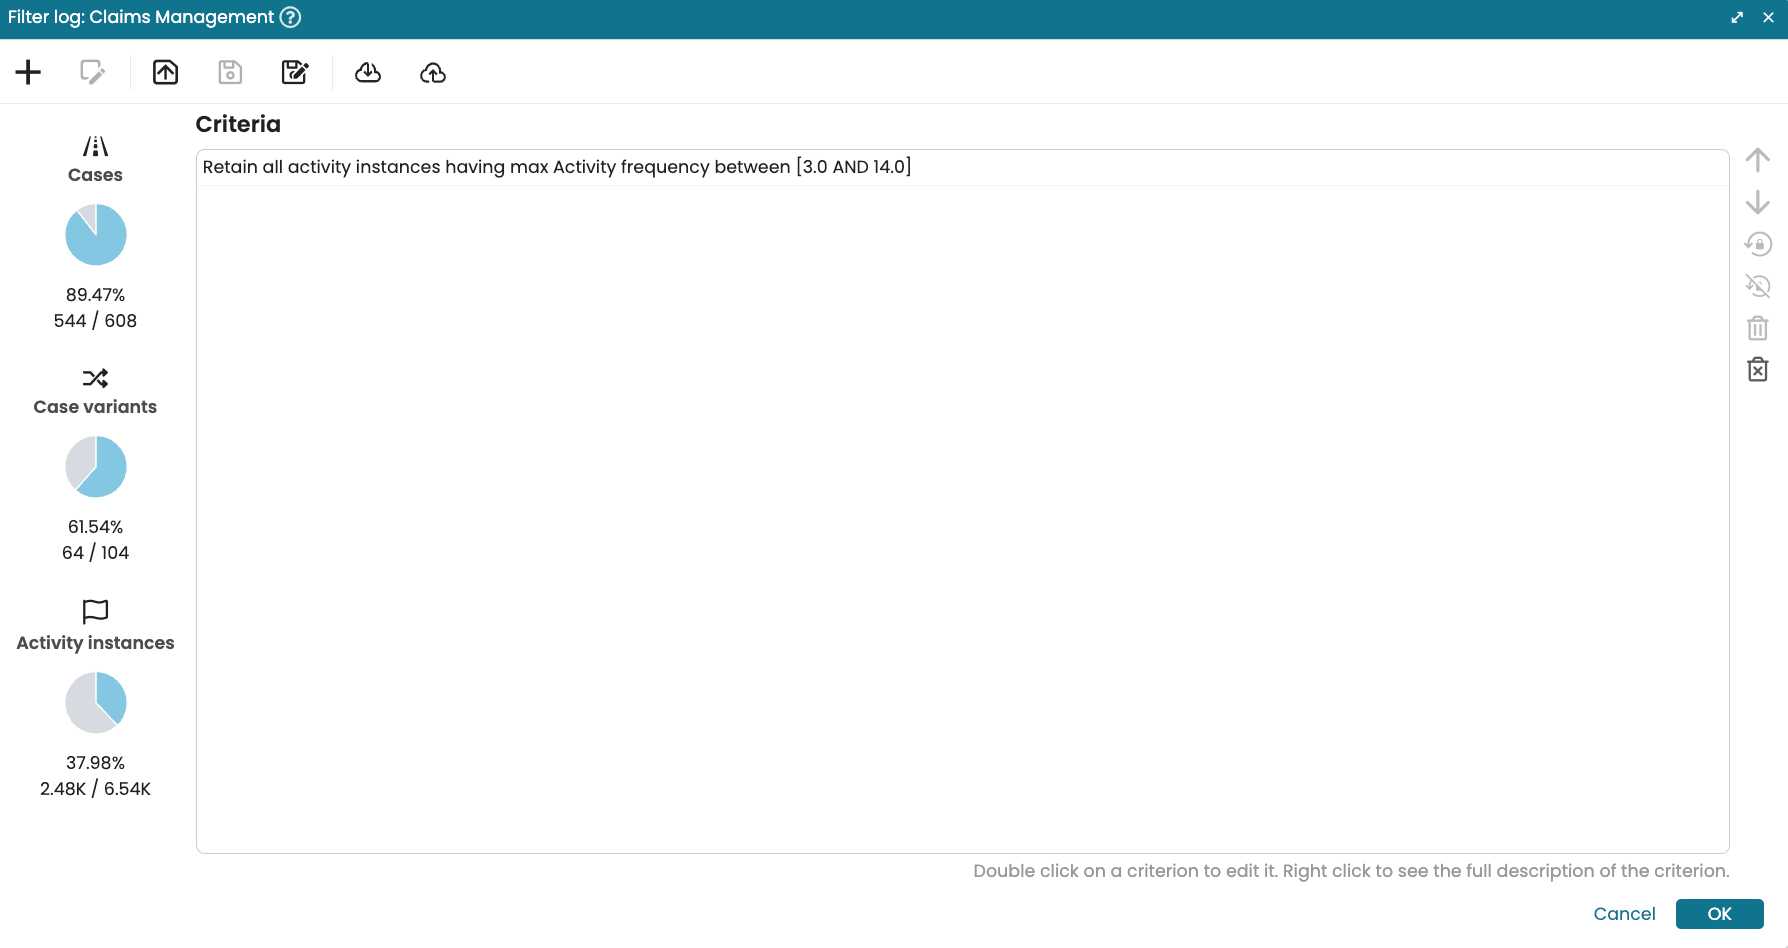
Alternatively, we can define the boundaries using “greater than”. This time, click the > symbol and enter 2.
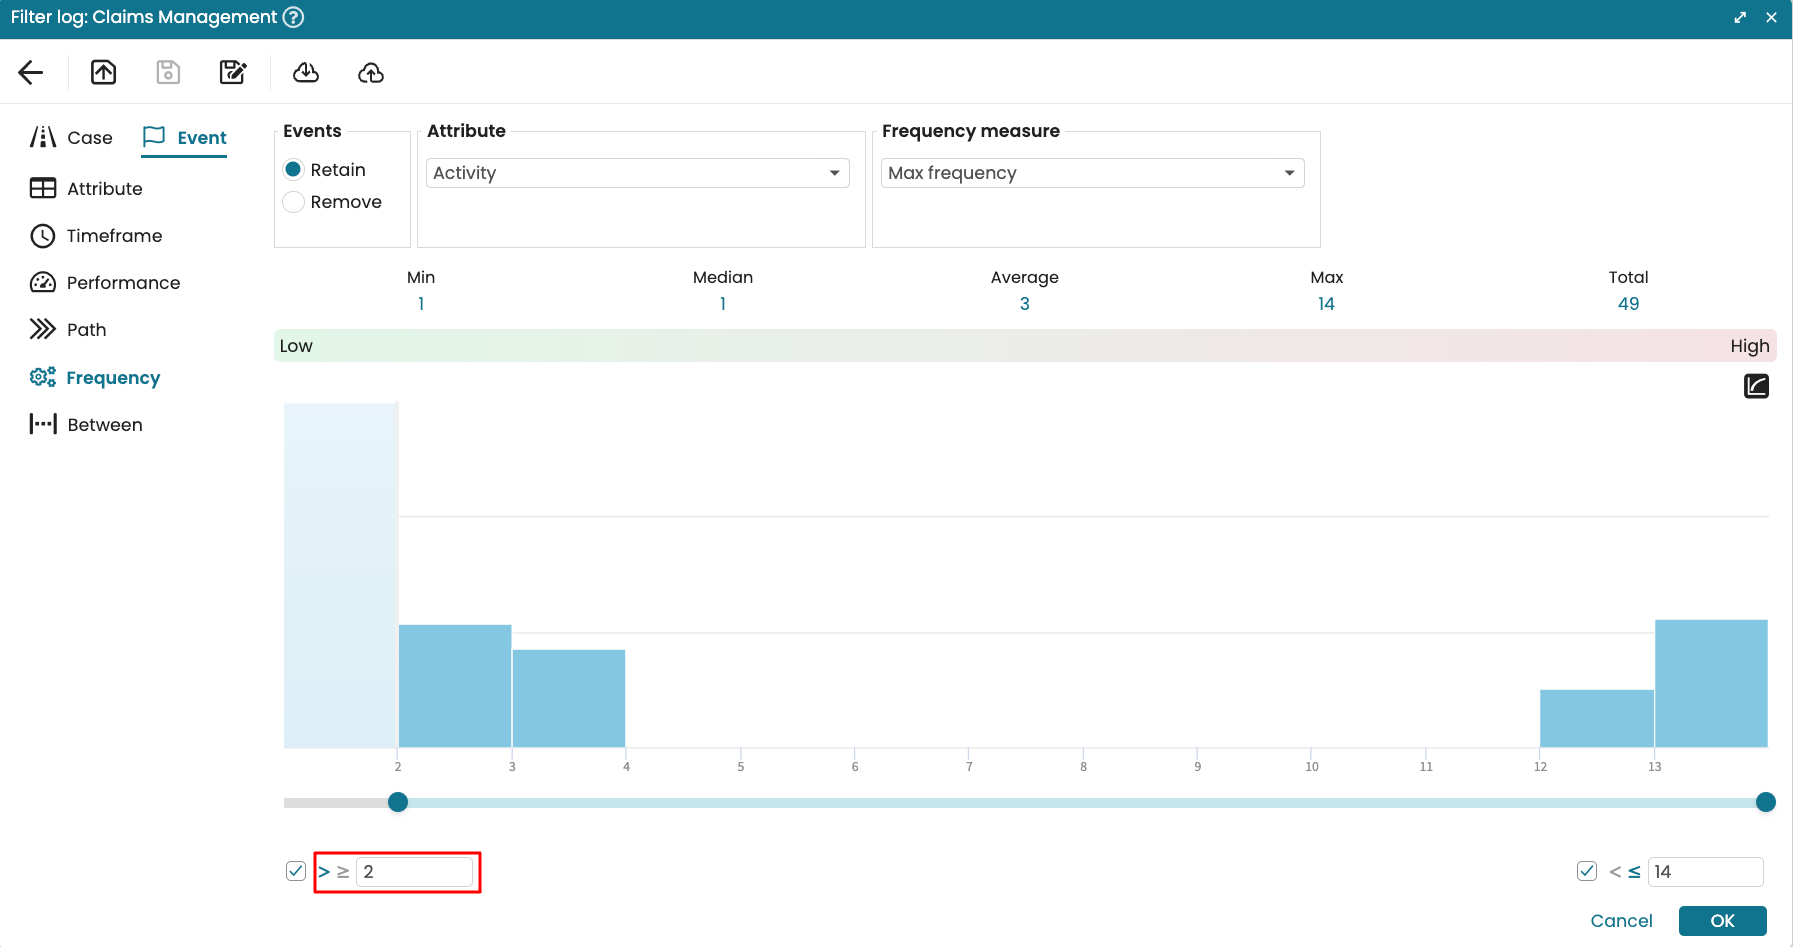
Click OK.
Note
When we filter “less than” or “greater than” a boundary, the boundary values themselves are included in the filter description. However, the filter result correctly excludes these boundary values.
Click OK.
Event > Performance filter
During waste analysis, it may be useful to find the activity-processing bottlenecks or high-cost activities. The Performance event-level filter allows us to filter events based on their duration or cost.
When filtering events based on performance, the performance measure can be of two categories:
Duration or cost: This filters events based on the duration or cost of each individual event. For instance, retaining only activities where each event’s duration is greater than 2 hours.
Aggregated duration or cost: This filters events based on aggregated metrics such as average, total, median, minimum, or maximum duration or cost across all events of that type. For instance, retaining activities where the average duration of all occurrences of a task is greater than 2 hours. First the average duration of all activity instances is calculated. If this average is greater than 2 hours for a given activity, that activity is retained.
Let us imagine we want to filter activities that took more than 2 hours. Open the filter window, go to Events and click Performance.
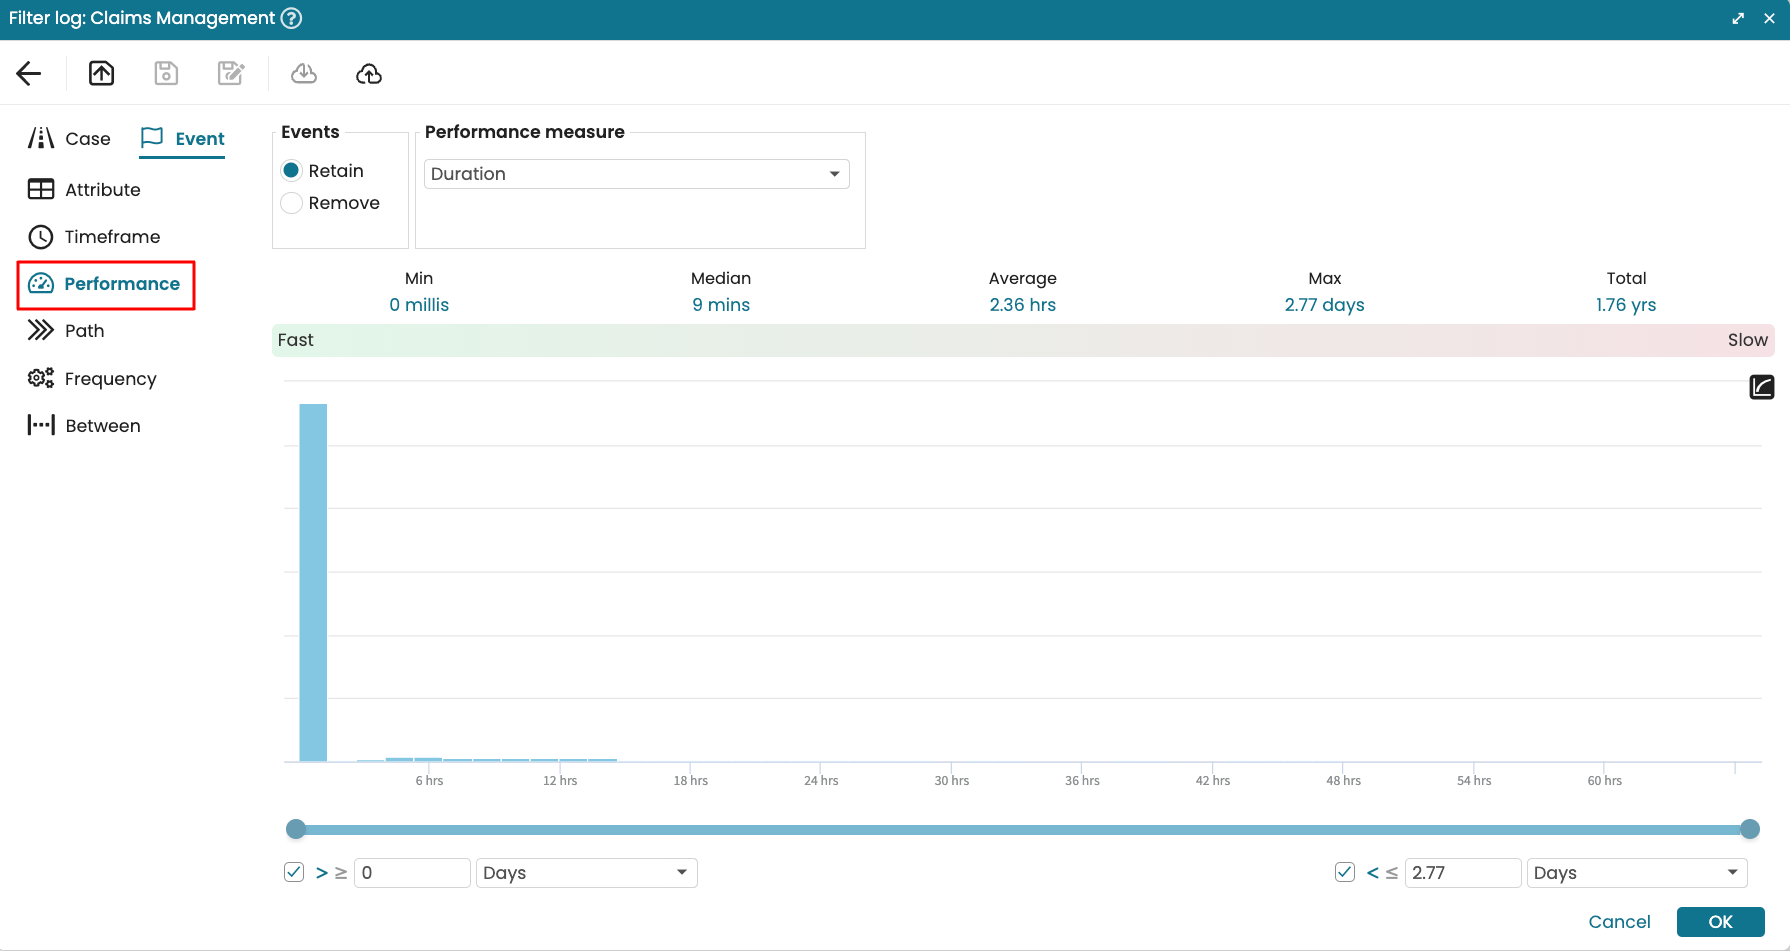
Since we wish to retain any activity that takes longer than a given period, we use Duration as the Performance measure.
Specify the duration range.
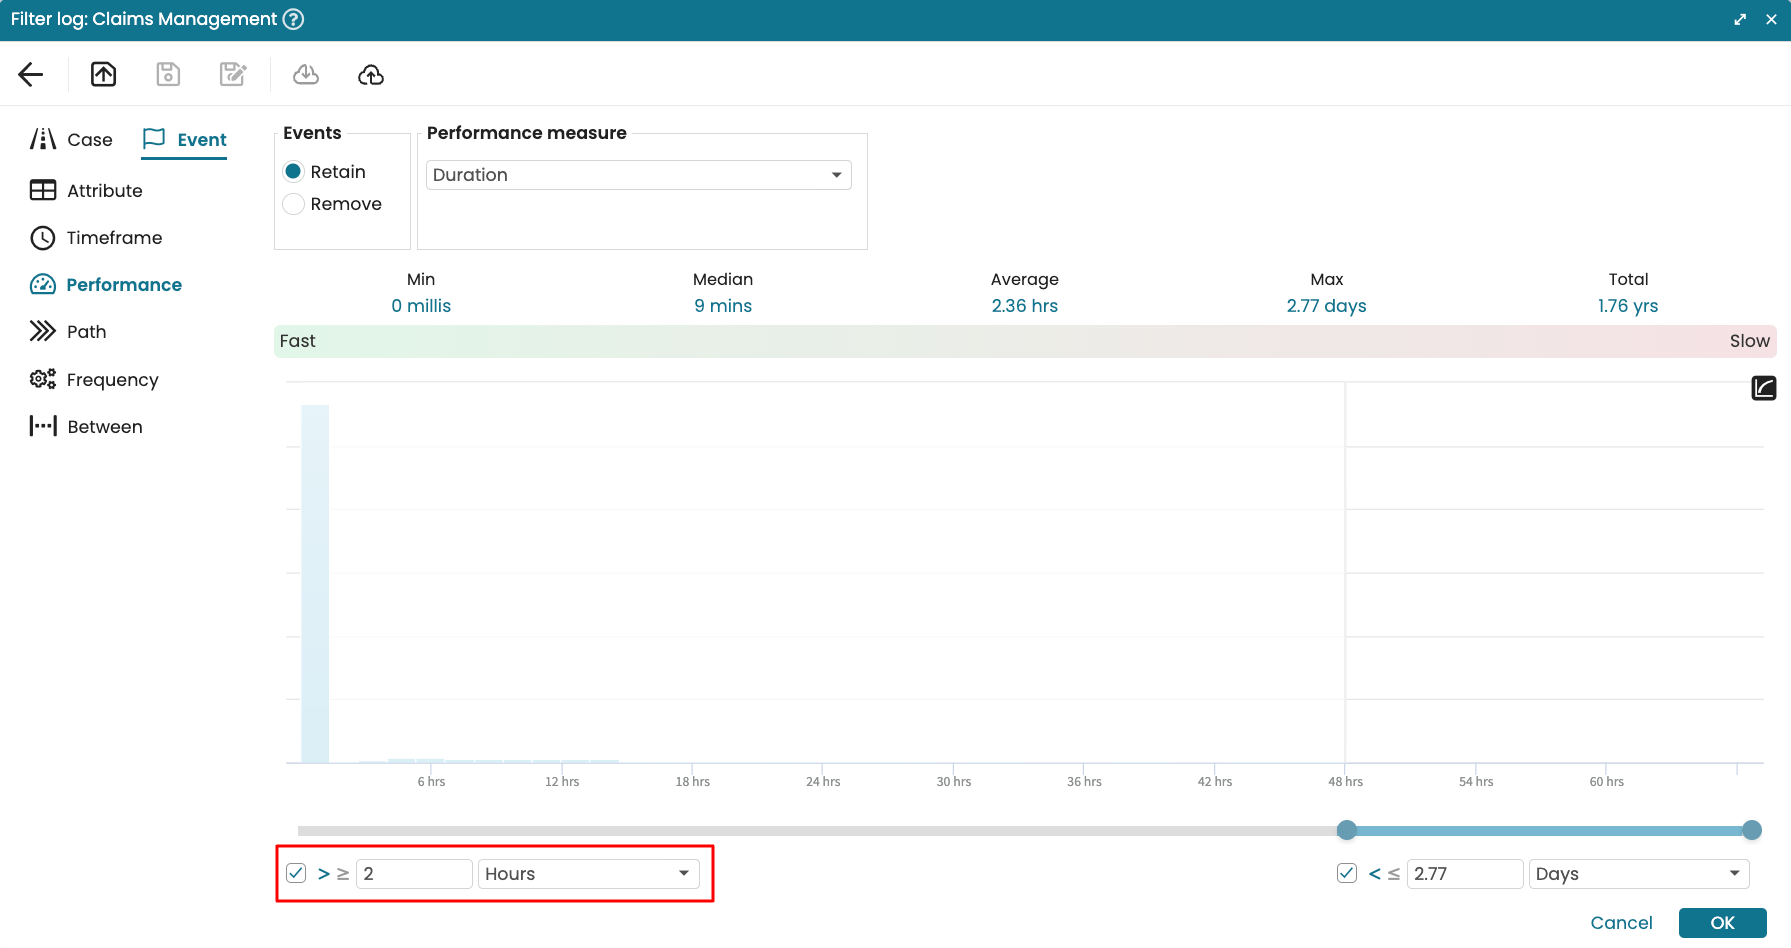
Click OK to confirm it.
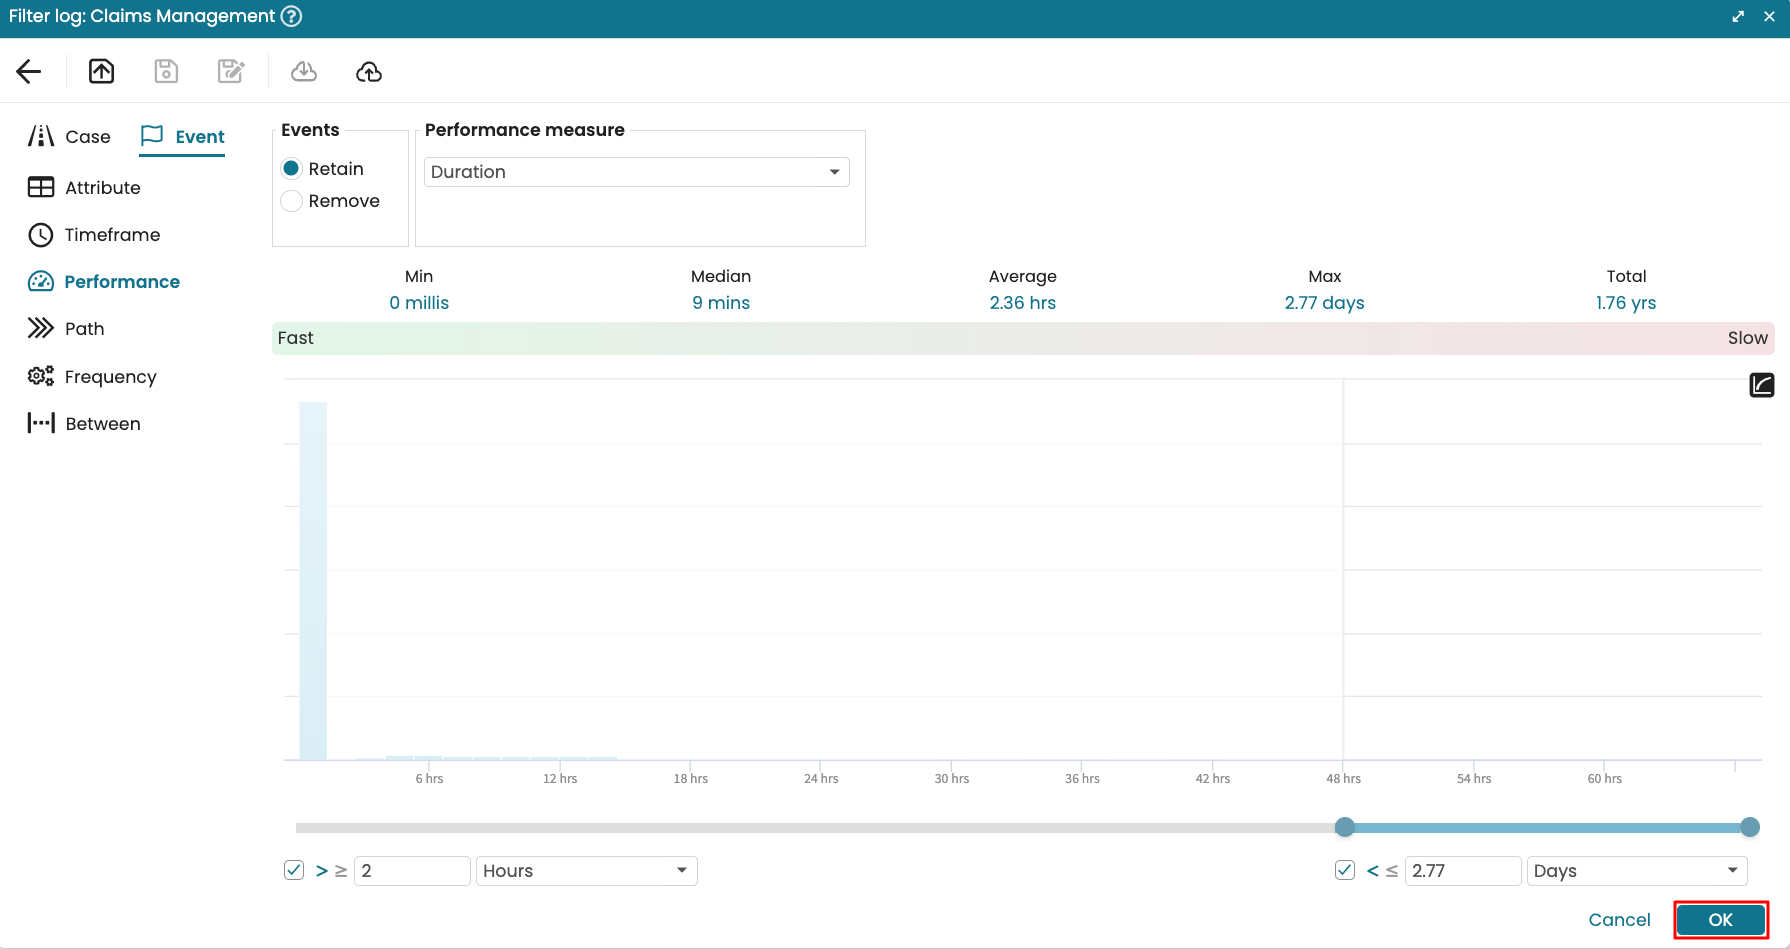
As seen, there are 9 activity instances that took more than 2 hours.
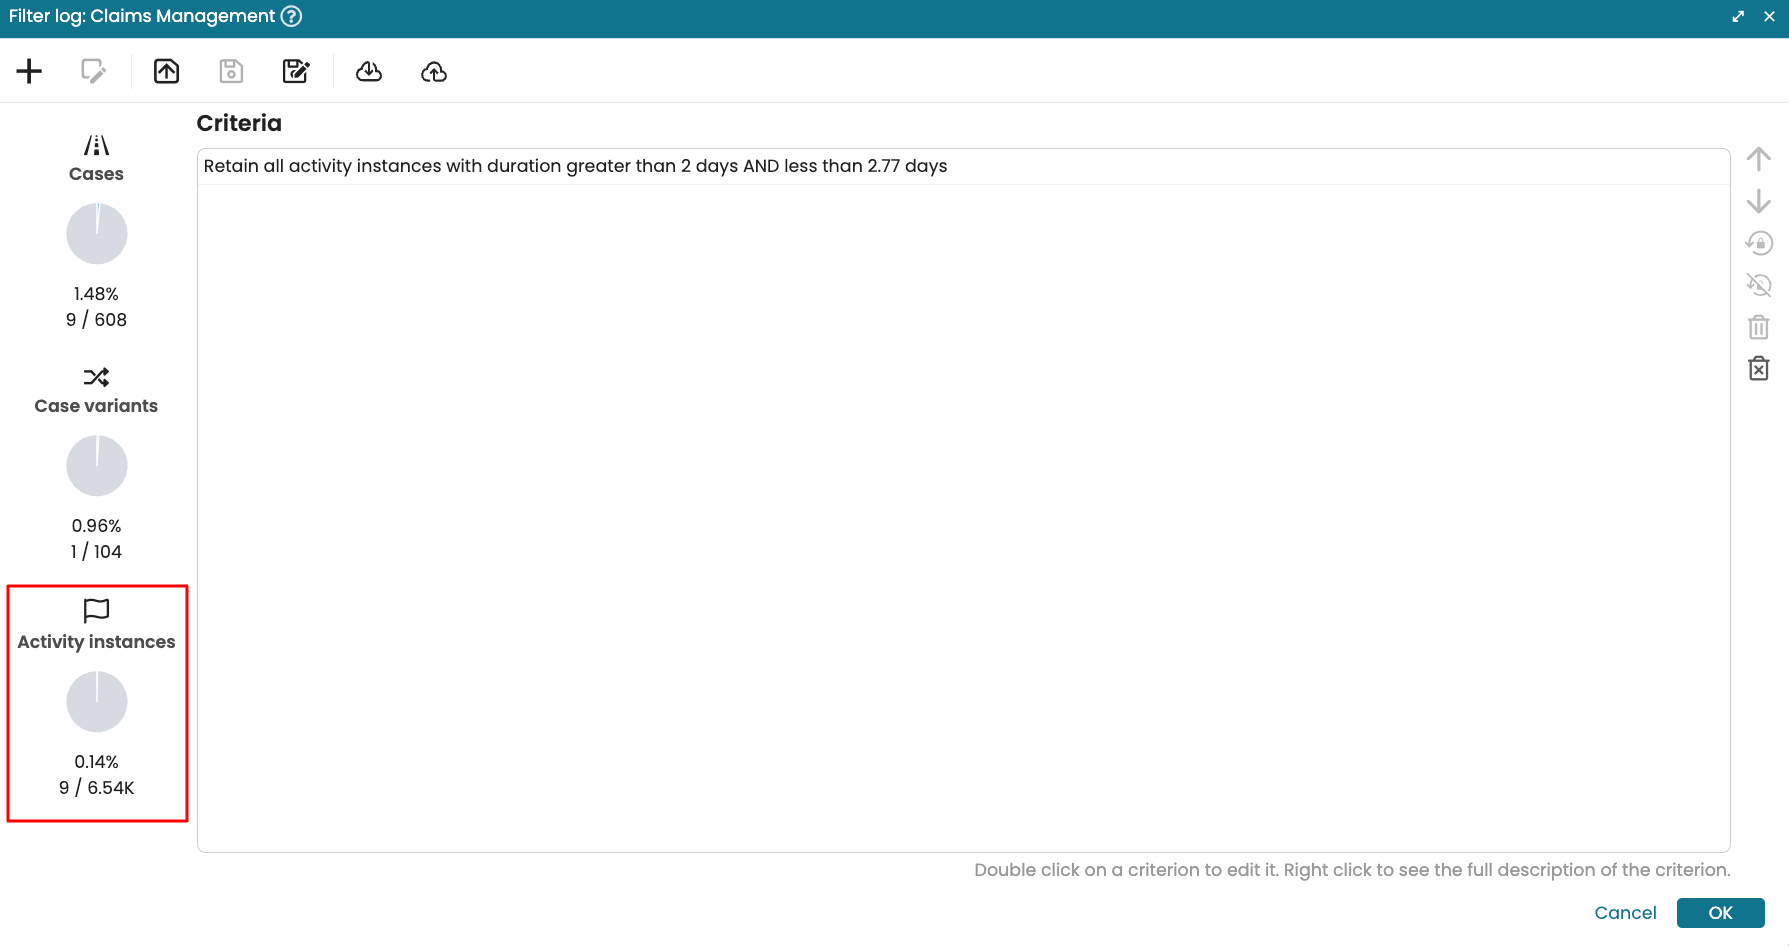
We can click OK to confirm it.
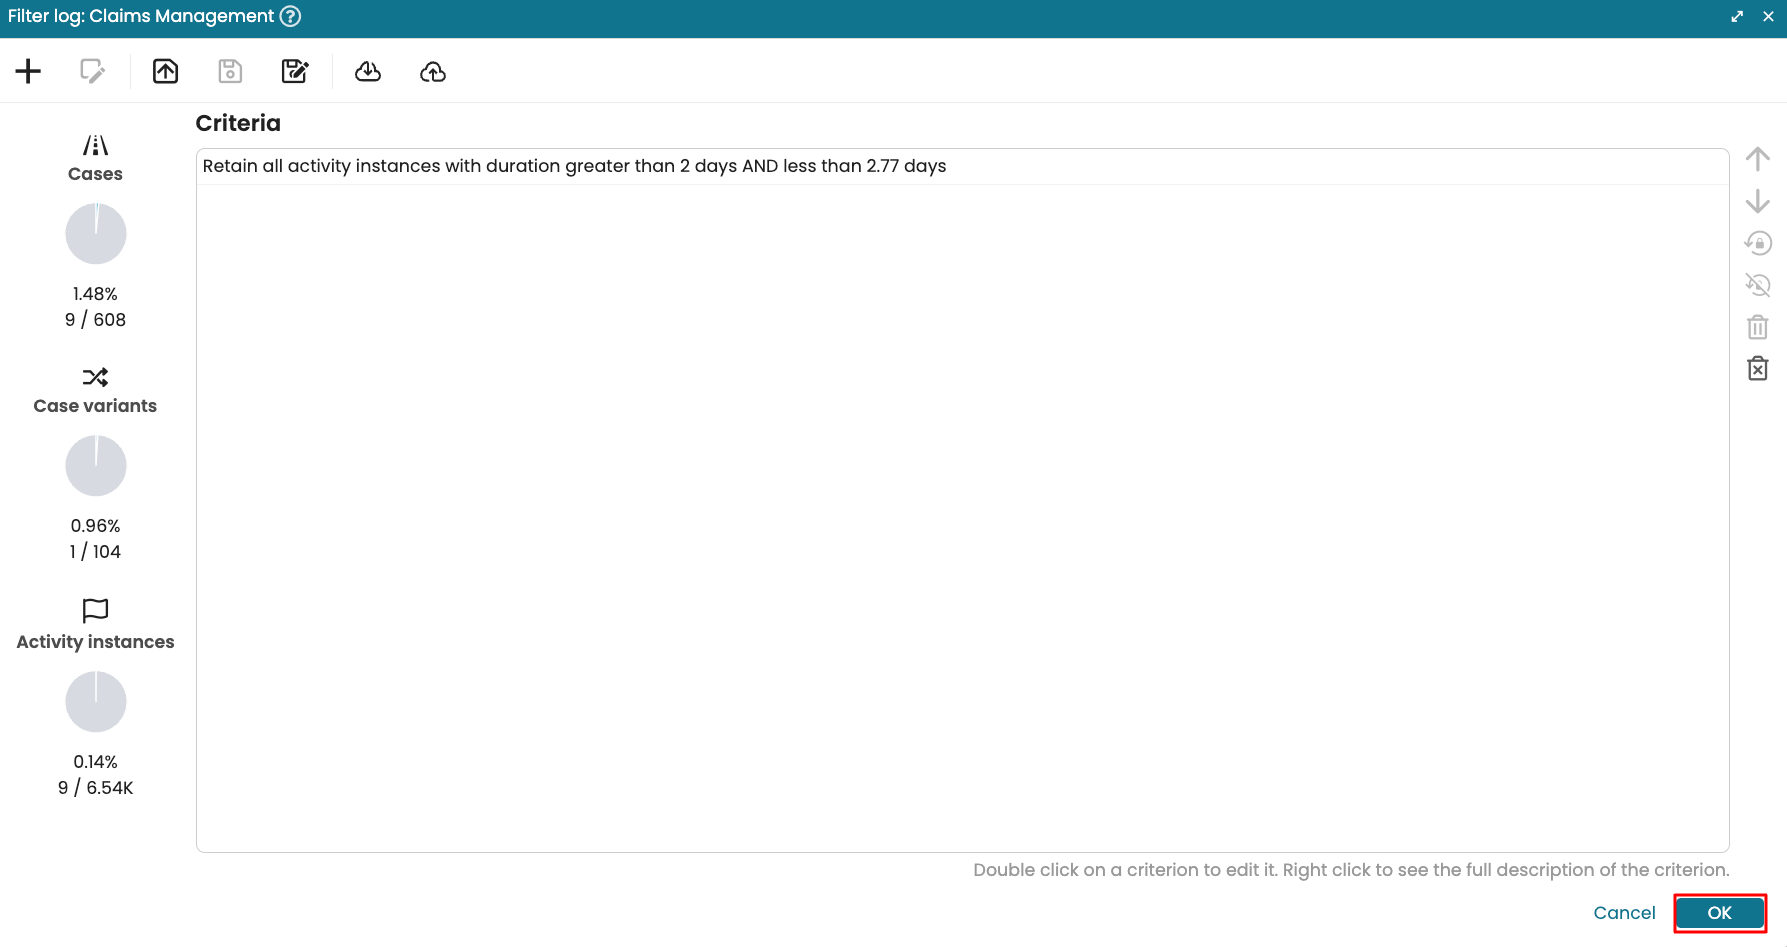
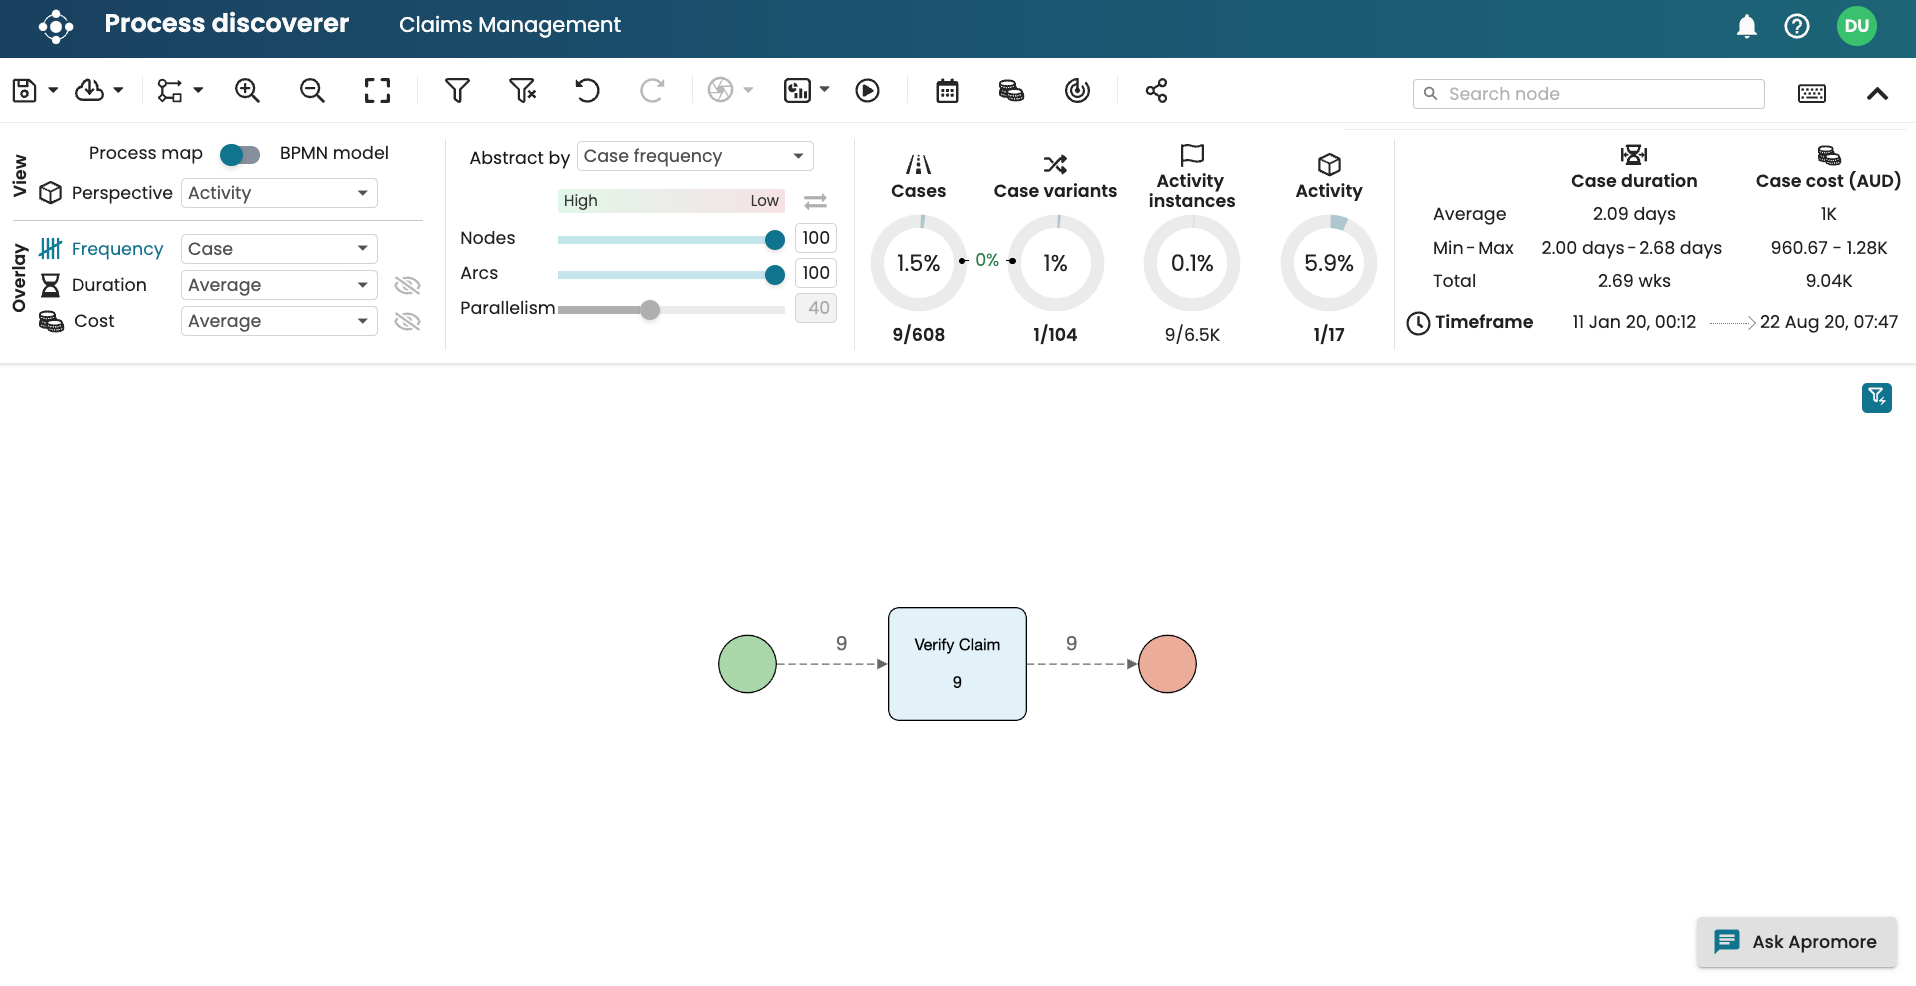
As seen, the activity “Verify Claim” is the only activity that took more than 2 hours in the process. And this happened in 9 instances.
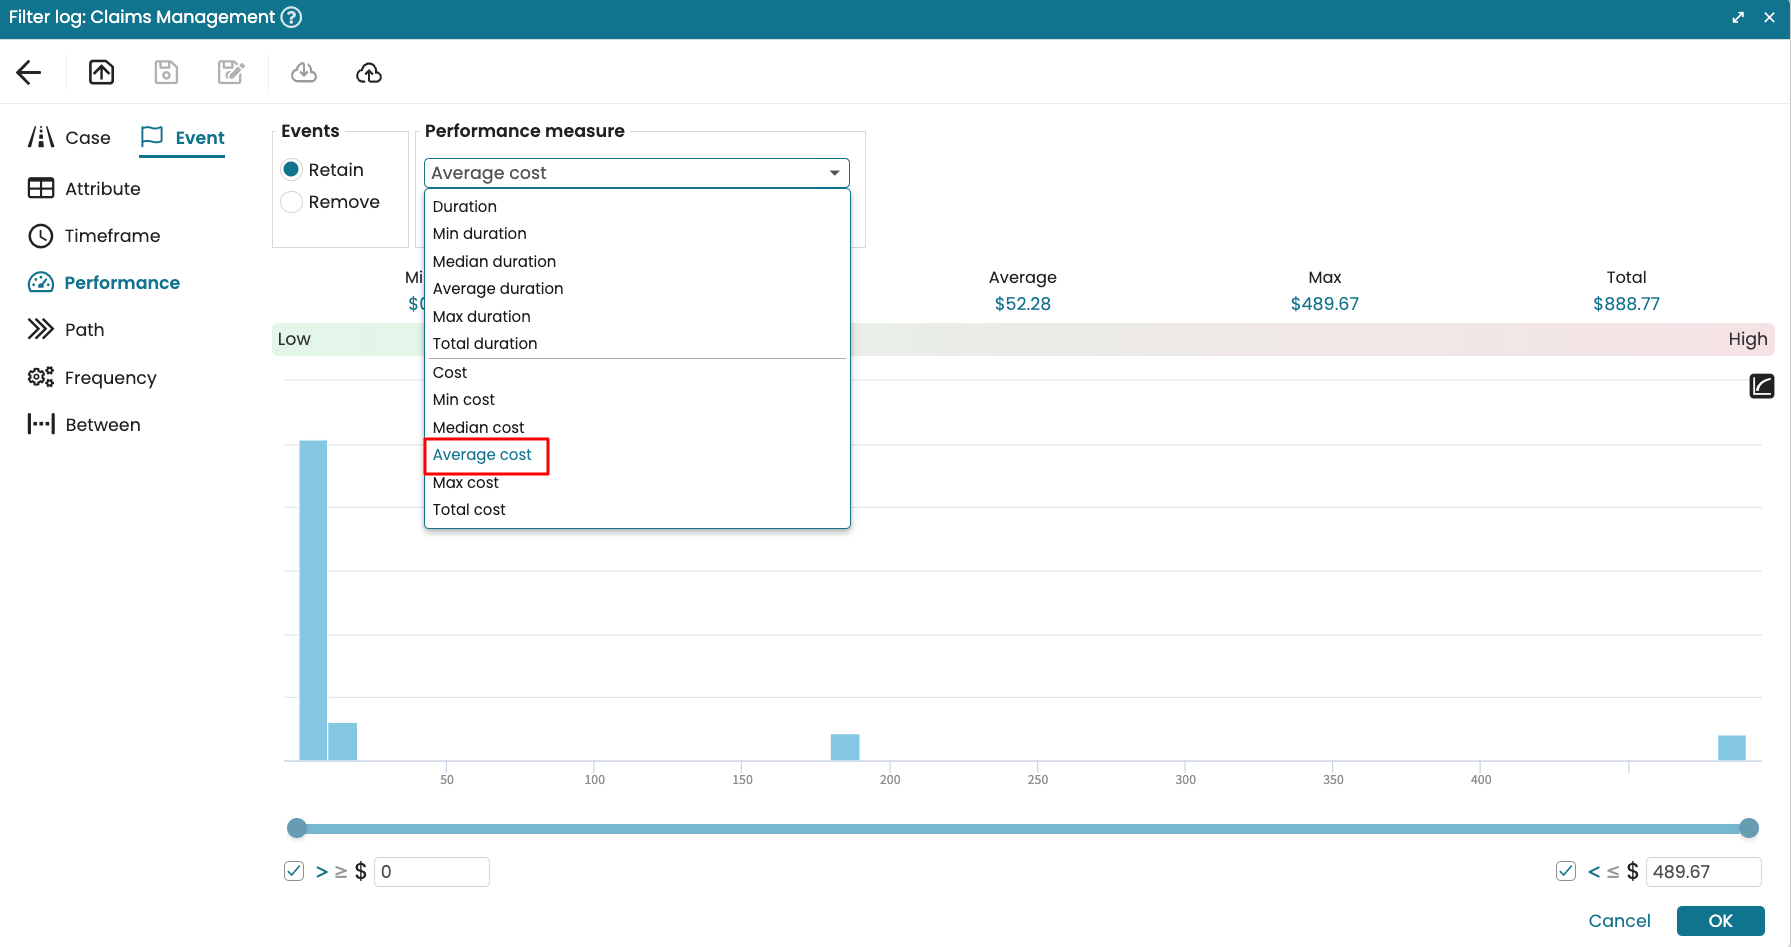
We can also filter based on cost. Let us say we wish to find high-cost activities. We can filter activities that cost 100 AUD on average. Go to the performance event-level filters.

Since we wish to filter based on average cost of an event. We select Average cost as the Performance measure. This first calculate the average cost of all the activities.
Specify the cost range.
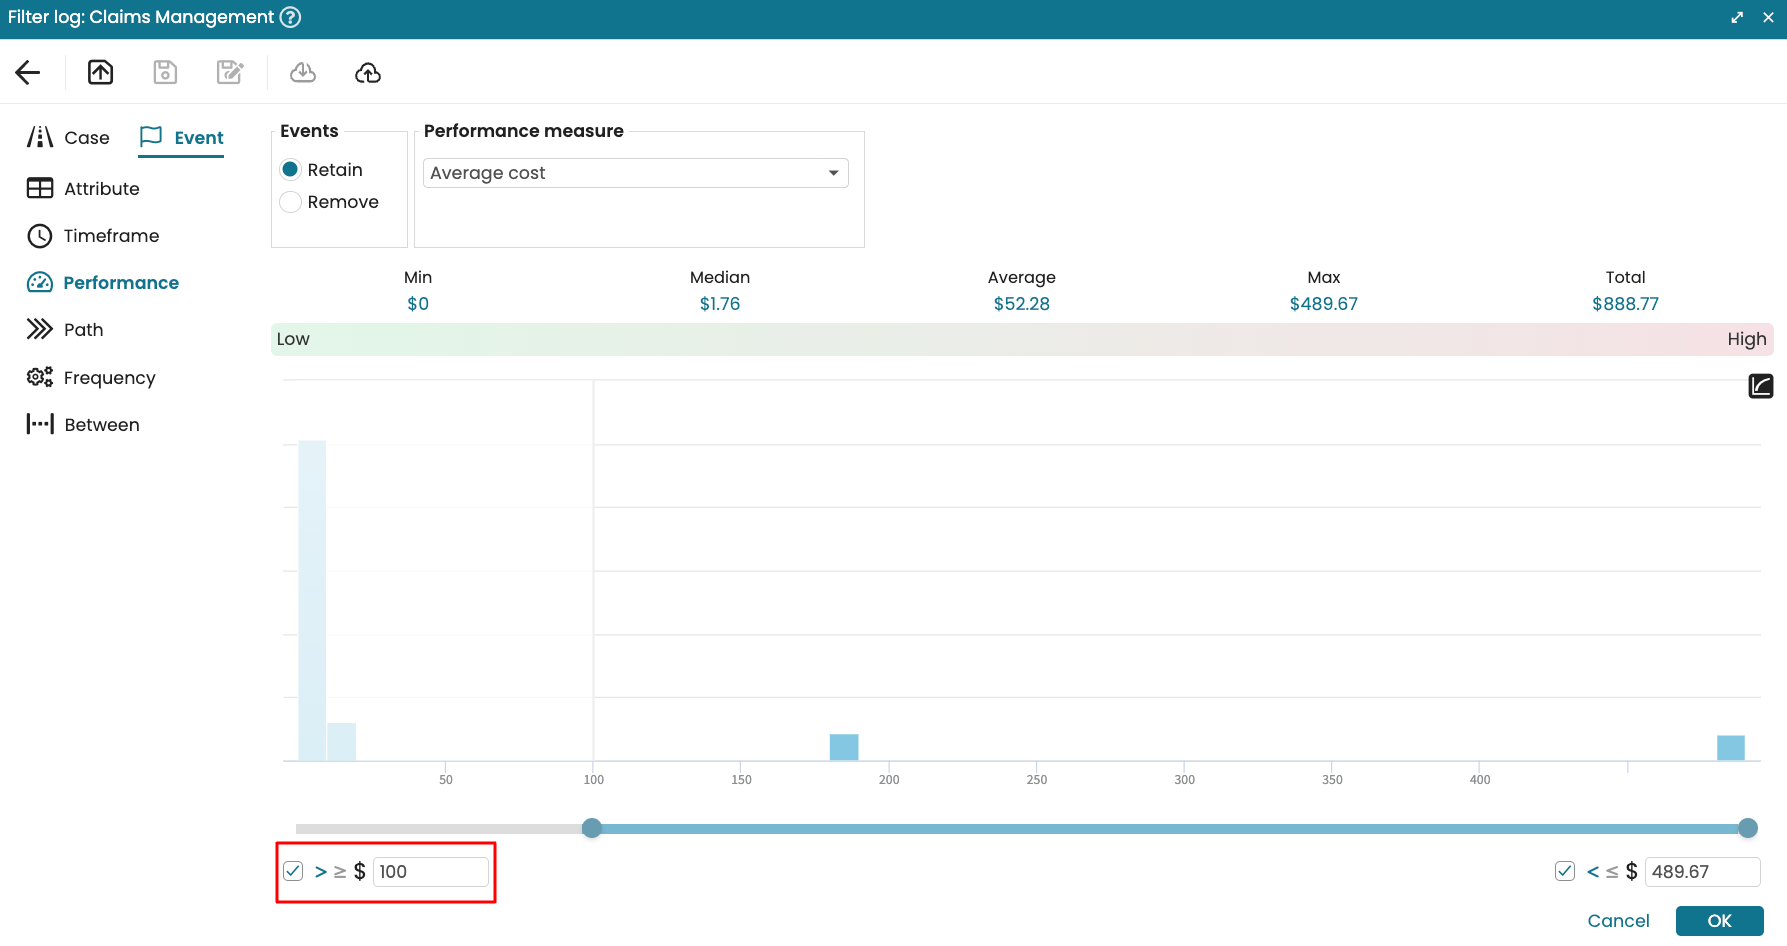
Click OK and apply the filter.
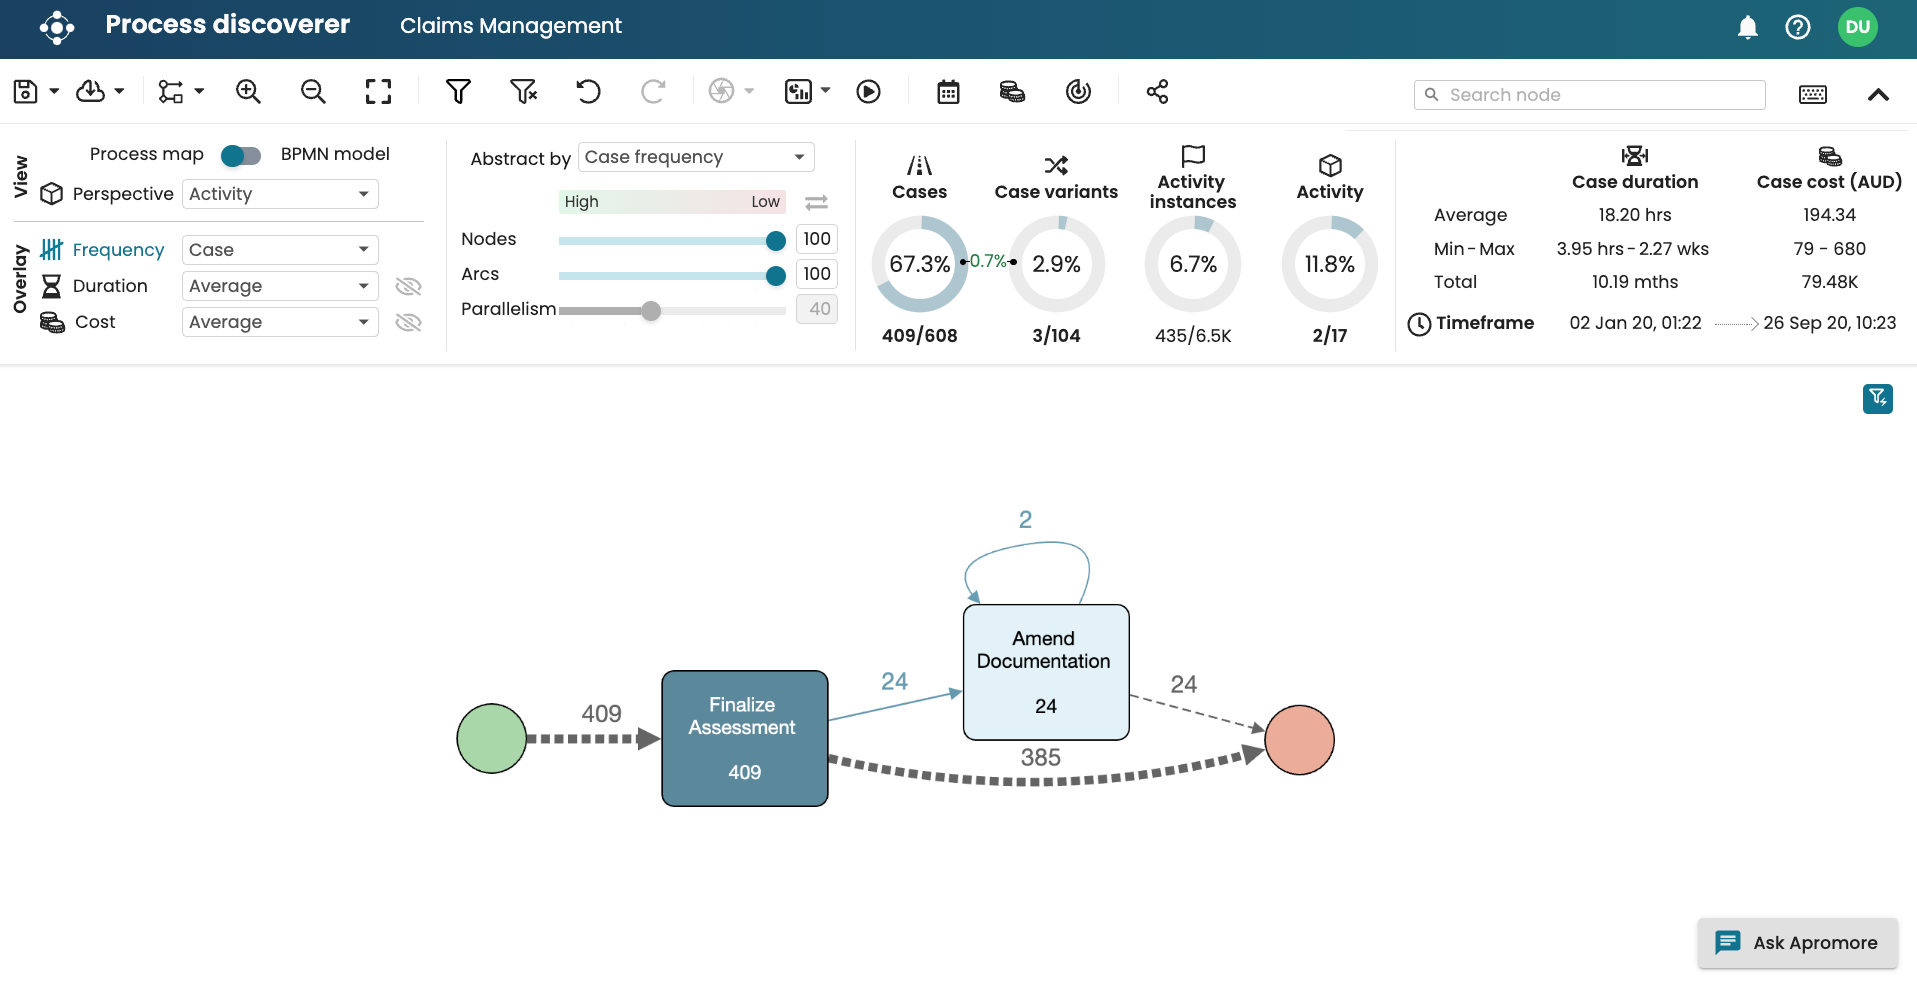
We see that there are two activities that cost more than 100 AUD on average – Finalize Assessment and Amend Documentation.
Event > Path filter
In some situations, understanding what happens immediately before or after a particular event can reveal critical insights about the process. For example, we may want to display all the events that directly-follow “Close Assessment” in the process. This will reveal what possible activities that happen after closing a claim assessment. On the other hand, we may be interested in events that lead to a specific event. For instance, we may want to see the roles that are handed over to the Product Manager. To create such filters, we can use the new path event-level filter.
Let us say we wish to display all the activities that directly-follow “Close Assessment”. Open an event filter and click Path.
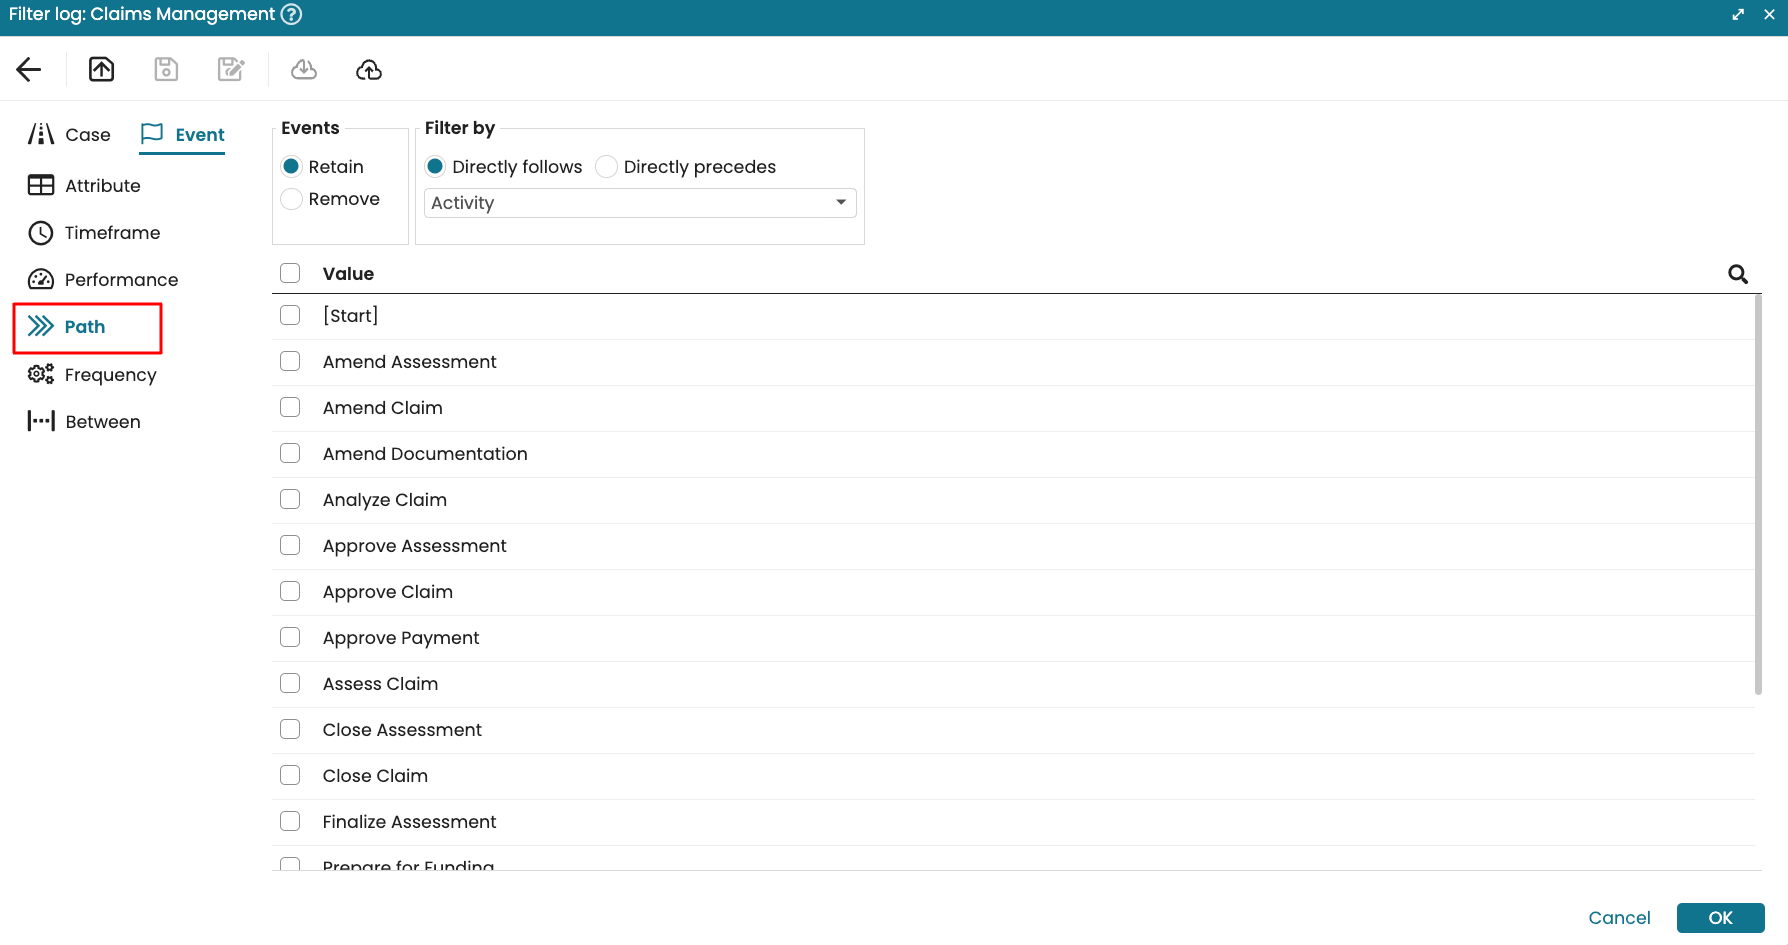
We can filter by activity or any event attribute in the process. In our case, we select Activity.

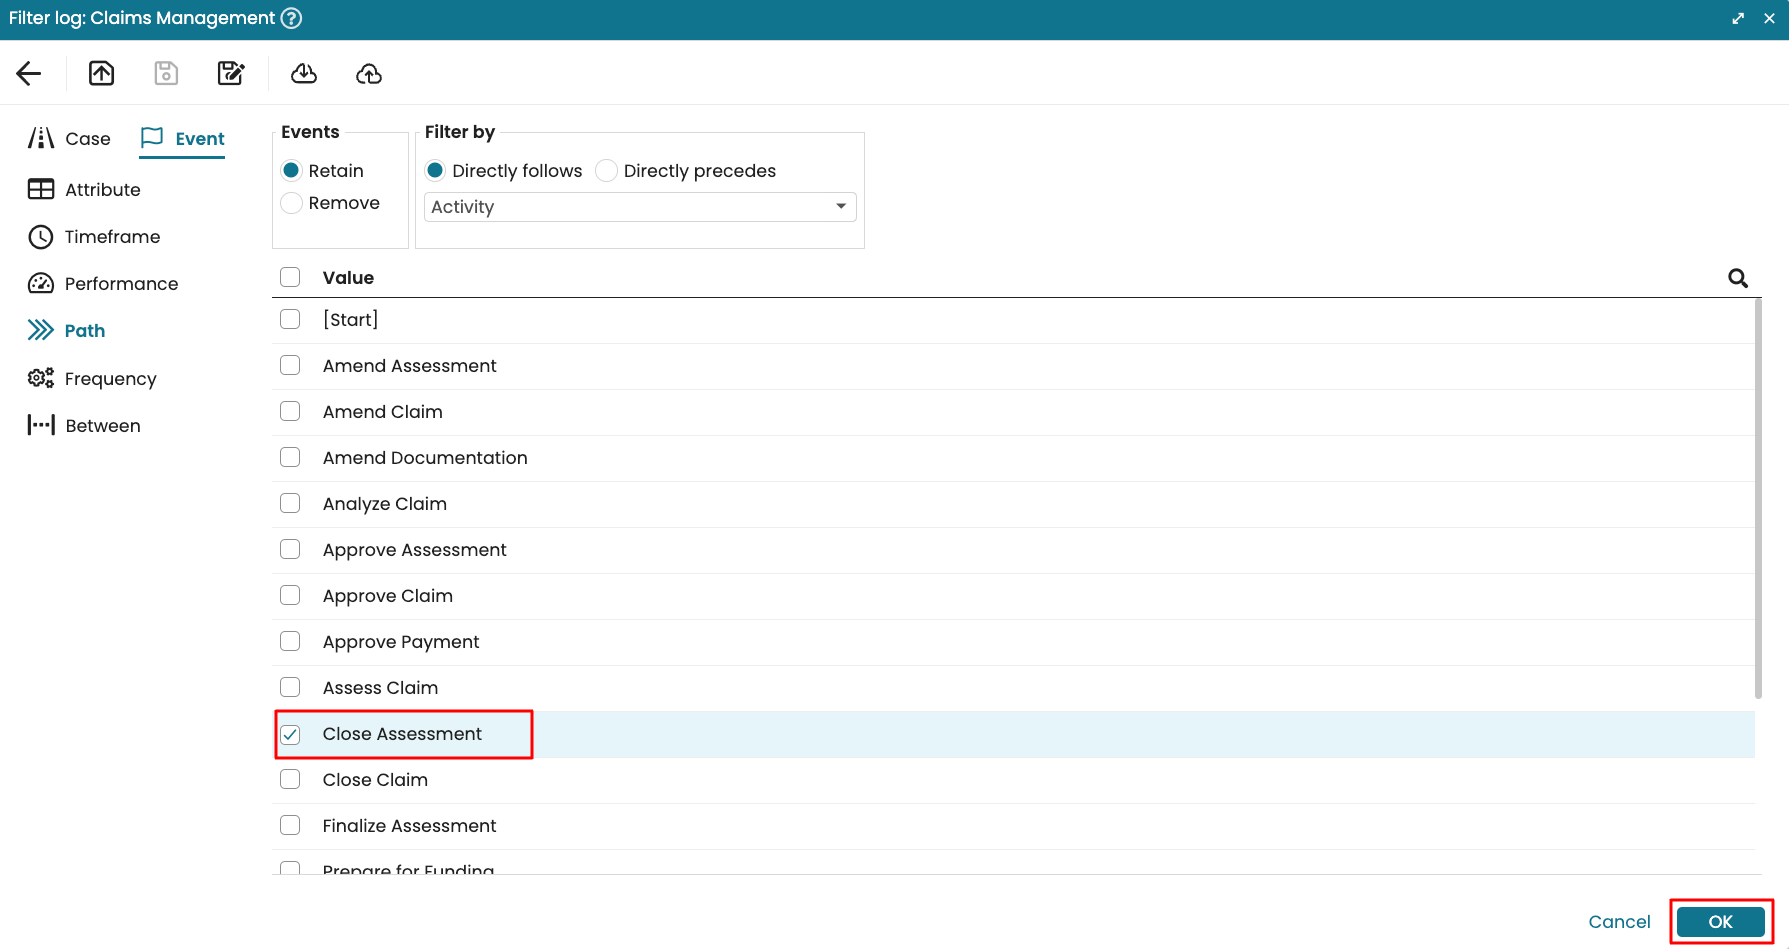
Select the reference activity, in our case, “Close Assessment” and click OK.
Note
We can select multiple activities. When we do, Apromore displays a process map showing the activities that happen right after the selected activities.
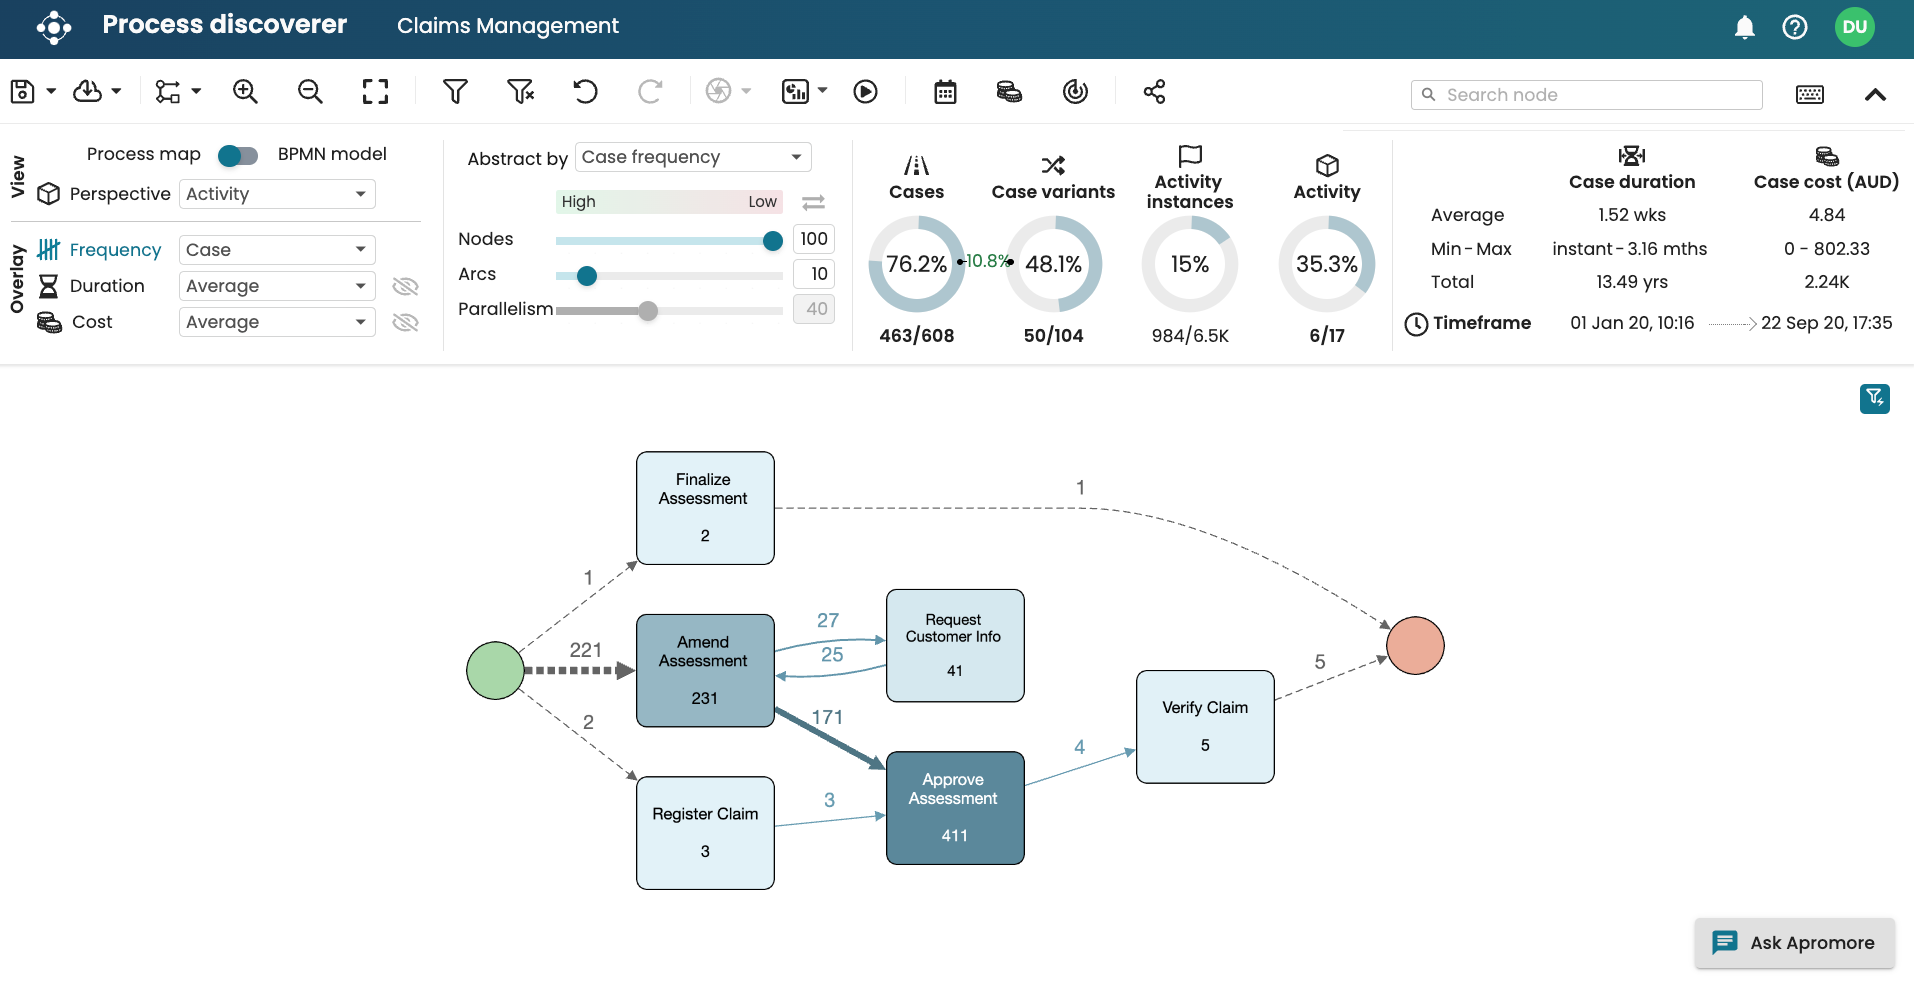
Apromore displays a process map of all the activities that happen immediately after “Close Assessment”.
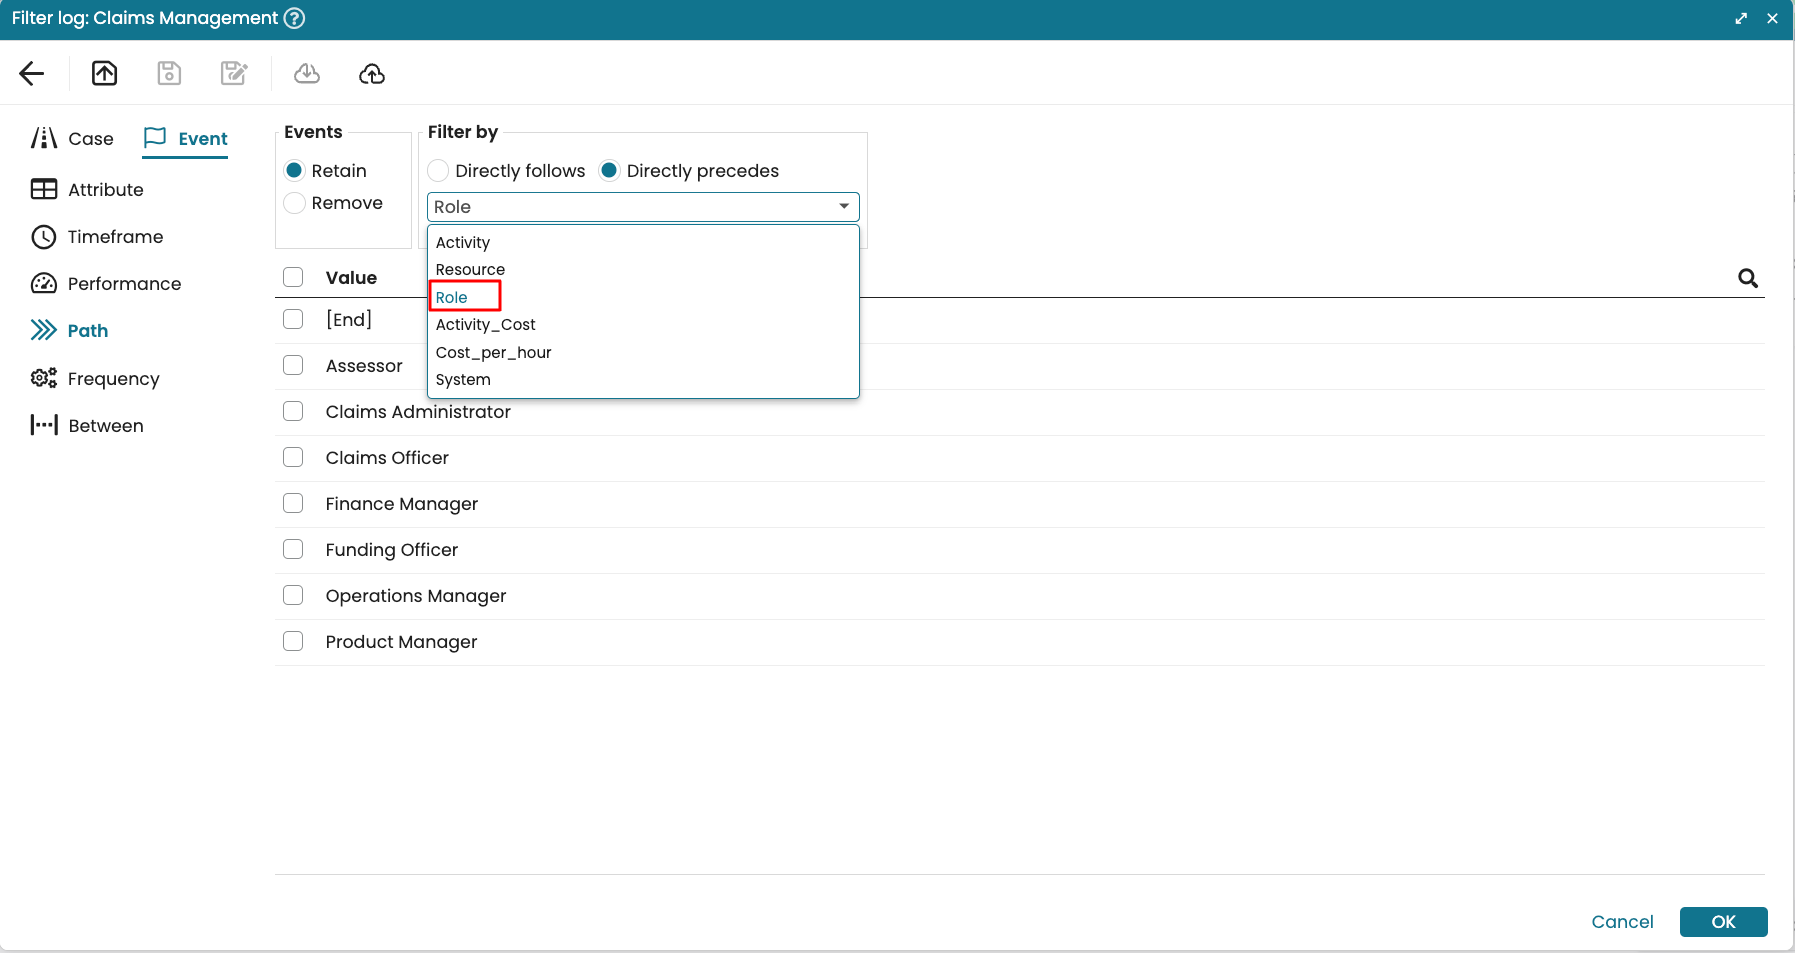
We can also create a “directly-precedes” path filter. For instance, let us say display the handoffs between roles before it gets to the Product Manager. Go to the event-level path filter. Select Directly-precedes.
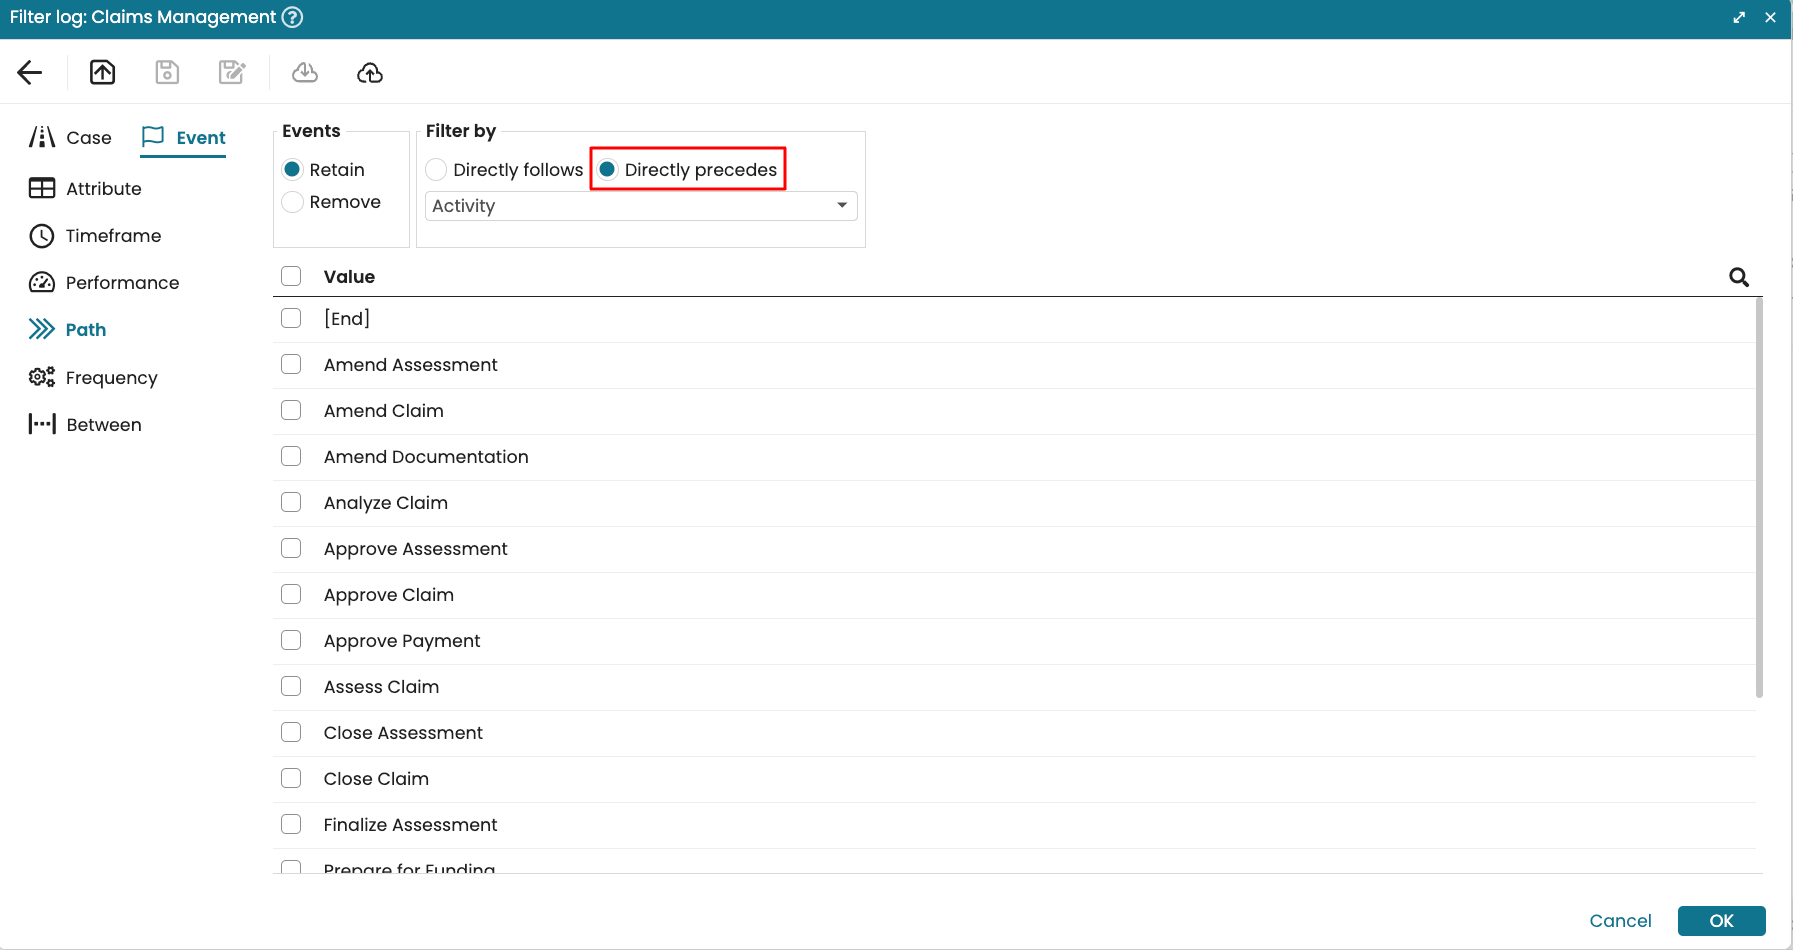
Select Filter by Role.
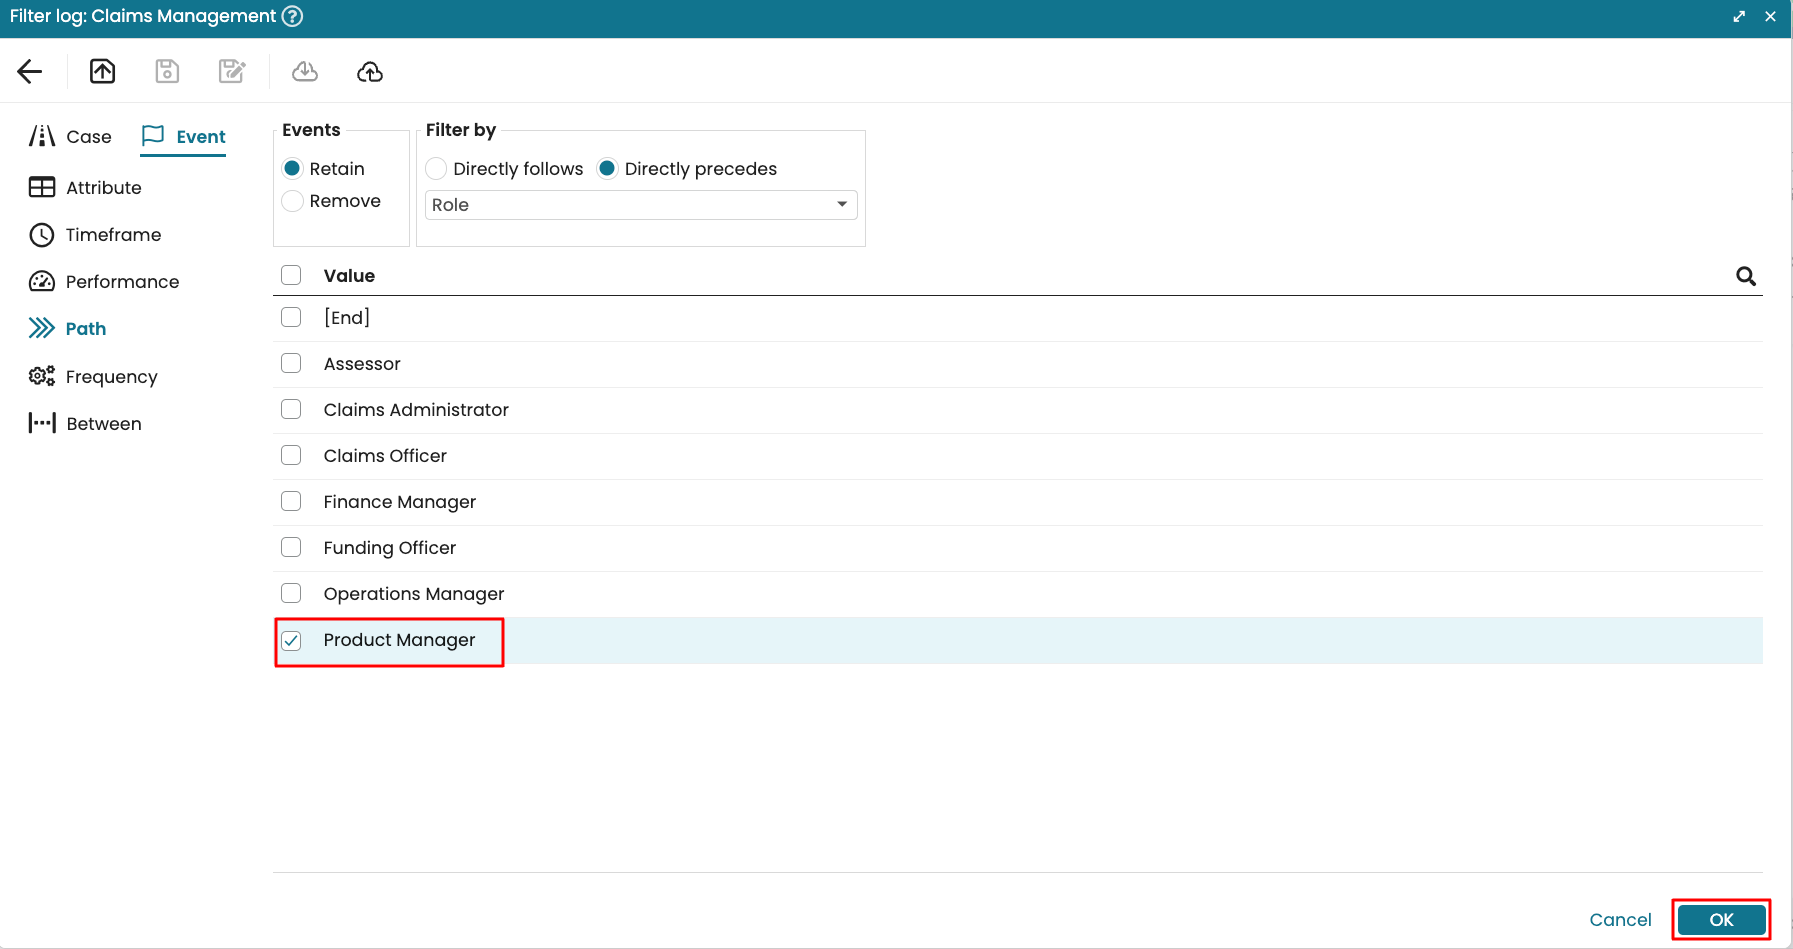
Select Product Manager and apply the filter.
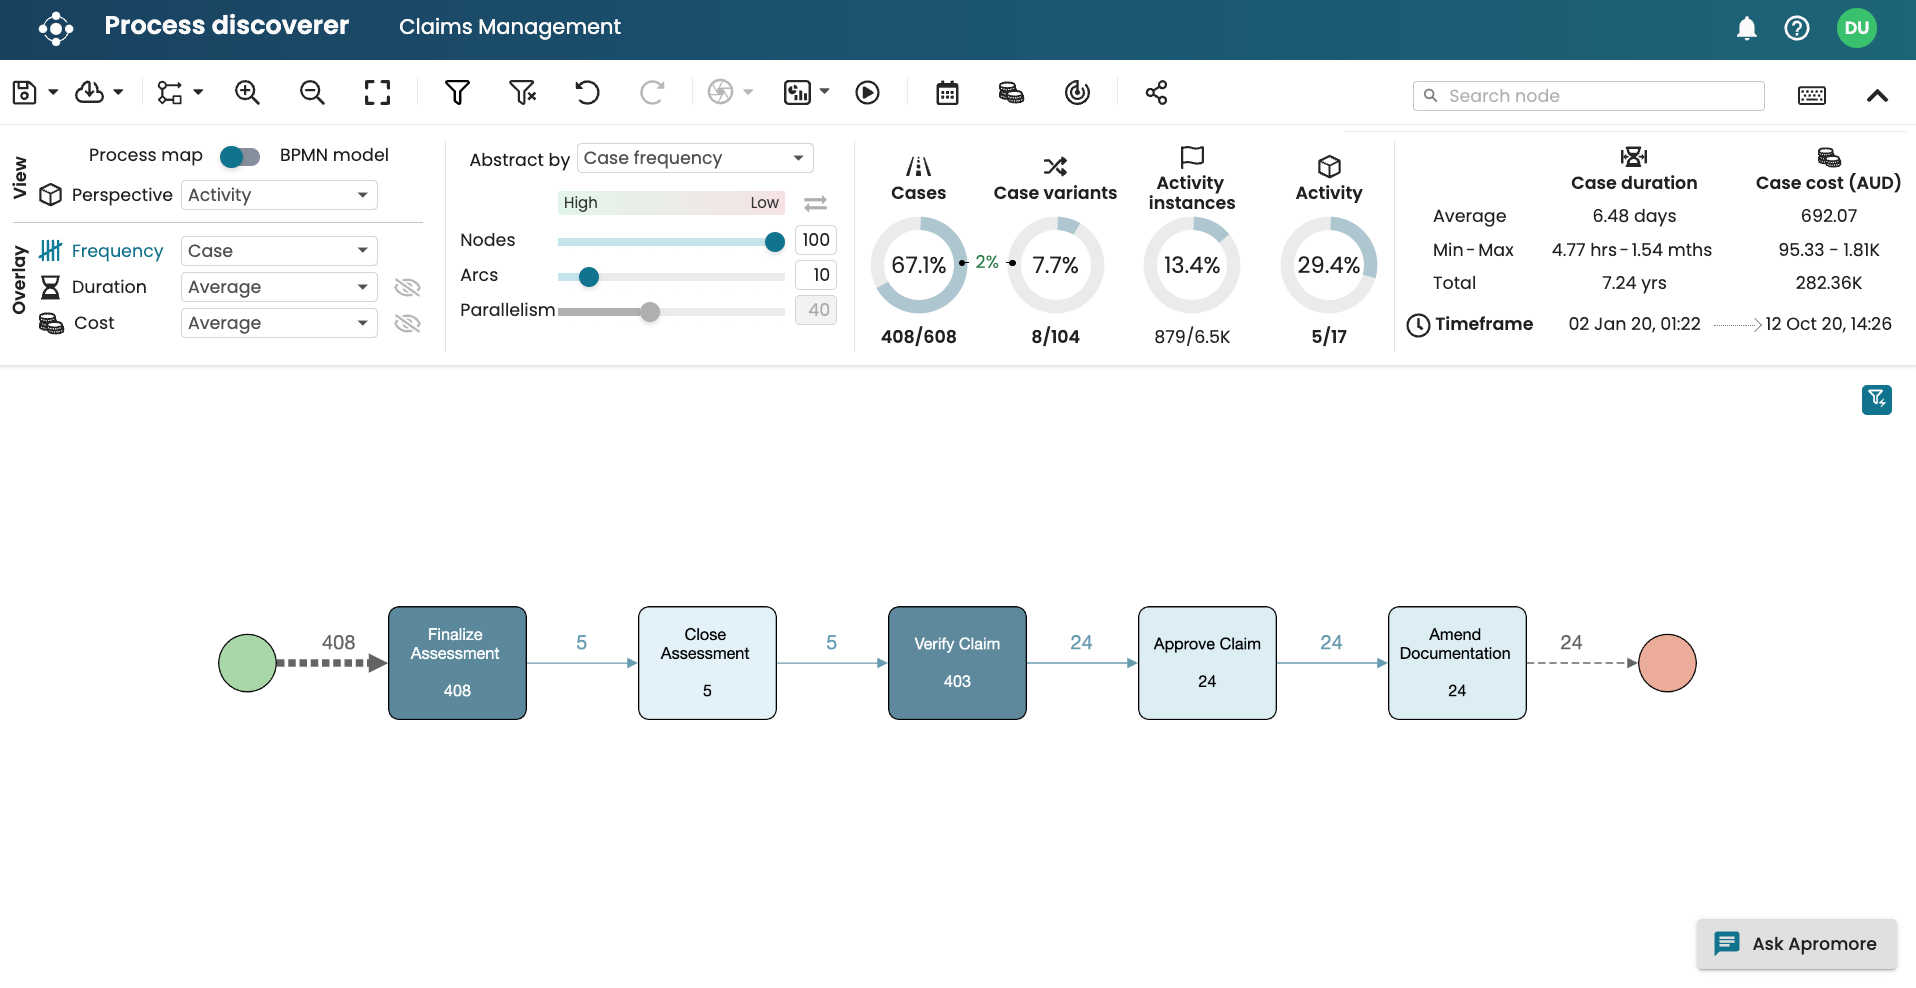
We see the activities that directly hands-off to the Product Manager.
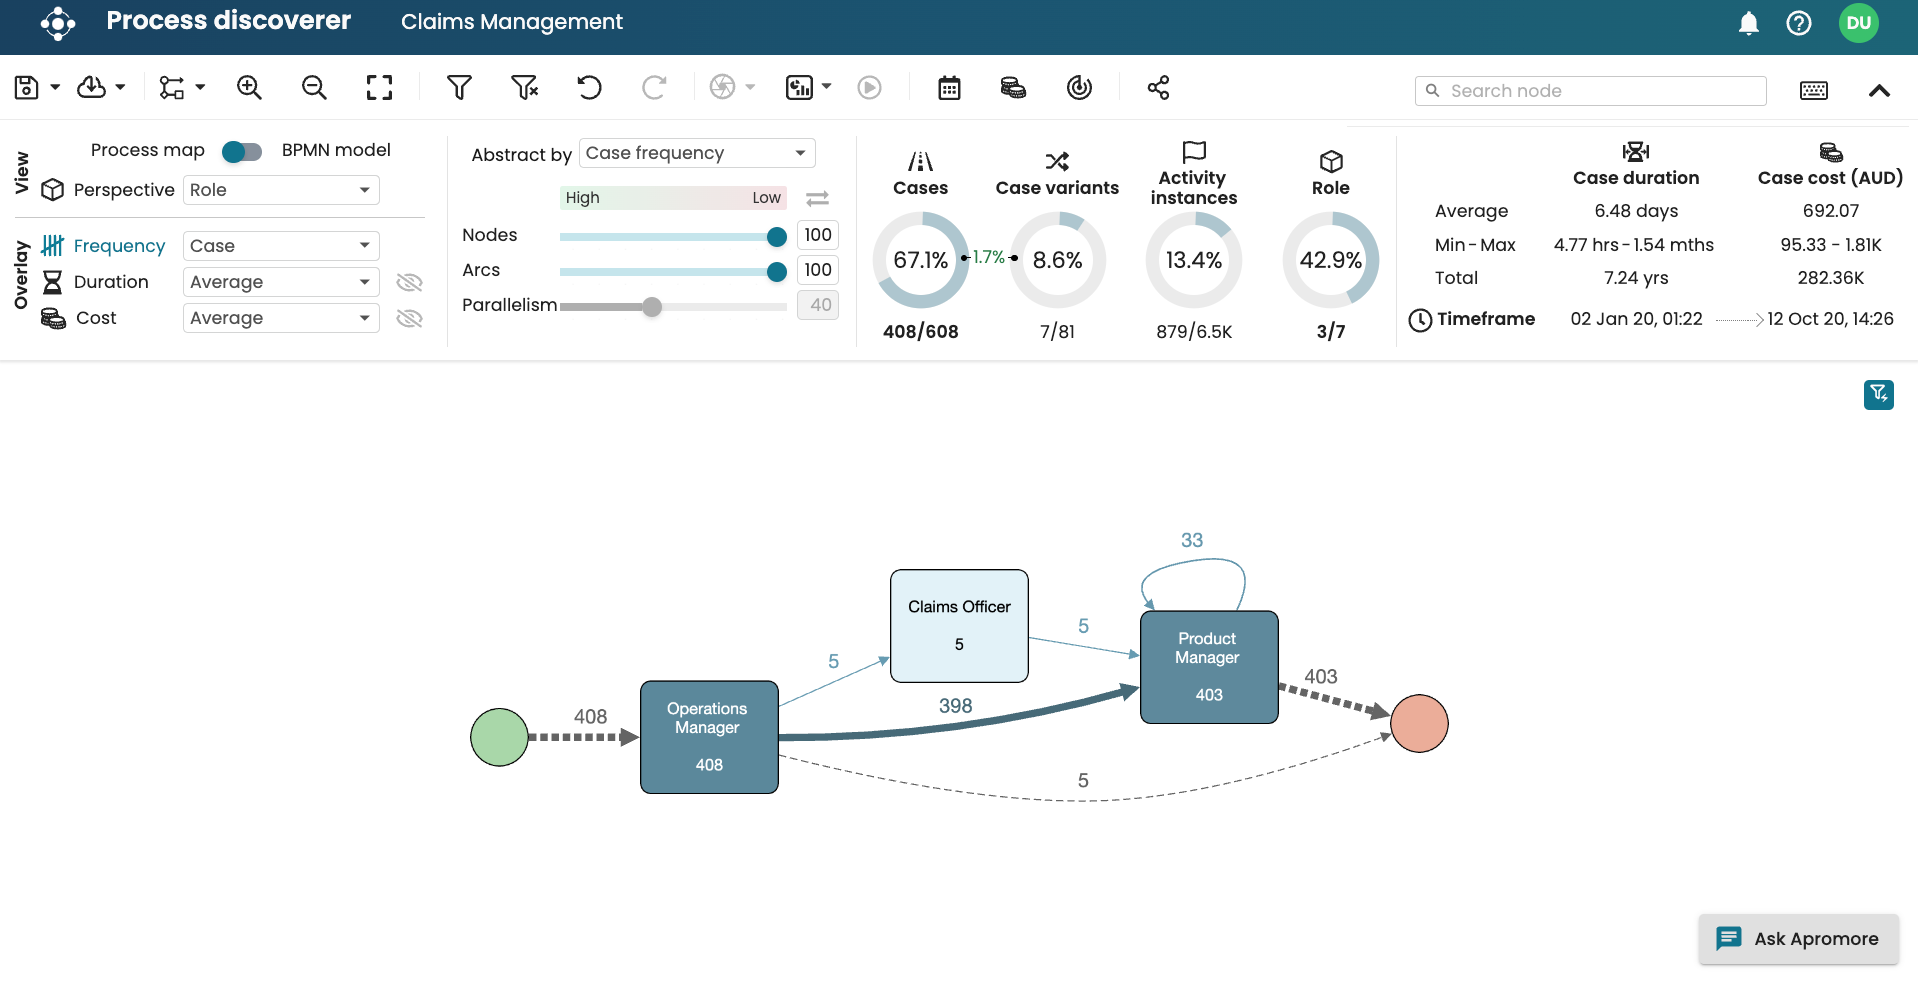
To view in terms of roles, go to the Role perspective. We see that the Operations Manager directly hands-off to the Product Manager 398 times and the Claims Officer hands-off to the Product Manager 5 times.
Event > Between filter
The between event-level filter allows us to define a new filter criterion to retain or remove events between the first or last occurrence of a source and target node in the process map.
To do this, select the “start” of the between filter activity from the Source list on the right and the “end” activity from the Target list on the left.
For example, we can retain all events between the first occurrence of the “ER Triage” activity and the last occurrence of the “ER Registration” activity. Click OK.
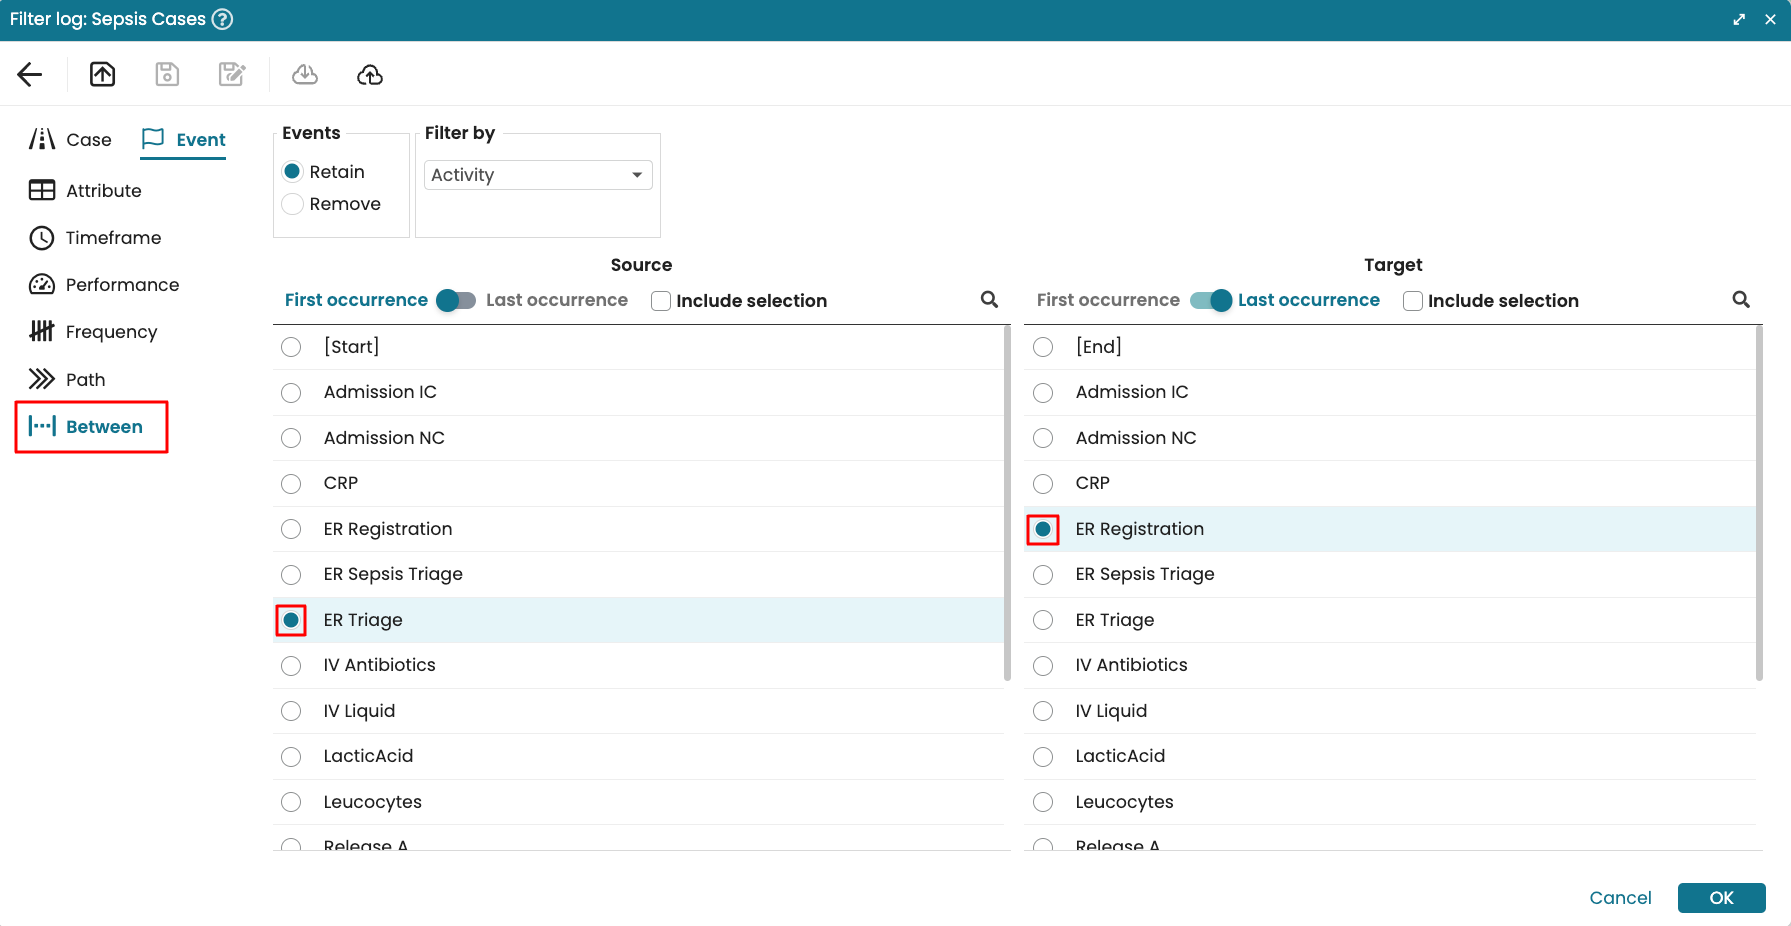
To include the selected activity and make the between filter interval inclusive, select Include selection.
The example below filters cases between the first ER Triage, including this activity, and the last ER Registration, excluding this activity.

After creating a filter criterion, click OK to apply it.
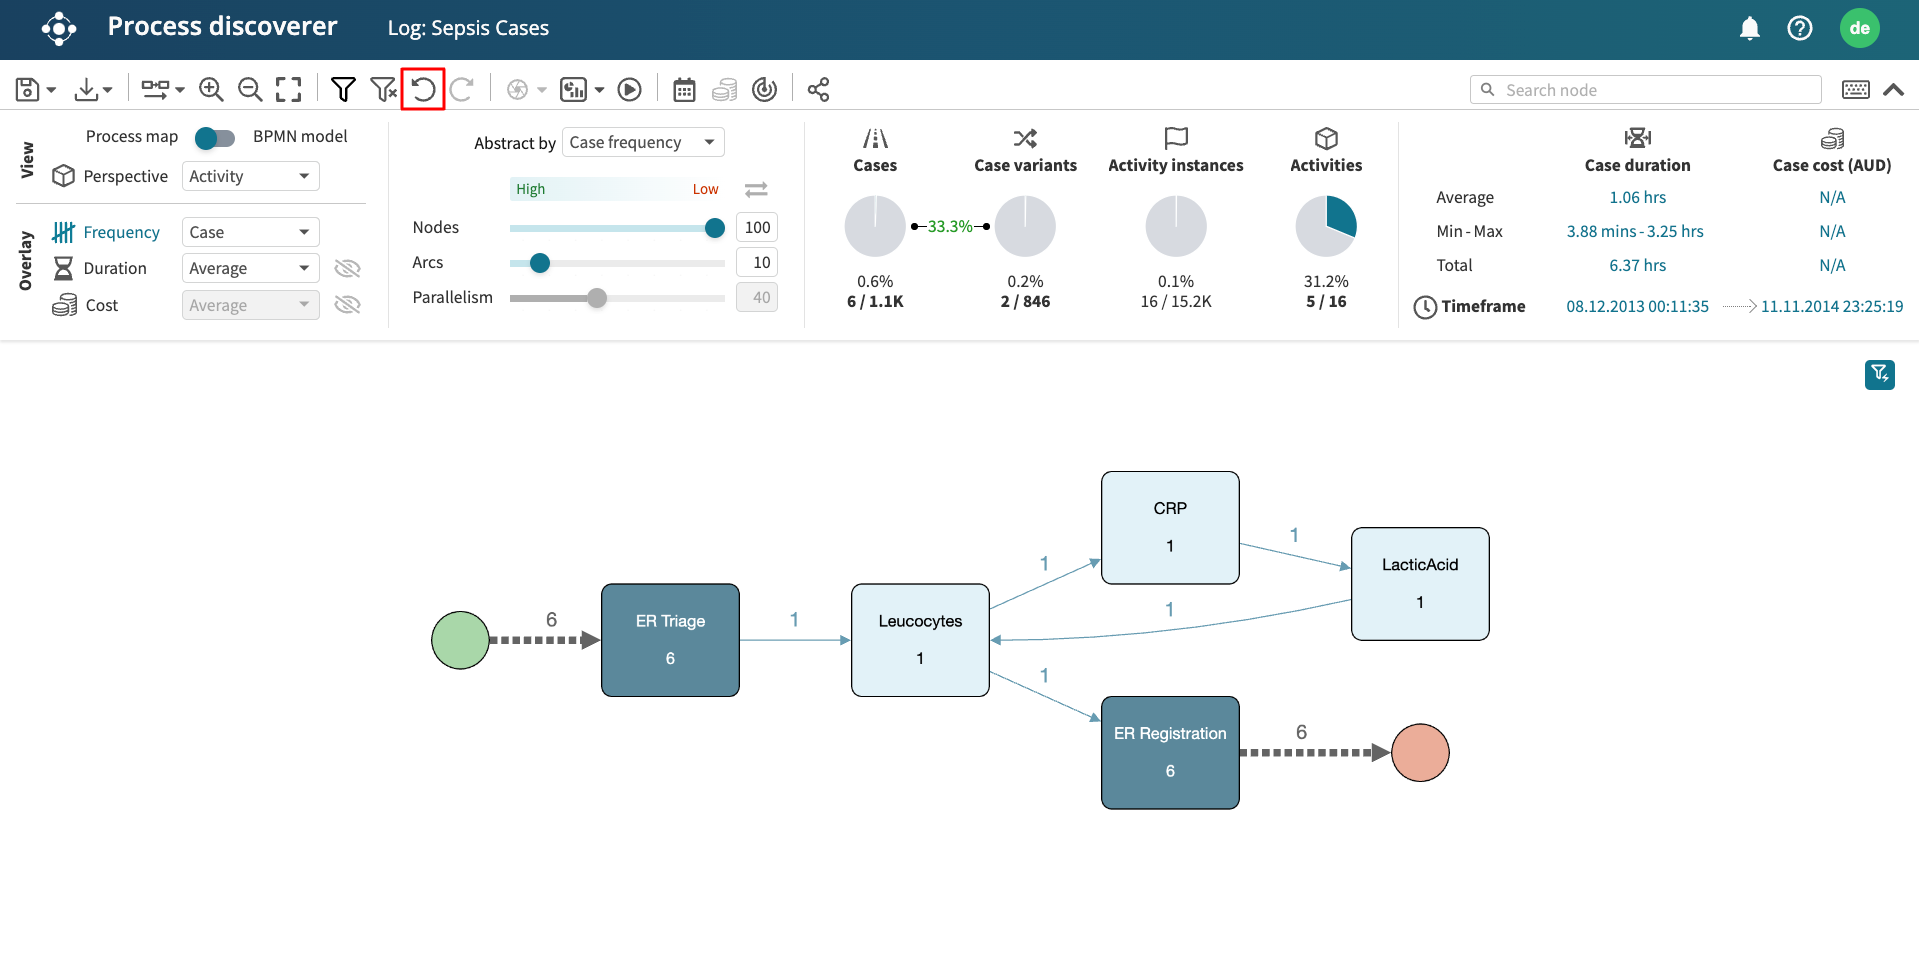
Undo/Redo filters
Filters can be applied and removed using the Undo/Redo buttons. To undo a filter criterion, click the Undo filter button.
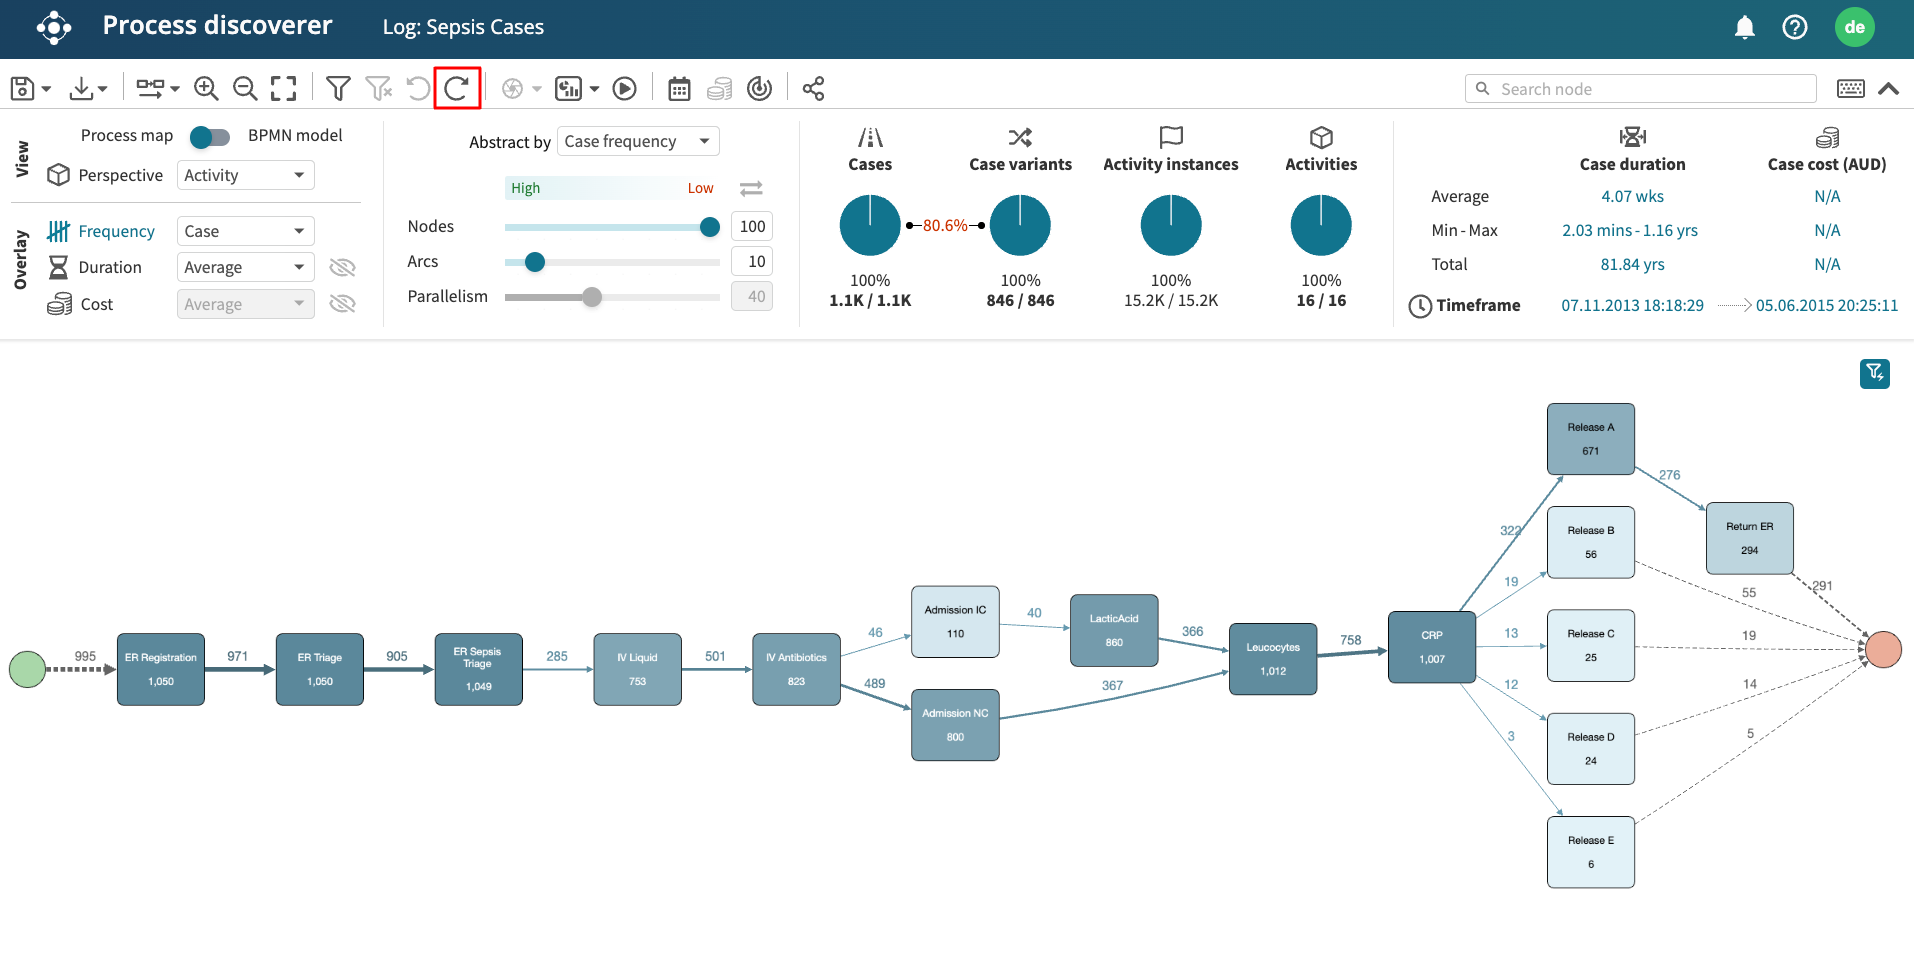
To reapply the previous filter, click the Redo button.
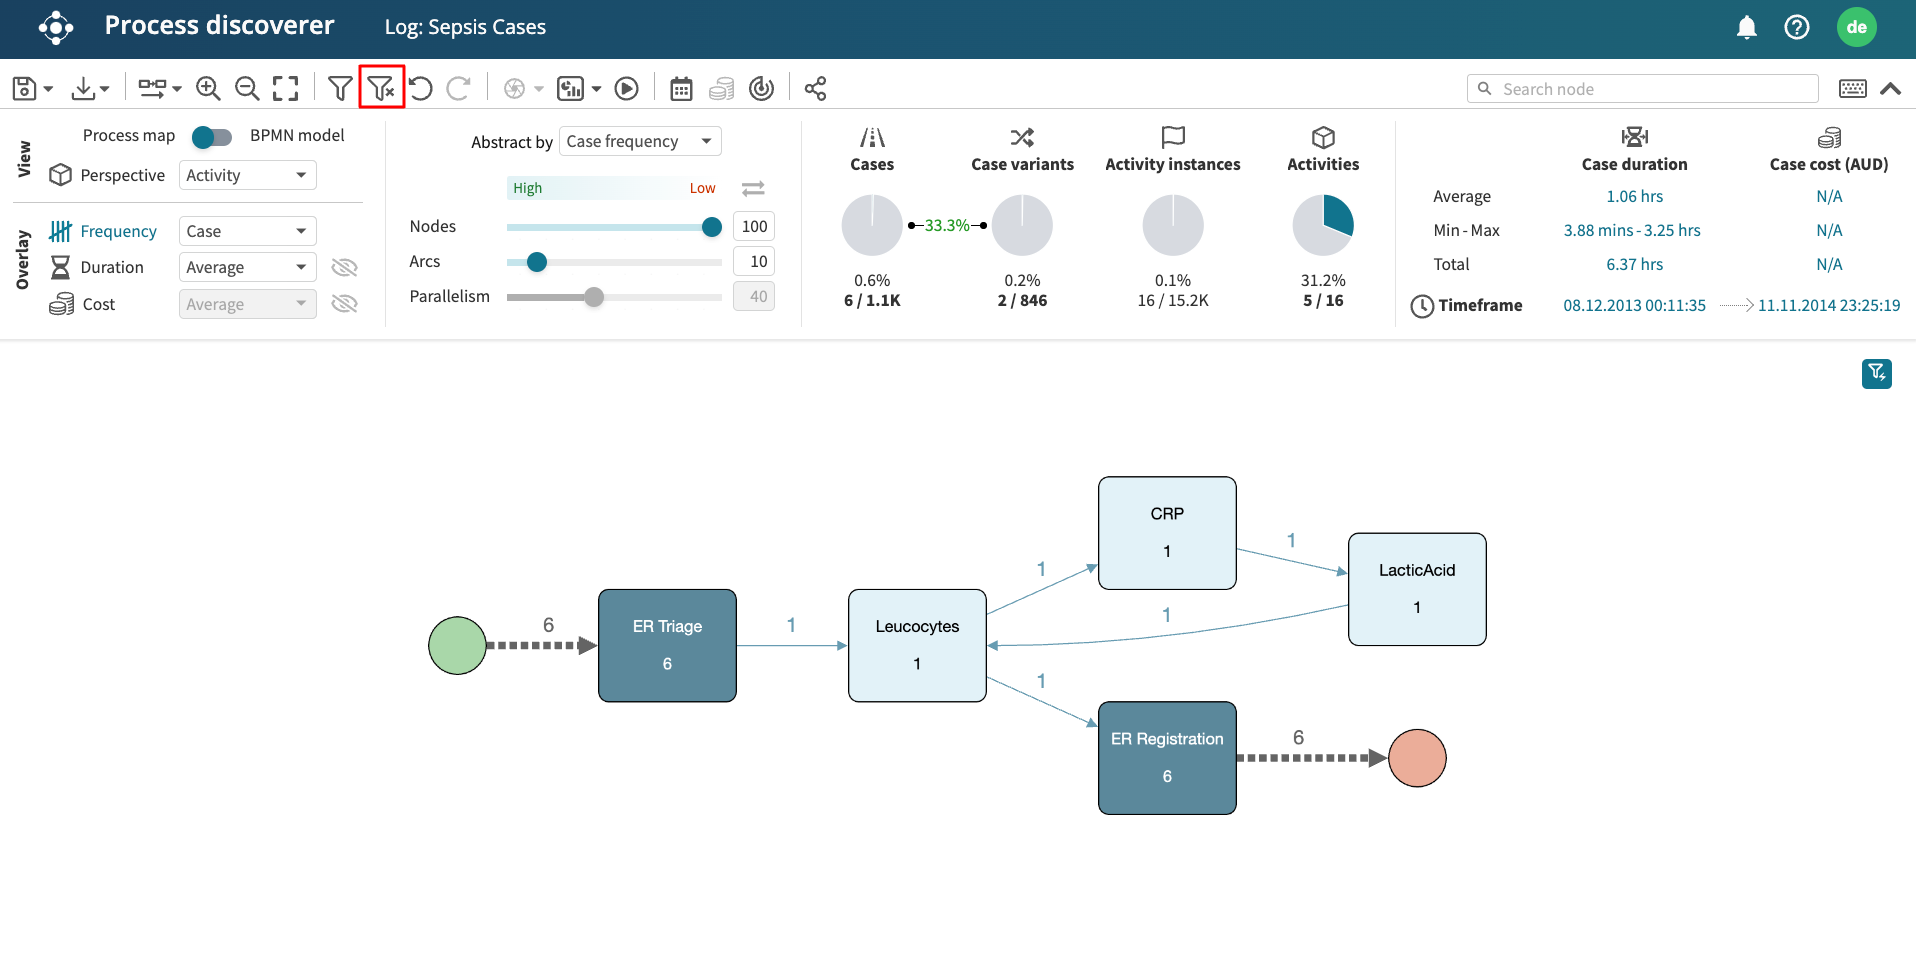
Clear all filters
To clear all the applied filters, click the Clear all filters button.
Shortcuts
Note
Right-click on an arc: remove all cases containing the selected directly-follows relation
Shift + right-click on arc: filter cases based on this arc’s duration (from any perspective)
CTRL + Right-click on an arc: retain only cases containing the selected directly-follows relation
Right-click on a node: remove all cases with an event containing the selected attribute
CTRL + Right-click on a node: retain only cases with an event containing the selected attribute
Alt (Option) + Right-click on a node: remove all events containing the selected attribute
Alt (Option) + CTRL + Right-click on a node: retain only events containing the selected attribute
Shift + right-click on a node: filter cases based on this node’s duration (from any perspective)
Shift + CTRL+ right-click on a node: filter cases using this node as a primary attribute.
CTRL + Z: Undo
CTRL + Y: Redo